When saving field mappings to enable field syncing, the Zendesk Support for Jira integration registers a Jira webhook. The webhook is designed to be triggered whenever a linked issue is updated, moved, or deleted by a user to inform the integration that data has changed and syncing may be required.
Jira Cloud doesn't automatically create webhooks by third-party add-ons like Zendesk Support for Jira. Jira administrators must manually create a webhook for field syncing to work properly.
This article includes the following topics:
Configuring a Jira webhook
Follow these steps to configure a Jira webhook for field syncing. If you're using the legacy integration, see Configuring a Jira webook (legacy Jira integration).
Note: It is important that you follow these instructions carefully, including entering the correct webhook name.
To configure a Jira webhook
- In Admin Center, click Apps and integrations in the sidebar, then select Integrations > Integrations.
- Click the Jira link.
- If you have multiple connections, click the name of the connection you are setting up.
- Click the Field mapping tab.
- Select Turn on Jira to Zendesk sync, then click Copy webhook URL to clipboard.
- In Jira, click the Settings cog icon, and under Jira Settings, click System.
- Select Advanced > WebHooks in the left navigation menu.
- Click Create a WebHook in the upper-right of the screen.
-
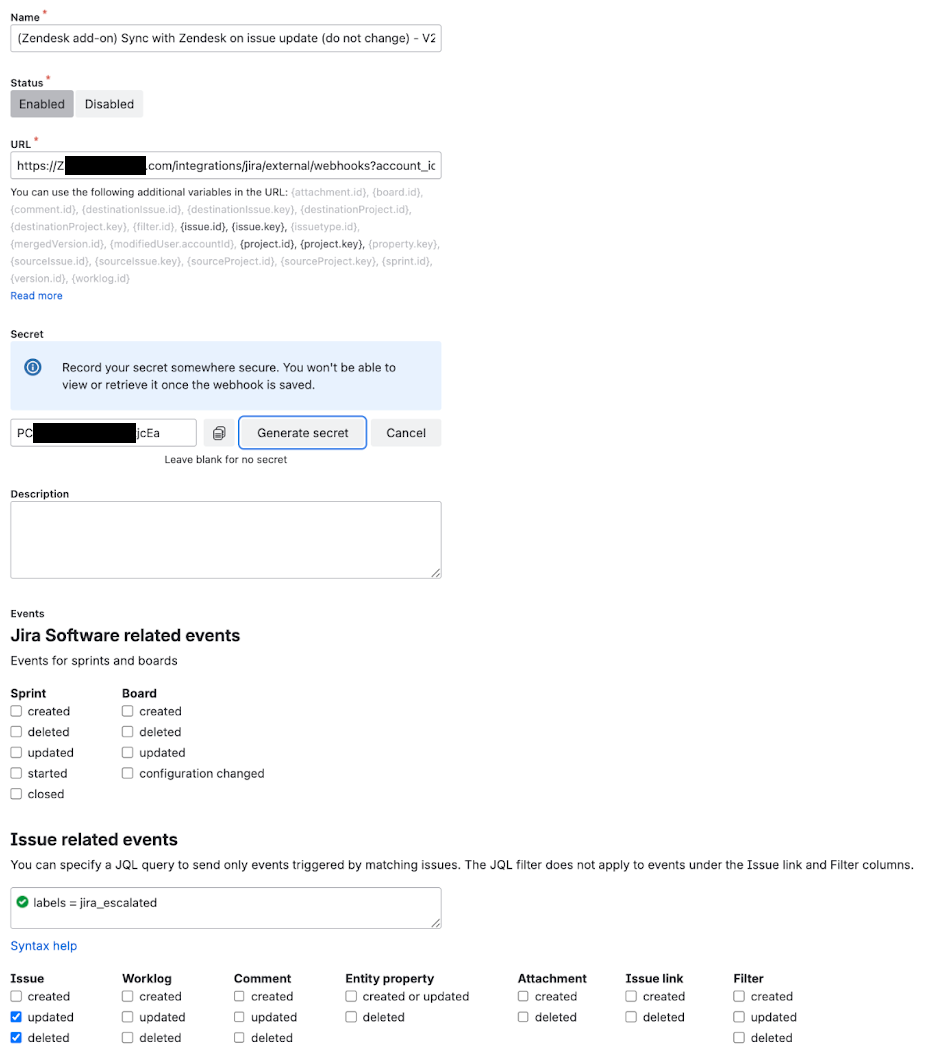
Enter the following information:
- Name: Enter (Zendesk add-on) Sync with Zendesk on issue update (do not change) - V2
- Status: Select Enabled
- URL: Enter your WebHook URL that you previously copied in Step 3. We have provided a convenient mechanism to get the WebHook URL with all placeholders replaced with the correct values for your Zendesk account.
- Secret: Create the secret and paste it into the Field mapping tab when setting up Zendesk to Jira field sync.
- Events: labels = jira_escalated
- Issue: Select updated and deleted
-
Exclude body: Do not select this option.

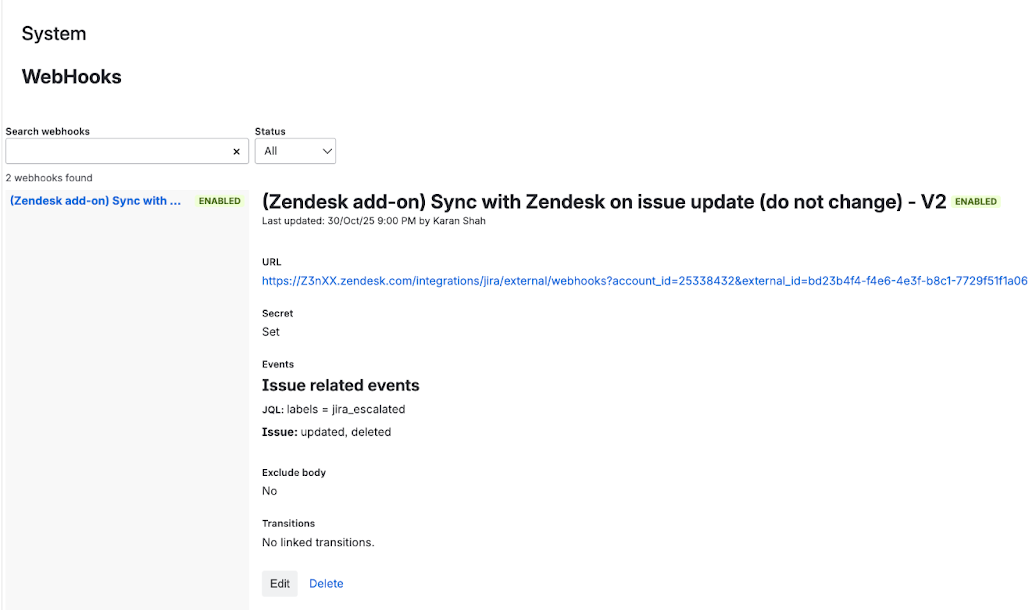
- Click Save. The WebHooks page displays the webhook details:

Configuring a Jira webook (legacy Jira integration)
Follow these steps if you're using the legacy Jira integration.
To configure a Jira webhook (legacy integration)
- Log in to Jira as an administrator, and in the top navigation bar, select Apps > Manage your apps.
- Select Zendesk Support for JIRA in the accordion, then click Configure.
- Select Field Mapping in the left navigation pane, then click Copy webhook URL to clipboard.
- Click the Settings cog icon, and under Jira Settings, click System.
- Select Advanced > WebHooks in the left navigation menu.
- Click Create a WebHook in the upper-right of the screen.
-
Enter the following information:
- Name: Enter (Zendesk add-on) Sync with Zendesk on issue update (do not change) - V2
- Status: Select Enabled
- URL: Enter your WebHook URL that you previously copied in Step 3. We have provided a convenient mechanism to get the WebHook URL with all placeholders replaced with the correct values for your Zendesk account.
- Events: labels = jira_escalated
- Issue: Select updated and deleted
- Exclude body: Do not select this option.
- Click Save. The WebHooks page displays the webhook details.