This guide describes how certain features and functionality in Zendesk Support can assist with your obligations under privacy law.
To learn more about meeting your obligations in other Zendesk products, see Complying with GDPR in Zendesk products.
In this guide, users can be End-Users or Agents as the terms are defined in the Zendesk Customer Agreement.
Topics covered in this guide:
Meeting an access obligation
Individuals from certain regions have a right of access. On request, you may have an obligation to inform an end user or agent where their personal data is being held and for what purposes.
If a data subject requests a copy of their personal data, you can export the data from Zendesk Support as described in Meeting a data portability obligation.
Meeting a correction obligation
Individuals from certain regions have a right to rectification, or the right to have inaccuracies in their personal data corrected. On request, you may have an obligation to provide the individual with their personal data and fix inaccuracies or add missing information.
Both agents and administrators can access and update user data in Zendesk Support. End users can also access and update some of their personal data.
The following topics describe how to access and update user data:
- Updating personal data
- Letting end users update some personal data
- Updating personal data with the API
If an end user or agent requests their personal data, you can export the data from Zendesk as described in Meeting a data portability obligation.
Updating personal data
To update an end user's or agent's personal data as an agent or administrator
- Navigate to a user's profile in Zendesk Support (see Viewing a user's profile in Zendesk Support).
- Click the user's name to enter a new profile name.
- Click the down arrow next to the +New ticket button at the top right of the profile to merge, suspend, delete, or assume the identity of the user.
- To edit a user's details, click the field box you would like to edit. You can also add user's contact information from this location.
For details of the default user fields, see the table in Viewing a user's profile in Zendesk Support. The sidebar may also include custom user fields.
For more information, see the following topics in the Support Help Center:
Letting end users update some personal data
In some cases, end users can use Help Center to view or update certain personal data in their Help Center community profile. You must meet the following account requirements:
- Help Center is activated
- You have the Zendesk Suite Growth plan or above or Zendesk Support with Guide
- User profiles are enabled in Help Center
If you meet these requirements, the end user can use Help Center to change their community profile, which includes their name, profile photo, email address, phone number, and the short description of themselves. This also updates the corresponding data in the user profile in the agent interface.
To update personal data as an end user
- Sign in to Help Center.
- Open your profile by clicking your name in the upper
right corner of any page in Help Center and
selecting My profile.
You can also click your name in an article, post, comment, or search result in Help Center.
- On your profile page, click Edit Profile.
- Make changes and click Close.
Updating personal data with the API
Administrators and agents can use the Users API to update the personal data of end users or agents. When an agent or admin makes the API request, the user records returned have the attributes described in JSON Format for Agent or Admin Requests.
Zendesk also has a User Identities API for updating the identities of end users or agents. An identity is something that can be used to identify an individual. It's typically an email address, a phone number, or an X (formerly Twitter) handle. See the JSON format table in the User Identities doc for the attributes of each record.
The following endpoints take one or more user ids as parameters. See Getting the id of an end user or agent.
To update the personal data of a specific end user or agent
PUT /api/v2/users/{user_id}.jsonPUT /api/v2/users/{user_id}/identities/{identity_id}.json
See Update User and Update Identity in the developer documentation. Use the List Identities endpoint to get the id of the identity you want to update.
To update the user record of multiple users or agents
PUT /api/v2/users/update_many.jsonPUT /api/v2/users/update_many.json?ids={user_ids}
See Update Many Users in the developer documentation.
Getting the id of an end user or agent
Use any of the following endpoints to get a user id:
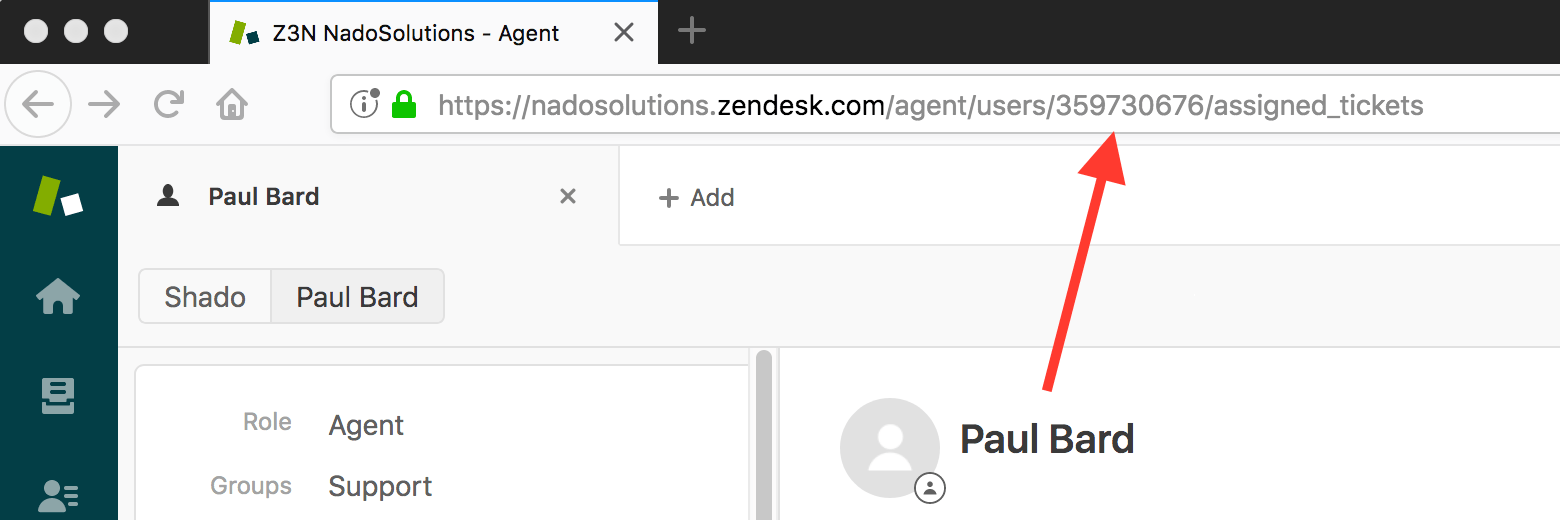
You can also get a user id from the profile page of the end user or agent in Zendesk Support. The id appears in the URL of the profile page:
Meeting an erasure or deletion obligation
Individuals from certain regions have a right to erasure, or the right to be forgotten or deleted. On request, you may have an obligation to delete the personal data of an individual.
The workflow for deleting the personal data of an end user or agent is as follows:
- Delete personal data from ticket comments, which is also known as the ticket conversation.
- Delete the end user or agent from Zendesk Support.
The order of operations is important because user data might be required to find the tickets containing personal data. For details instructions, see Forgetting a user in Zendesk.
To delete personal data in ticket conversations
You can use the agent interface to find personal data in ticket conversations. See the following topics in this guide:
You can also delete personal data in tickets by permanently deleting the tickets themselves. Permanently deleting tickets also deletes attachments, call recordings, and images in the ticket. See the following topics in this guide:
At this stage, you can ignore any personal data in ticket fields that the system retrieves from the user profile, such as the requester's name. The data will be replaced with the placeholder string "Permanently Deleted User" when you delete the user in the next step of the workflow.
To delete the end user or agent
After deleting personal data from ticket conversations, you can delete the end user or agent from Zendesk Support. See the following topics in this guide:
Searching for personal data in ticket conversations
Before you start, create a list of possible search terms to find the user's personal data in tickets. Go through your list of search terms to find personal data in ticket conversations. Inline images, attachments, and call recordings may contain personal data that isn't searchable. Make sure to manually check any image, attachment, and call recording in the tickets in your search results.
With the Advanced Data Privacy and Protection add-on, you can use redaction suggestions to automatically highlight certain types of personally identifiable information (PII) within a ticket for agents with appropriate permissions. Redaction suggestions proactively identify PII rather than rely on the agent to identify PII that needs to be redacted.
To search for personal data
- In the agent interface, click the Search icon
(
 ) in the upper-right of
the top toolbar and search for each of your search
terms to find tickets that contain the information.
) in the upper-right of
the top toolbar and search for each of your search
terms to find tickets that contain the information.

- Select a ticket from the results and review the
conversation, including any inline images,
attachments, and call recordings.
If during your review you discover other identifying information that your organization defines as personal data, add it to your search list. For example, if you find out that the user included their home address in a comment, add it to the list.
Note: Your organization decides what personal data is. - Confirm that the personal data in the conversation
belongs to the user.
Make sure to positively identify the user before deleting data. The conversation may be referring to another person with the same name or alias.
- Delete the personal data as follows:
- If the ticket is closed, permanently delete the ticket. There's no way to redact information in conversations of closed tickets. See Permanently deleting tickets.
- If the data consists of a string in the conversation, redact the string. See Deleting personal data in ticket conversations.
- If the data is in an inline image or an attachment, permanently delete the ticket. See Permanently deleting tickets.
- If the data is in a call recording, delete the call recording. See Deleting call recordings in Complying with Privacy and Data Protection in Zendesk Talk.
Deleting personal data in ticket conversations
You can redact personal data in ticket conversations. With redaction, you specify a text string to redact from the conversation, and it replaces the characters in the string with a replacement character. For example:

In the Zendesk Agent Workspace, you can use native ticket redaction to redact personal data. You don’t need to install a separate app. See Redacting ticket content.
- Redaction completely deletes the string from Zendesk databases, but it doesn't purge it from any existing logs of when the ticket was originally created. The logs are automatically deleted after a period of time.
- Similarly, you can redact phone numbers in strings, but it doesn't delete the phone numbers used as identities in the system.
- You can use redaction to delete inline attachments.
Permanently deleting tickets
Both administrators and agents with delete permissions can delete tickets in the agent interface in Zendesk Support. Deleted tickets are moved into a Deleted Tickets view, where you then permanently delete them.
Agents must have permission to delete tickets.
For reporting purposes, several anonymous attributes of a permanently deleted ticket are stored as a record. See Effects of permanently deleting a ticket in Forgetting a user in Zendesk.
To delete one or more tickets
- If you want to delete one ticket, open the ticket you
want to delete in the agent interface, click the
Ticket options menu in the upper right, then select
Delete.
The Ticket options menu looks slightly different in the Zendesk Agent Workspace (shown on the left) and the standard agent interface (shown on the right).


- If you want to delete more than one ticket, open one of
your views, select the tickets you want to delete,
then select Delete from the toolbar at the
bottom of the list.
 Tip: You can create a view consisting only of tickets you want to delete. See Adding views.
 - When prompted, click OK to confirm the
deletion.
The tickets are deleted and moved to the Deleted tickets view. The next step is to permanently delete them.
- Click the Views icon (
 ) in the sidebar, then
click Deleted tickets in the Views list.
) in the sidebar, then
click Deleted tickets in the Views list. - Click the checkbox beside the ticket or tickets you want
to permanently delete.

A toolbar appears at the bottom of the list.
- Click Delete permanently.
- Confirm that you want to permanently delete the selected tickets.
Permanently deleting tickets with the API
You can use the Tickets API to delete tickets that contain personal data. Your application logic can start by using the Search API to find the tickets with the personal data, then use one of the following endpoints to delete the ticket or tickets.
To delete a single ticket permanently
DELETE
                                                  /api/v2/deleted_tickets/{id}.json
See Delete Ticket Permanently in the developer documentation.
To delete multiple tickets permanently
-
DELETE
                                                  /api/v2/deleted_tickets/destroy_many?ids={ids}
The endpoint accepts a comma-separated list of up to 100 ticket ids.
See Delete Multiple Tickets Permanently.
To get ticket ids for the delete endpoints
Use any of the following endpoints:
You can also get a ticket's id from several places the ticket page in Zendesk Support:

Deleting end users or agents
After deleting personal data from ticket conversations, you can proceed to delete the end user or agent from Zendesk Support. Deleting the user in Support also deletes the user in Guide, Chat (for agents), Message, Talk, and Explore. The user is also deleted from all product reports. For details, see Forgetting a user in Zendesk.
Both agents and administrators can delete end users or agents in the agent interface in Zendesk Support. Agents can delete end users while administrators can delete all users except the account owner. Zendesk retains information about the account owner to continue providing its services. When the account is terminated, Zendesk follows its Data Deletion Policy to purge remaining profile data.
You can't delete an end user or agent who's a requester on a ticket that hasn't been closed yet. See What is the difference between a Solved ticket and a Closed ticket? First, the ticket must be solved before it can be closed. Second, the solved ticket must be closed by a trigger or an automation. The ticket can't be closed directly in the agent interface. To close the ticket immediately, you can create a trigger for the specific purpose of closing the ticket. For details, see the tech note How can I manually close a ticket?
To delete an end user or agent
- In the agent interface, click the Search icon
() in the upper-right of
the top toolbar and search for the user's name or
other identifying information.

- On the results page, switch to the Users tab and select the user to open their profile page.
- Make sure the user is in fact the person requesting to be deleted.
- In the user's profile, click the User options arrow in
the upper right, then select Delete.

- When prompted, click OK to confirm the deletion. If you want to cancel the deletion, click Cancel instead.
The user is soft deleted, meaning the user is still in the Zendesk database for 30 days and accessible on a limited basis to Zendesk employees with certain database privileges. Zendesk permanently deletes soft-deleted users after 30 days automatically. If you'd like to permanently delete the user before the 30-day timeframe, continue to Permanently deleting an end user or agent.
Permanently deleting an end user or agent
To permanently delete a user
- Soft delete a user as described in Deleting end users or agents.
- In Admin Center, click
 People in the sidebar, then select Deleted users > Deleted users.
 - Click the user you want to delete permanently from the list. A page appears with the user's name and their associated tickets.
- Click Delete User.
Deleting end users or agents with the API
You can use the Users API to delete an end user or agent from your account. You can also use the User Identities API to delete the identities of an end user or agent. An identity is something that can be used to identify an individual. It's usually an email address, a phone number, or an X (formerly Twitter) handle.
A user must be soft deleted before you can permanently delete them.
The following endpoints take one or more user ids as parameters. See Getting the id of an end user or agent in Accessing or updating personal data with the API.
To soft delete a single end user or agent before permanently deleting them
DELETE
                                                /api/v2/users/{user_id}.json
See Delete User in the developer documentation. You can permanently delete the user after soft deleting them.
To soft delete multiple end users or agents before permanently deleting them
-
DELETE
                                                  /api/v2/users/destroy_many.json?ids={user_ids}
The endpoint accepts a comma-separated list of up to 100 user ids. See Bulk Deleting Users. You can permanently delete the users after soft deleting them.
To permanently delete an end user or agent
DELETE
                                                  /api/v2/deleted_users/{user_id}.json
See Permanently Delete User. The user must be soft-deleted before running this endpoint.
To delete one of the user's identities
DELETE
                                                  /api/v2/users/{user_id}/identities/{identity_id}.json
See Delete Identity. Use the List Identities endpoint to get the id of the identity you want to update.
Meeting a data portability obligation
Individuals from certain regions have a right to data portability. On request, you may have an obligation to provide an individual with their personal data or to transmit the data to another organization.
The following topics describe how to export user data:
Exporting user data
You can use the agent interface in Zendesk Support to export user data to a JSON file. The file lists all your users (end-users, agents, and administrators). The exported data doesn't include all the users' possible personal data in Zendesk.
You must be an administrator on a Zendesk Suite Growth plan or above or a Support Professional or Enterprise plan to export this data.
To protect the data in your Zendesk Support account, data export is not enabled by default in the account. You must contact Zendesk Customer Support to activate it. Be sure to include your Zendesk Support subdomain name.
- In Admin Center, click
 Account in the sidebar, then select Tools > Reports.
 - If necessary, click the Export tab to display the data export options. Some legacy versions of Zendesk show the export options on a separate tab.
- Under Full JSON Export, set a date range
and select "users" as Type.

- Click Export.
A build starts, and you're notified by email when it's complete.
- Click the link in your email notification to
download a zip file containing the report.
The download link is valid for at least three days.
- Filter the JSON results for the person or persons requesting their data.
See Exporting account data for more information on exporting data from your Zendesk account.
Exporting user data with the API
You can use the Users API to export JSON data that can be transformed or imported into other systems. The JSON objects in responses have the attributes described in JSON Format for Agent or Admin Requests.
End users and agents can also use the Users API to export some of their own data. When an end user makes the API request, the user record has the subset of attributes described in JSON Format for End-user Requests.
Zendesk also has a User Identities API for accessing the identities of end users and agents. An identity is something that can be used to identify an individual. It's typically an email address, a phone number, or an X (formerly Twitter) handle. See the JSON format table in the User Identities doc for the attributes of the JSON objects in responses.
Most of the following endpoints take one or more user ids as parameters. See Getting the id of an end user or agent in Accessing or updating personal data with the API.
Your application logic can start by using the Search Users API to get the id of one or more end users or agents, then use the Users API to export their data.
To export the user data of a specific end user or agent
GET /api/v2/users/{user_id}.jsonGET /api/v2/users/{user_id}/identities.json
See Show User and List Identities in the developer documentation.
To export the user data of multiple end users or agents
-
GET
                                                  /api/v2/users/show_many.json?ids={user_ids}
The endpoint accepts a comma-separated list of up to 100 user ids.
See Show Many Users.
To let the end user or agent export their own personal data
GET /api/v2/users/me.json
The end user or agent must authenticate the request with their Zendesk email address and password. See Show the Currently Authenticated User.
Meeting the objection obligation
Individuals from certain regions have a right of objection, or the right to object to direct marketing. You may have an obligation to stop processing personal data for direct marketing purposes when you receive an objection from an individual.
If you get an objection from an individual about the notifications sent by Zendesk, you can stop all notifications by suspending the user in Zendesk Support. A suspended user is no longer able to sign in and any new support requests you receive from the user are sent to the suspended tickets queue.
To suspend a user
- Click the Search icon () in the top toolbar.
- Enter the name of the user you want to suspend in the search box and click the user's name when it appears.
Alternatively, you can open a user's profile from one of their tickets.
- Click the Ticket options menu in the upper right, then select Suspend.

- Enter a reason for the suspension, then click Suspend user to confirm the
suspension.

For more information, see Suspending a user in the Support Help Center.
Disclaimer
This document is for informational purposes only and does not constitute legal advice. Readers should always seek legal advice before taking any action with respect to the matters discussed herein.