This part of the Zendesk Suite trial evaluation guide helps you evaluate voice features in the Zendesk Suite to see how they'll work for you. Your trial is on the Professional plan.
You can add another dimension to your support experience by enabling customers to call or text you with their problems. Calls and texts become tickets so you have a record of all communication.
Follow the steps in this guide to try out voice features. Each task typically takes less than 10 minutes to complete.
This article contains the following sections
Step 1: Place and receive a call
When you started your trial you were given a number so you can jump right in and start testing. If you want to purchase a different number, or use your own phone number, see Adding Zendesk phone numbers.
Try it out
Try placing an outbound call from Zendesk, then try answering an incoming call. The best way to try out answering a call is to dial your Zendesk phone number from another phone. You can see your number at the bottom of the call console.
To place a call
- Click the call icon (
 ) on the right side of the toolbar.
 - Click the dial pad icon, enter the telephone number you want to call,
and then click Call.

- When you’re finished with the call, click Hang up.
To answer a call
- To answer the call, click Accept in the call console.

When you receive a call, you’ll see who’s calling in the call console and hear the phone ring. When you accept the call, the call console begins recording the call (see Step 3: Configure call recording) and a ticket is created.
Learn more
Step 2: Configure agent wrap-up time
After a call, agents often need a few minutes to update details on the call ticket or to take notes. This is known as agent wrap-up time. By default, agents have unlimited wrap-up time after a call, until they are ready to make themselves available to take new calls in the call console. However, you can adjust the wrap-up time agents have or even deactivate it.

Plan it
As an admin, you can allow agents to take as much wrap-up time as they need, or you can configure the length of time agents have to wrap up calls. If you set a time limit, agents are automatically available for calls when the time expires. Additionally, you can deactivate it completely, if you want. Think about what makes sense for your team.
Try it out
In this trial, try setting a wrap-up time limit so that agents are automatically available for calls if they don’t click the Available to take new calls button within five minutes.
To set agent wrap-up time
- In Admin Center, click
 Channels in the sidebar, then select Talk and email > Talk.
 - On the Settings page, click the Lines tab.
- Click your phone number.
- On the number settings page, click the Settings tab.
- From the list of settings, ensure Agent wrap-up after calls? is
enabled and set the Wrap-up time limit to the amount of time you want the
agent to have to wrap-up calls.

- Click Save changes.
The agent now becomes available for new calls once the time you configured elapses.
Learn more
Step 3: Configure call recording
When you enable call recording, all calls are recorded by default and attached to the ticket associated with the call. However, you can turn off recording for any number, give callers the ability to opt-in or opt-out of call recording, or temporarily pause call recording.
Plan it
Take some time to read about the available call recording settings and how you want to configure them. You must also ensure that you understand any local laws in your country about recording calls. For example, most countries require you to inform the caller that the call is being recorded, but some countries require that you explicitly ask the caller for consent to record the call. Before you start recording calls, consult your legal department to ensure that the recording settings you want to use are OK.
Try it out
For this trial, you’ll try configuring some of the call recording settings.
Configure call recording settings
- In Admin Center, click
Channels in the sidebar, then select Talk and email > Talk.
- On the Settings page, click the Lines tab.
- Click your phone number.
- On the number settings page, click the Call recording tab.
- Configure the call recording options as required. Read Managing call reporting options to help you understand the available options.
- When you’ve finished configuring recording settings, click Save changes.
Learn more
Step 4: Use conference calling to transfer to another agent
Sometimes, while you are taking a call, it can be useful to consult another person (a third-party). This person can be another agent, an end user, or an external number. You can put the caller on-hold while you speak to the third-party, or transfer the call to the third-party. Additionally, you can also invite the third-party into a conference call.
Try it out
In this example, you’ll add another agent to a test call. Before you start, ask one of the agents you’ve added to the account to set their status to online. That way you’ll be able to conference in that agent on your test call. You’ll need to initiate the call (as an end user) to your Zendesk number from an outside line to start the test call.
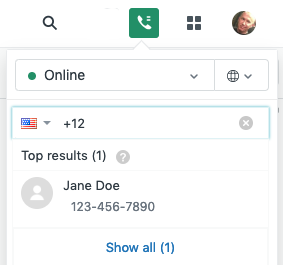
To add another agent to a call
- During a call, click the transfer button.
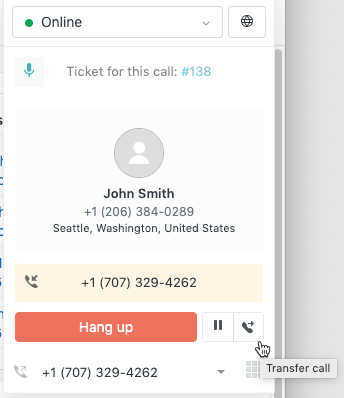
- Start typing the agent’s name or phone number, then click the agent’s name when
you find the right agent.
- When the agent answers, you can consult before clicking one of the buttons to
add the agent to the call, transfer the call to the agent, or cancel to
reconnect with the end user.
You, the end user, and the agent can now talk.
Learn more
What's next?
Congratulations! You've completed your trial evaluation tasks for voice. There’s plenty more you can explore on your own. See Resources for voice support.
To get the most out of your Suite trial:
- Set up other channels for your account. See Evaluating your Zendesk trial account.
- Check out the Launch guide for Zendesk Suite products