Verified AI summary ◀▼
Admins can manage installed apps by adjusting their location, order, and settings, restricting access, and enabling or disabling them. You can also uninstall apps, activate shortcuts, and rate or review public apps. For private apps, you can upload, update, or download them. These actions help customize your workspace and streamline your workflow.
Apps are available for Support, Sell, and Chat. You can make changes to your installed apps on the My Apps page in Support, Sell, and Chat. Any updates you make to apps appear for all agents.
Installed apps might include public apps from the Zendesk Marketplace and private apps built by your company.
You must be an administrator to update your installed apps.
Managing app location and order
App placement is determined by the app's developer. When you install apps in your account, they can appear in several different locations.
- Top navigation: The top of the Zendesk Support screen.
- Main navigation: The left side of the Zendesk Support screen.
- Ticket: In the body of an existing ticket, when the Apps panel is open.
- New ticket: In the body of a new ticket, when the Apps panel is open.
- User profile: On the profile page of a selected user, when the Apps panel is open.
- Organization profile: On the profile page of a selected organization, when the Apps panel is open.
You can update the order in which the apps appear within each location.
To see the apps in a location
- Depending on which apps you're working with, open the My Apps page in Support, Sell, or Chat.
- Click Reorder apps.
The Reorder apps page appears.

- Click any of the items under Location to see which apps are there. The available locations depend on where you currently have apps in Zendesk Support. You can select only locations where you have apps.
From here, you can change the order of your apps.
To reorder your apps in a location
- Depending on which apps you're working with, open the My Apps page in Support, Sell, or Chat.
- Click Reorder apps.
- Click the location where you want to change the app order.
- Drag and drop an app into a new position.
The new order is automatically saved after you move the app.
- Repeat to reposition the other apps in the list.
If you reorder apps with group or role restrictions, they will show only if you are a part of that group or role.
If you're working with contextual workspaces, the app order you set on the contextual workspace Apps tab takes priority over the order you set for tickets on the My Apps page. If the ordering you set on the My Apps page doesn't work as expected, check to see if there's a contextual workspace associated with the ticket form.
Changing app settings
You can change the settings for an app, including the title.
Restricting app access
You can restrict access to an app so only agents in the groups or roles you list can access it.
To restrict access to an app
- Depending on which app you're working with, open the My Apps page in Support, Sell, or Chat.
- Hover over the app for which you want to change settings, then select Change settings from the drop-down menu.
- Select Enable role restrictions, Enable group
restrictions, or both, and then enter the names
of the groups or roles you want to access the app.
No other agents will be able to access the app.
- Click Update at the bottom of the page.
Your changes are saved.
Disabling your apps
You can disable apps installed in Zendesk at any time. When you enable or disable an app, it's enabled or disabled for all agents in your Zendesk.
If you want to remove an app permanently, you can uninstall it instead.
The disabled app appears in the Disabled apps section of the My Apps page and can be re-enabled.
The enabled app appears in the Enabled apps section of the page.
Uninstalling an app
You can uninstall an app that you no longer need. Uninstalling an app removes it from Zendesk for all agents.
If you want to remove an app temporarily, you can disable it, then enable it when you're ready to use it again. You can uninstall both enabled and disabled apps.
To uninstall an app
Activating and deactivating app shortcuts
If app shortcuts have been activated by an admin, agents can create shortcuts for apps available to them in the Zendesk Agent Workspace. App shortcuts allow agents to quickly access the apps they use the most. App shortcuts are activated by default.
To activate or deactivate app shortcuts
-
In Admin Center, click
 Apps and integrations in the sidebar, then select Apps > Zendesk Support
apps.
Apps and integrations in the sidebar, then select Apps > Zendesk Support
apps.A list of your installed apps appears.
- Click the Settings tab.

- To activate app shortcuts, make sure Pin apps to context panel is selected. To deactivate app shortcuts, deselect the setting.
- Save your changes.
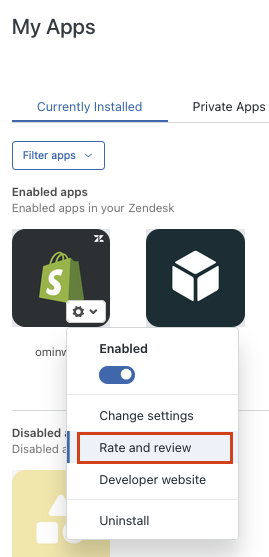
Rating and reviewing a public app
You can submit ratings and reviews of public apps directly from Admin Center.
- In Admin Center, click
Apps and integrations in the sidebar, then select Apps > Zendesk Support
apps.
- In the Currently Installed tab, hover over the public
app you want to review, then click Rate and
review from the drop-down menu.
Contacting an app's developer
As apps are tweaked and improved, updates may become available. Apps are updated to their latest versions automatically. If you have a question about an app, you can contact the app developer directly.
Managing private apps
Private apps are apps that have been built by your company and uploaded to Support. They are not listed on the public Zendesk Marketplace and cannot be installed and used by other Zendesk customers.
If you want to submit a public app or learn more about how to build your own private app, see our Developer documentation.
To upload and install a private app
Private apps must be uploaded as a ZIP file. The maximum file size is 2 MB.
To update a private app
To download a private app