Verified AI summary ◀▼
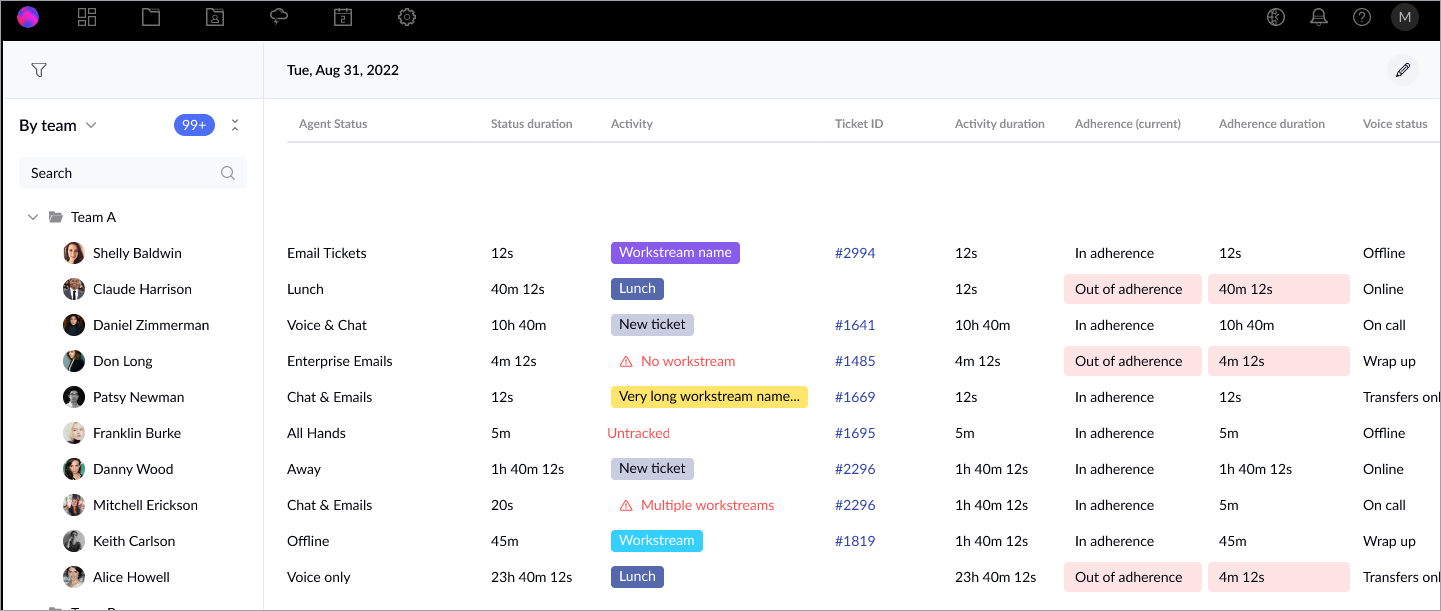
Use the Agent status page to monitor agents in real-time, viewing their current tasks and status durations. Customize the view by selecting relevant columns and sorting or filtering by team, location, or activity. This page helps you quickly identify situations needing attention, enhancing your ability to manage and support your team effectively.
View what each of your agents are working on in real time on the Agent status page.
The Agent status page is best used for monitoring what's currently happening. If you want to view intraday activity and historical reporting, use the Agent activity page instead.
Accessing the Agent status page
You must be an admin to access the Agent status page.
To access the Agent status page
- In Workforce management, click the agent folder (
 ) in the navigation bar, then select Agent
status.
Understanding the Agent status page
The Agent status page provides a real-time view of what each agent is working on and how long they've been on that task. You can access the exact tickets agents are working on and view agent states for the voice channel. The data on the page is refreshed every 30 seconds.
If you've activated the unified agents status synchronization, you can monitor your agents’ statuses in this page as well. This provides managers with more context about agent activity and status.

The following data populates the Agent status page.
| Column | Description |
| Activity | Displays the agent’s current activity. For example, their workstream, a paid or unpaid general task, unified status, or no workstream. |
| Activity duration | The amount of time the agent has spent in their current activity. |
| Adherence duration | The amount of time the agent has spent in their current adherence state. |
|
Availability (only for accounts with the unified agents status synchronization turned on) |
Assessment outcomes of availability can be:
|
| Availability duration (only for accounts with the unified agents status synchronization turned on) | The amount of time the agent has spent in their current state. |
| Agent status (only for accounts with the unified agents status synchronization turned on) | Displays the unified agent status the agent is in in Zendesk in real time. |
| Current adherence status |
The agent’s current adherence status. Inactive agents with approved time off appear as in adherence. Hover over the agent to see their time off and time off reason. |
|
Status duration (only for accounts with the unified agent status integration active) |
The amount of time the agent has spent in that status. |
| Ticket number or Id | The Zendesk ID of the ticket the agent is working on. Click the ticket number to open the ticket. |
| Status | The agent’s status for the voice channel. For example, Online or On call. |
| Status duration | The amount of time the agent has spent in the voice status. For accounts with the unified agent status synchronization active, it displays the amount of time the agent has spent in each status. |
| Talk activity (only for accounts with the unified agents status synchronization turned on) | The agent’s status for the Talk channel. For example, Online or On call. |
|
Talk activity duration (only for accounts with the unified agents status synchronization turned on) |
The amount of time the agent has spent in the Talk status. |
| Workstream (only for accounts with the unified agents status synchronization turned on) | Displays the agent's workstream in real time. |
Choosing columns to display
Choose which columns to display to customize the Agent status page so that it displays only the specific metrics you want to view. This flexibility allows you to focus on data that’s most relevant to your role and responsibilities by removing the distraction of other metrics.
For example, a manager may want to focus on Activity metrics to gauge agent performance. In contrast, team leads would want to focus on metrics such as Adherence so that they can analyze trends over time.
To choose the columns to display
- Access the Agent status page.
- Click the Pencil (
 ) icon.
 - In the Edit Agent status dialog, select the metrics you want to display.
 Note: You must select at least one metric.
 - Click Save.
Sorting and filtering
The Agent status page sorts agents by their default Zendesk group. You can sort agents by team, location, or show all agents.
You can also sort agents based on the columns at the top of the page. Use the agent status filters to display only information that's relevant to you.
Sorting and filtering can help managers quickly identify situations where they might need to intervene.
To sort agents
- Access the Agent status page.
- Click the By group menu, then select By team, By location, or
All agents.

You can also use the search field to quickly find an agent, group, team, or location, depending on which grouping is selected.
- To sort by column, click a column name.
To filter the Agent status page
- Access the Agent status page.
- Click the Filter (
 ) icon.
You can filter by activity, hide agents without a schedule or activity, and filter by locations, teams and groups.
- To reset the filters, click the Refresh filters icon in the lower-right of the filter side panel.