App Builder lets you create Zendesk apps that extend Zendesk to fit your unique customer and employee service workflows. Instead of costly developer support, or long waits for new product features, you can quickly build solutions you need to support specialized processes, right when you need them.
App Builder lets you create these apps using natural language processing (NLP) and generative AI. With NLP, you can provide instructions in plain language, similar to how you might explain your ideas to a colleague or friend. Generative AI interprets these prompts and generates the necessary code, UI, and functionality. With generative AI, building apps is as easy as describing them, eliminating the learning curve associated with traditional coding.
Here are some key benefits of App Builder:
- Accelerated prototyping: Generate functional code from plain language prompts lets you move quickly from concept to working prototype.
- File upload support: You can upload up to five files directly into your App Builder prompts. The following file types are supported: PNG, JPG, TXT, DOCX, PDF, CSV, or JSON. This allows the AI to "see" your wireframes, requirements, and data samples to determine the layout, required input fields, UI components, and functionality logic, helping you build production-ready apps with less manual back-and-forth.
- Real-time visual preview: Instantly see how your app will look and behave as you build, making it easy to validate the design and functionality.
- Built-in version control: Every change you make is automatically versioned. Easily trace changes, restore previous versions, and compare differences.
- End-to-end testing environment: Test your app with real Zendesk data and API responses in a safe environment before deploying. Any changes you make during testing will be reflected in your actual account.
- Zendesk-specific AI expertise: Generate apps using Zendesk frameworks, APIs, and design best practices, and automatically resolve common Zendesk-specific issues.
- Data integration: Build apps that connect and work with data from Zendesk, your company's internal systems, and popular third-party platforms like Google, Jira, and others.
- Work saved and synced everywhere: Your work stays securely saved and up to date across sessions, browsers, and devices.
- Dark mode support: App Builder supports both dark and light modes. You can build and test your app in your preferred theme, and agents will see the app automatically adapt to match their own interface settings. No additional coding is required. Apps built prior to December 2025 may require a republish or prompt update to display properly in dark mode.
- Global and localized interface: App Builder and all its menus, prompts, and guidance are fully translatable. The interface displays in your chosen language where translations are available, and automatically supports right-to-left (RTL) layouts and region-specific formats.
Apps created by the App Builder are designed with Zendesk Garden components as well as ZAF APIs and REST APIs.
This article includes the following sections:
- App Builder overview (video)
- Getting started
- Creating your first app
- Example: Creating an assignee change tracker app
- Exploring the code tab and app settings
- Installing and managing apps
- Integrating with private systems and third-party platforms
- Troubleshooting
- Disclaimer and maintenance
- Limitations
- Browse all App Builder recipes
- Create an app recipe: Share your own App Builder creations with the community by submitting a recipe host. See the full instructions to get started.
App Builder overview (video)
In addition to the details in this article, this video provides a visual overview of App Builder to help you get started.
Getting started
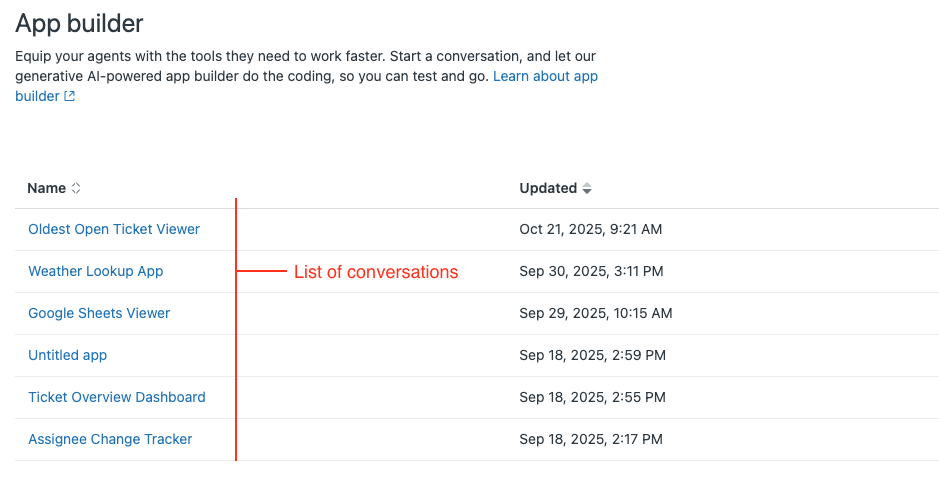
A conversation is a guided, ongoing exchange in the conversation pane where you outline your requirements, review suggested solutions, refine your app, and troubleshoot errors as needed. Conversations serve as your interactive workspace with App Builder, recording all prompts, responses, and iterations as you shape your app idea.
You can have multiple conversations at the same time to explore different ideas or prototypes. Not every conversation results in a published app. Sometimes you use a conversation solely for experimenting, learning, or testing features.
Prompts are the individual instructions or questions you send within a conversation to move your app forward. For example, you might enter “Add a status filter to this view” or “Update the app to show high priority tickets first.” Through a series of prompts and responses, you and App Builder collaboratively build and refine your app.
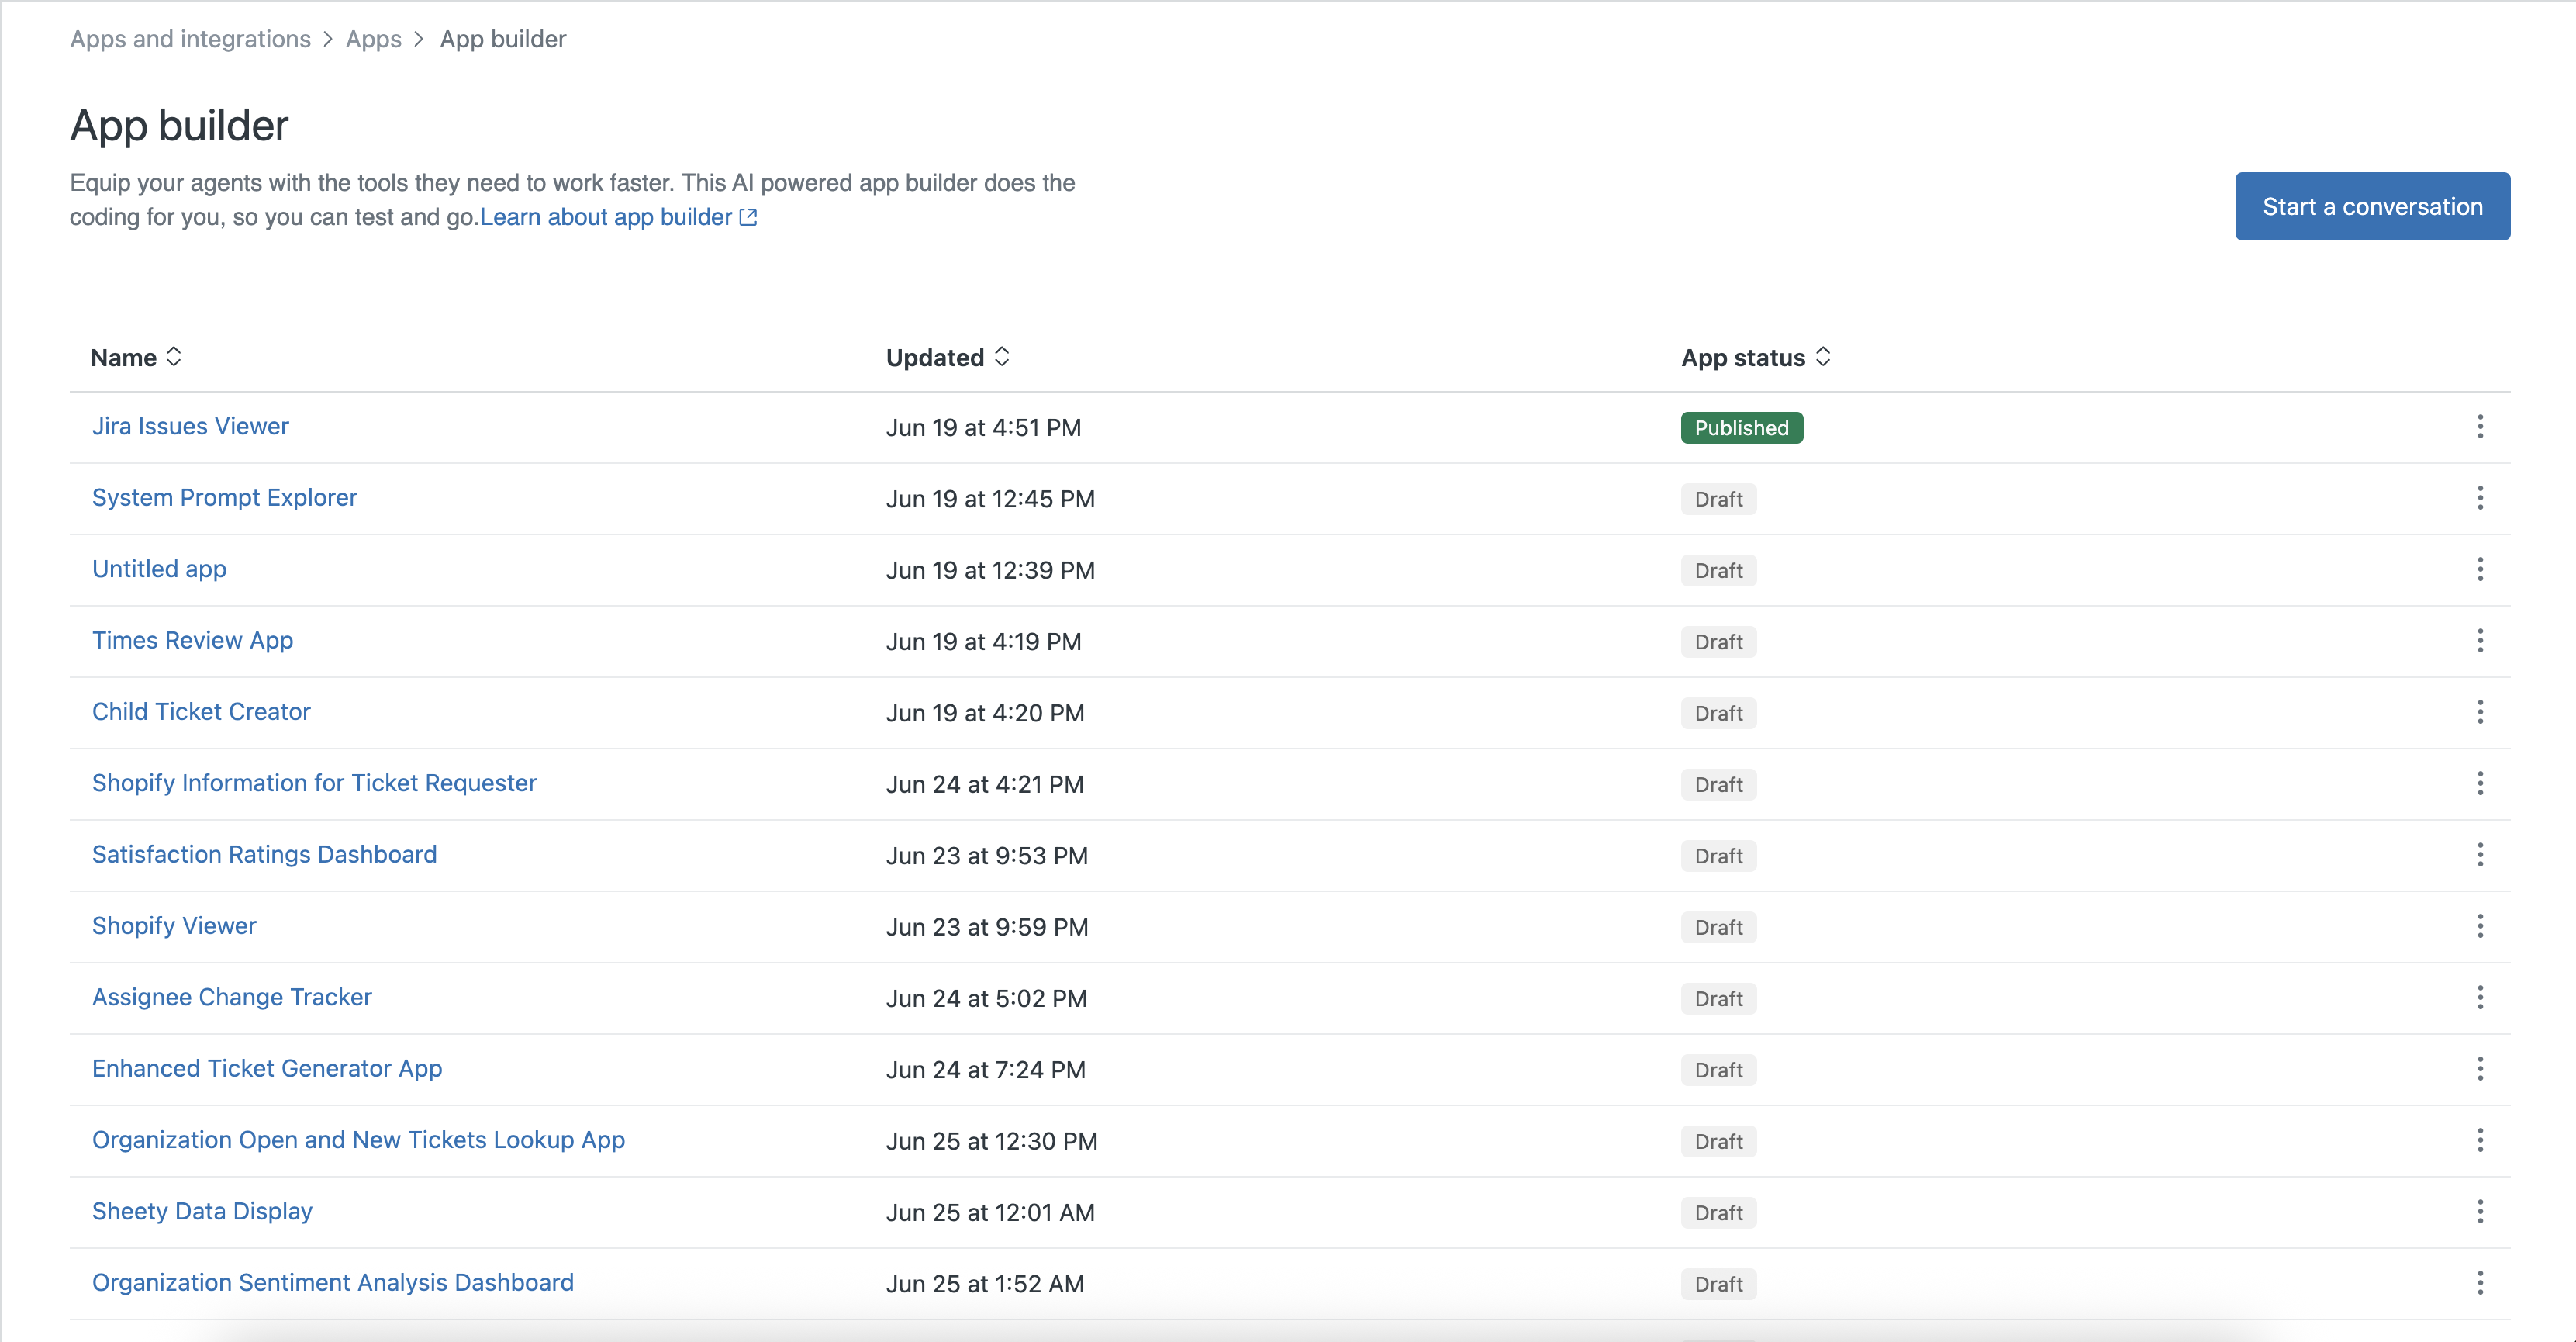
Apps are the tangible results you create and install from successful conversations. An app is the working solution you build, test, publish, and manage in Zendesk. Once published, agents and admins can use the app in their workflow. An app may be generated from a single conversation or from several rounds or after several refinement cycles.
Conversations and apps are tracked separately in App Builder. A conversation can be linked to either a draft app (still being built or refined) or a published app that’s already live in Zendesk. This means you can return to any conversation at any time to continue building a draft or update and re-publish a live app.
App Builder uses NLP and generative AI to interpret user prompts and convert them into functional apps. To ensure you get the best results from App Builder, it's important to follow specific guidelines when crafting your prompts. For best practices, see Prompting guidelines for App Builder.
- Build a simple feature and keep refining the app by adding additional prompts that offer more context and detailed requirements. By breaking the development process into several segments, you can more easily troubleshoot and address issues in specific parts of the app before introducing additional complexity.
- If the built app doesn’t work, ask the AI to add logging.
- Read the AI's response to make sure it understands what you are asking it to build.
- Perform thorough testing of the app before publishing it.
- If you encounter an error while testing your app, copy and paste the error message into the prompt. This allows App Builder to analyze the issue and assist you in debugging the problem.
- If something doesn’t work as expected, provide detailed explanations of what you’re expecting, which parts are functioning correctly, and which parts are not. Avoid simply stating that it doesn’t work.
- Approach the process with patience to better understand how the AI operates and what steps to take if you’re not achieving the desired results.
Creating your first app
To create an app:
-
In Admin Center, click
 Apps and integrations in the sidebar, then select Apps > App builder. You must be a Zendesk admin to use App Builder.
If you haven't created an app yet, opening App Builder takes you to a welcome page. Click Start a conversation to begin the app creation process.

Returning users land on a conversation list page for quick access to their existing conversations. Conversations are sorted by most recently updated.
- Ticket Sidebar: Appears alongside each ticket’s details in Zendesk Support (the default). Select this location for displaying ticket-specific information, actions, or integrations. The ticket sidebar applies to existing and optionally new tickets.
- New Ticket Sidebar: Visible when an agent is creating a new ticket. This location is good for solutions that assist with ticket creation, templates, data enrichment, or validation.
- Top Navigation: The top bar of the Zendesk interface is always accessible regardless of the ticket or screen. Select this option for global tools like notification hubs or quick actions.
- Side Navigation: Located at the bottom of Zendesk Support’s left-hand navigation panel, this area is ideal for complex or standalone apps that require additional space such as dashboards or reports.

Once you’ve selected the app location, you’ll enter the conversation window. Use one of the provided example prompts or enter your own app requirements and click Send.
Designing with file uploads
To accelerate the app creation process, you can upload up to five files directly into your App Builder prompts. The following file types are supported: PNG, JPG, TXT, DOCX, PDF, CSV, or JSON. The AI analyzes these files to automatically determine the layout, required input fields, and UI components, saving you from writing lengthy, detailed prompts.
-
In the prompt interface, click the paperclip icon. You can attach up to five files per prompt.
-
Include a detailed description of the app's use case to guide the AI. Be specific about the app’s purpose, required functionality and workflows, UI parts, users, and constraints, as described in the MAPS framework. For example: "Make an app that looks exactly like the attached screenshot for our employee hiring process. Use case: The app will be used by Agents to create new "child" tickets for SMS and email side conversations from parent tickets. The parent and child tickets will have different ticket requesters. The app will handle email child tickets and (if the recipient has opted in) SMS tickets."
-
Click Send. The AI will parse both your written instructions and the visual elements of your uploaded files to suggest a comprehensive build.
-
Recipient input fields with contact validation.
-
Message text areas for custom content.
-
Status indicators (for example, SMS delivery status).
-
Action buttons for specific workflows like "Create Email Ticket."
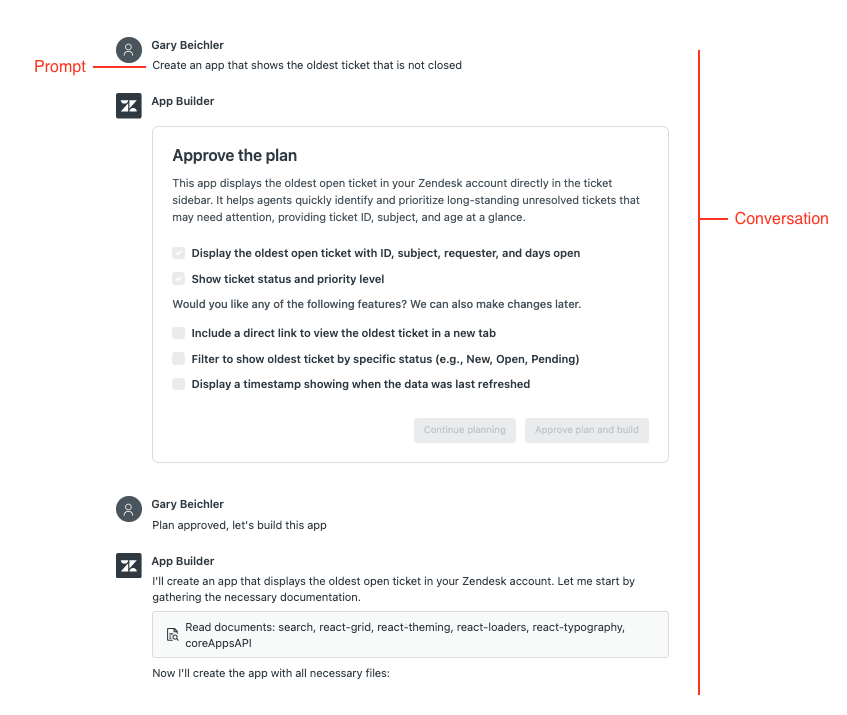
Once the AI has processed your files, the AI presents a proposed plan for review.
Approving the AI-proposed plan
After you enter your initial prompt, App Builder’s AI generates and presents a recommended plan for your app. You can review the plan, approve it as is, remove unnecessary elements, or incorporate additional suggested features. This approach offers a quick and flexible way to tailor your app to your exact needs.
On the “Approve the plan” screen, you’ll see a summary of your app’s proposed functionality, along with core and optional features. Check or uncheck the boxes next to each feature according to your preference. You can continue making changes later so don't worry if you're unsure now. Here's an example:
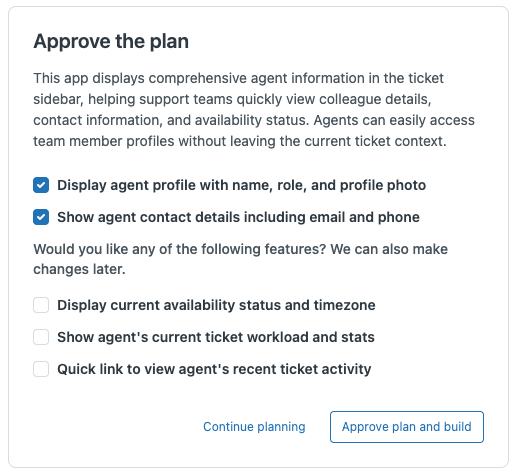
At the bottom of the planning screen, you have two choices:
- Continue planning: Refine the proposed plan further by adding new requirements or making additional adjustments.
- Approve plan and build: Confirm your selected features and allow App Builder to generate your app based on the approved plan.
Refining and testing your app
After the AI generates your approved plan, App Builder lets you refine, preview, test, and publish your app directly within your Zendesk account.
- Preview: Click Preview to view your newly generated app in the
Preview tab, which uses mock data for a safe first look at the layout,
data flow, and interactive elements. This does not guarantee the app
will work as expected once published. You should test your app (see
below) with real account data before publishing.
Use the Code tab to review your app's files, folders, and components. Use the Settings tab to review and update your app’s name and logo.
- Refine and iterate: Refine and update your app at any time by entering new prompts in the conversation pane. Every change is saved, allowing you to experiment freely and revert to a previous version whenever needed. Every change is automatically versioned.
- Restore: Each change is saved automatically as a new version, allowing you to revert to any previous version at any time—whether you're experimenting, fixing an error, or reconsidering your approach.
- Test: Click Test to run your app in Zendesk Support using real
account data. Here you can check if your app displays, reads, and writes
data as intended and works in real-world scenarios. Note: Any updates or changes made while testing your app are applied to your actual account data.
- Address issues: If something doesn't work, use the app's readable error messages and logs to identify problems. Paste error details into the prompt for targeted help, or ask App Builder to add debugging output.
- App settings: Customize your app by entering a custom name and selecting an icon along with a background color from the Garden icon library in the Settings tab.
- Publish and manage your app: When you're fully satisfied, click Publish to make your app available to Zendesk admins or agents.
Example: Creating an assignee change tracker app
Here is an example of building an app for tracking changes in ticket assignees.
- In Admin Center, click
Apps and integrations in the sidebar, then select Apps > App builder.
- Click Start a conversation.
- Select Ticket sidebar and click Select location.
- At the prompt, enter the following:
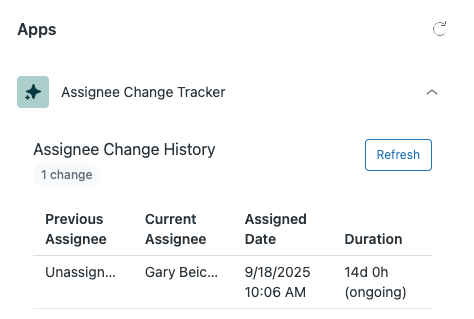
Mission: This app helps to give a very quick view of assignee changes instead of having to dig through the ticket event history, search for all the assignee change events, and track that way. And this is often a question for folks ‘ok, well, where is the handoff in the chain of custody for these tickets’. Action: Create an app called Assignee Change Tracker that tracks the history of changes on an assignee on a given ticket. Parts: A table should list each time the assignee of a ticket has changed, in order of most recent to least recent. Each row should include the assignee’s name, the date they were assigned, and how long they were assigned to the ticket. Above the table, display the total number of changes in assignment of the ticket. Add a button to refresh the displayed data to reflect the latest changes. Add another button to export data to an excel spreadsheet. Make both buttons small and next to each other. Scope: This app is for only the current ticket.
- Use the default plan selections and click Approve plan and build.
- Click Send.
App Builder responds with something similar to this:

- Review the preview to see how your app looks and behaves, and check the AI’s response prompt to understand the underlying instructions.
- Click the Code tab to view the files containing the generated code and mock data used to populate the preview.
- At the prompt, enter the following:
Add Previous Assignee as the first column in the table to capture the full name of the person whom the ticket was previously assigned to. Also add tooltips to both buttons that display a short description of each button's function when hovered over.
- Click Send.
App Builder responds with something similar to this:

- Click Test to test your app using your own Zendesk data.
While testing, any changes you make will affect your actual account, so carefully review the impact of your actions. Also consider customizing your app’s appearance in the Settings tab. For example, update the app’s color and icon to something relevant to your app’s theme rather than using the default icon. This helps to clearly identify your app.
Your app is now complete and is ready to be published.
Exploring the code tab and app settings
After building and refining your app with App Builder, you can access the Code tab to view all code files and folders generated for your app.
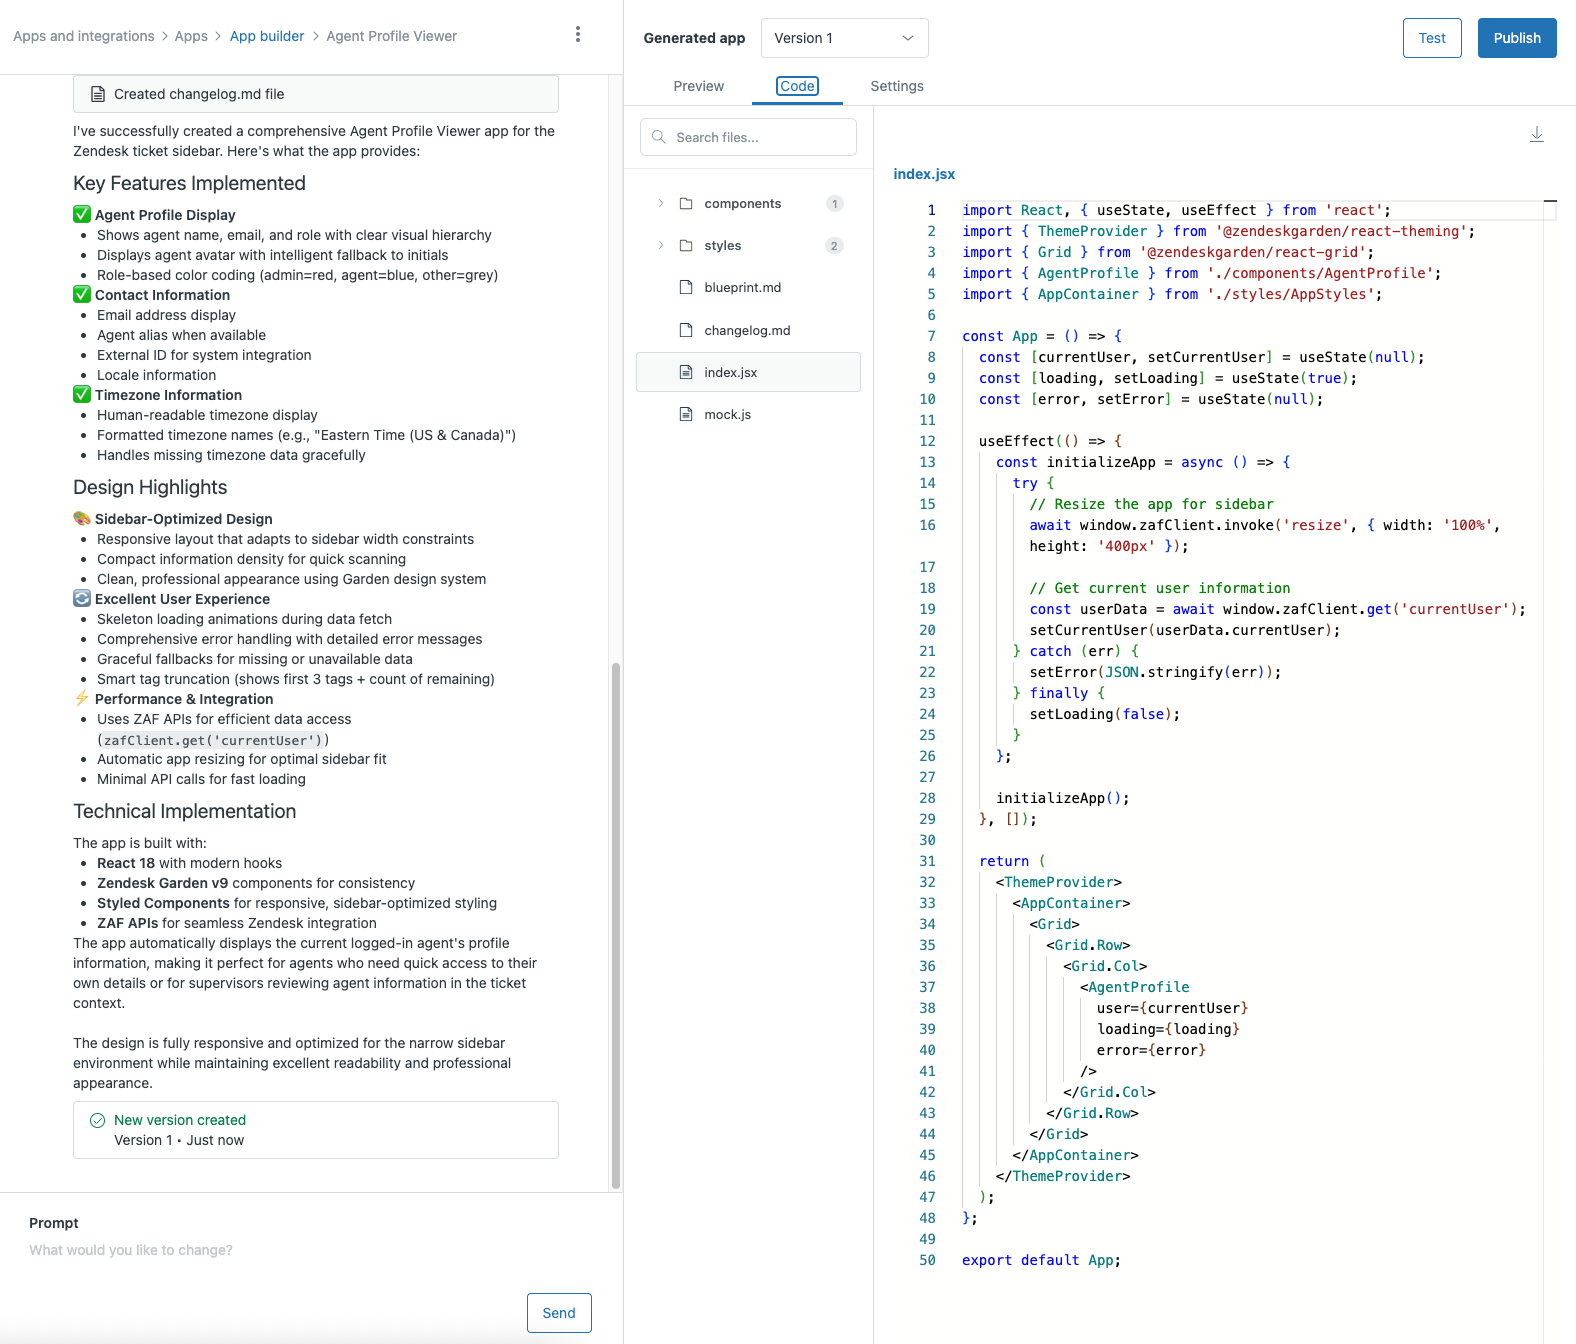
| File or folder | Description |
|---|---|
| blueprint.md | A high-level summary of the app's purpose, architecture, features, integration details, and key technologies used (such as React, Zendesk Garden components, and so forth). |
| changelog.md | A chronological log of all changes and updates made during the app's development. Use this to track progress and roll back if needed using the Generated app pulldown menu or Version in the conversation history. |
| index.jsx | This is the main source file for your app. It manages how the app loads, handles errors, applies themes, and serves as the entry point for the app functionality. |
| mock.js | This file contains the mock data used for previewing the app's appearance and testing UI flows within the App Builder environment. |
| components | This folder contains React components that define your app's interactive user interface and structure. |
| styles | This folder contains stylesheets to ensure a consistent look and feel. |
| utils | This folder contains helper functions and utility code used throughout your app. These functions perform tasks such as formatting dates, filtering data, and so forth. |
- Track changes over time, using the blueprint and changelog files.
- Find and fix issues easily, since you'll know where to look if something isn't working.
- Experiment safely with styles, mock data, or new features.
Even if you don't write code every day, understanding the structure helps you build, refine, and maintain apps confidently.
For more information about the code, see Apps in the Zendesk developer docs.
At the top, you'll find the following:
- Options menu: Click the three vertical dots to give feedback or download the conversation as a JSON file. Downloading the conversation is especially helpful when troubleshooting as it allows your team to review the full conversation details if a user encounters an error they cannot resolve. You can also access the Prompting Guidelines help center article to view strategies and examples for clearly communicating your needs to App Builder.
- Generated app: Use the menu to choose and preview different versions of your app. This allows you to review specific versions, compare changes, and restore previous functionality as needed.
- Test: Click to view and interact with the app in Zendesk Support. Testing your app here lets you explore and assess its functionality using real data from your Zendesk account. Any updates or changes you make while testing the app will be applied to your actual account data. Be sure to verify that the app behaves as intended before deploying it to your team. If you encounter an error while testing, it is not resolved automatically upon publishing. Publishing only makes the app available in your Zendesk account. It does not fix errors. Be sure to resolve any issues during testing to ensure your app works as expected after publishing.
- Publish: When you’re ready to release your app, click Publish. This installs the app and makes it available for agents to use.
Choosing a custom app icon
Custom icons make it easier to identify your app and tailor its appearance to your brand or workflow. You have the option to personalize your app’s icon by selecting from Zendesk’s Garden icon library. For each app location, App Builder ensures your icon displays correctly by generating a PNG version of your SVG icon as needed.
To select a custom app icon:
- Click the Settings tab.
- Enter a name for your app.
If you don't enter a name, App Builder will automatically generate a name based on the details from your conversation and the prompts you've given.
- Browse through a curated collection of Garden icons and background colors. Click any icon or color combination to preview how it will look for your app.
- Once satisfied, click Save.
Your selected name, icon, and color will appear in Zendesk Support once published. If you do not pick a custom icon, the default placeholder icon is used.
These settings are saved in App Builder, so the next time you revisit the same app, the latest name and icon choices appear starting from the version where you made those changes.
Version control
App Builder automatically manages versions of your app as you build and iterate, making it easy to experiment, review changes, and recover previous work.
Each time you generate an update or restore a previous version, App Builder creates a new version and records its timestamp.

When a new version is created, you’ll see the version details in your conversation history. Click Restore to return your app preview and code to any prior state. Restoring always generates a new version, so nothing is lost.
You can also select a prior version using the Generated app pulldown menu from the Preview or Code tab.
Installing and managing apps
- When you are satisfied with your app, click Publish in the upper
right corner.
You’ll be prompted to set who can access this app by selecting specific Zendesk roles (such as Admin, Agent, and so forth) and user groups. This allows you to limit access based on role or group. For example, restricting the app to only admins, or select user groups.
- Acknowledge the service disclaimer regarding the use of apps created through
App Builder.
After you click Agree and Publish, the installation process begins, and App Builder notifies you when your app has been successfully installed.
- Click Manage App to modify permissions or manage the app further, or
select Apps > Zendesk Supported Apps.
For more information, see Managing your installed apps.
Integrating with private systems and third-party platforms
App Builder makes it easy to connect your app with private company data sources as well as external, third-party platforms by guiding you step by step through connection setup and authentication.
To integrate with private or external services, you’ll typically need the API endpoint and authentication details. App Builder supports two primary authentication approaches:
- API key authentication: You provide an API key directly as a credential, which authorizes your app to access the external API. This key acts as proof that you’re allowed to use the API. Using an API key is quick and simple, making it ideal for internal systems or cases where you control the API.
- OAuth 2.0 authentication: Instead of entering an API key, OAuth 2.0 handles a secure handshake between your app and the external service. This method is more secure as it avoids direct API key handling and enables granular permissions. This method is best suited for third-party services where users need to explicitly grant your app access to their data.
App Builder automatically displays the appropriate authentication settings panel when it's needed, often after investigating requirements for a third-party system through its AI-driven web search. The authentication settings panel appears only when you click Test or Publish.
For more information, see Securing API connections in App Builder.
Using API keys
When you create an API key connection, you must specify an HTTP header name. When the connection is used to make an API call, Zendesk passes the API key as the value for this header.
The exact steps for setting up API key authentication varies depends on your integration. Below is one typical example and visual walkthrough.
- For Domain, enter the base URL for your account. For example, "testdomain".
- Enter the project key. This is a unique key that identifies the project you want this app to connect to. For example "HR".
- Click Continue.
- Click Test.
- Click Next.
- For Allowed Domains, enter the full domain you want to allow for this connection. For example, testdomain.atlassian.net.
- Enter the API token. This is the secure credential used to authenticate your connection to the service.
- Click Create integration and test app.
Using OAuth 2.0
App Builder supports the secure, industry-standard OAuth 2.0 protocol for connecting to third-party and internal APIs. This means you can safely build apps that access data from external systems or your own APIs, using token-based authentication flows instead of sharing static credentials.
Before creating a connection with the OAuth 2.0 authentication type, you must configure an OAuth client. When configuring the OAuth client, you need the client ID, client secret, authorization URL, token URL, and scopes from the external system's OAuth configuration interface or admin portal. These credentials are generated while registering your client application (such as Zendesk) with the external system. The exact steps vary based on the external service. App Builder will try to provide setup instructions for creating an OAuth client in the external system. However, guidance may not be provided if App Builder does not have the necessary details.
There are two approaches to creating an integration that requires OAuth:
-
Explicitly request OAuth: If you know your integration will require OAuth, you can specify this directly in your prompt to App Builder. For example, “Create an app that allows me to add links from my Google Sheets to Zendesk tickets. It should display a list of available Google Sheets. Use OAuth to connect to Google.” When you include a requirement like “use OAuth”, App Builder guides you step-by-step through connecting your app to the external platform using the correct OAuth flow.
-
Automatic detection of OAuth requirements: You don’t need to be an expert in authentication methods to get started. If you describe the functionality you want, such as “connect to Google”, App Builder will recognize when OAuth is required, even if you don’t mention it in your prompt. The system guides you through any required authorization steps.
When you click Test on a generated app that uses OAuth:
- Copy the OAuth client callback URL and save it in a secure location. You’ll need to use it as the redirect URI when creating the OAuth client in your third-party OAuth provider system.
- OAuth is automatically selected as the authentication type. This option is disabled and cannot be modified.
- Enter allowed domains for the connection. You can't change the allowed domains after you create the connection.
- Enter the Client ID. This is a unique identifier assigned to your OAuth client, similar to a username for your client.
- Enter the Client Secret. This is a confidential key issued when registering your OAuth client.
- Enter the Access Token URL. This is the URL used to receive an access token.
- Enter the Authorize URL. This is the URL to grant the application’s access
to the account.
For most of the above fields, App Builder will suggest and prefill values. However, always review and verify that the details are correct.
- Enter a space-separate list of default scopes. Scopes are permissions that represent what a client application can access on behalf of the user.
- Click Next.
- In the Grant Type field, enter your authorization code. The OAuth grant type determines how your app will authenticate.
- (optional) Check "Allow offline access" to request refresh tokens and to maintain access while the user is offline.
- (optional) Enter the OAuth URL subdomain. Enter the custom subdomain for your OAuth provider if required. Leave blank if not applicable.
- Click Connect and select an account.
App Builder redirects you to the third-party OAuth provider to select your account and authorize access.
- Copy the Connection ID. You'll need it to reference this OAuth connection when configuring or making authenticated requests from your app.
- Click Continue.
The following video shows an example OAuth flow, including testing the app.
The following video shows an example OAuth flow, including publishing the app.
Guided integration
When connecting to private or third-party services that require authentication (such as an API key or OAuth), App Builder’s AI analyzes your prompts in the conversation to determine the necessary connection details.
App Builder displays the relevant authentication settings and automatically captures any required information it can detect from your instructions.
If additional details are needed, App Builder prompts you for the necessary credentials or configuration, guiding you through the connection setup step by step.
Integrating with private company systems
To connect to private or internal systems:
- Obtain your API endpoint and information about how to authenticate (such as whether you need an API key or OAuth credentials) from internal docs or your development team.
- For more complex integrations, gather all required credentials (API keys, OAuth tokens) and define the input and output data formats your app will use.
- When you’re ready to set up the connection, prompt App Builder with the information you’ve gathered and you’ll be guided through the remaining steps. Note that App Builder is not familiar with your internal systems and can only assist if you provide relevant documentation or details about these systems.
Once your integration is configured, click Test in App Builder to verify integration functionality before deploying to your live Zendesk environment.
Integrating your app with third-party platforms
App Builder lets you create applications that can display or manipulate data to or from any third-party applications, such as Jira, Slack, Google, Calendly, Workday, and others, as long as those services have public-facing APIs. For example, you could build a Google Sheets integration that allows agents to quickly view or update customer records, ticket logs, inventory lists, or workflow trackers without leaving Zendesk. The app could present real-time data from specific spreadsheets or ranges, and even let agents add new entries, update cell values, or archive old records directly from the Zendesk interface. After each action, the app notifies the agent whether it was successful or if there were any issues with the integration.
Troubleshooting
App Builder may encounter errors that require additional context or information to resolve. Some examples of these errors include:
- The preview cannot be loaded.
- The app cannot be generated or installed.
- Integration with a private company system or third-party platform fails.
When App Builder encounters issues, it will attempt to resolve them automatically. If it cannot, it will present you with an error message. Click Show error details to view more information about the problem.
To help App Builder diagnose and fix the issue, provide clear and specific details in your conversation. This may include clarifications, credentials, or any missing context related to the error. The AI uses this information to better understand the problem and either resolve it or ask for more details.
For example, if the expected output was a specific data format or a particular response from the app, but the actual output was different, detailing these discrepancies will enable App Builder to troubleshoot effectively and suggest appropriate solutions. The more precise and detailed the feedback, the better the AI can learn from the interaction and improve its responses in future scenarios.
When you test your app with live data in your Zendesk instance, such as fetching or updating records, or integrating with third-party apps, errors may appear that wouldn’t be visible when using mock data in preview mode. Most apps seem to function correctly in the Preview tab unless there’s a code compilation issue that prevents the preview from loading. Guardrail notifications will alert you to any such errors during testing with real data. If you encounter an error, copy the details and paste them into the conversation to help App Builder analyze and resolve the issue.
- 401: Unauthorized Error - This indicates that the user does not have the necessary permissions to access the requested resource.
- 403: Forbidden Error - This occurs when a user is logged out of Admin Center after their session expires while App Builder remains open in their browser. It can also arise from integration failures.
- 404: Not Found Error - This error signifies a broken or incorrect URL, or it may indicate that the requested API path is incorrect or unavailable.
- 431: Request Header Fields Too Large - This error usually occurs after an extended series of prompts. To resolve it, try clearing the cache and cookies for the Zendesk app in your browser.
- 503: Service Unavailable Error - This error occurs when the server receives too many requests, causing it to exceed its resource limits. This can also happen if the server is down for maintenance or updates.
Disclaimer and maintenance
Apps created using App Builder are considered non-Zendesk services. You are responsible for verifying that your app functions as intended and for maintaining it over time. Zendesk does not guarantee the functionality, support, or continued maintenance of apps built with App Builder.
Limitations
Current limits include:
- Conversation allowance by plan per account:
- Suite Professional and Support Professional: Up to 5 conversations
- Suite Enterprise and Support Enterprise: Up to 10 conversations
- Suite Enterprise Plus: Up to 20 conversations
Note: A conversation is the chat or set of prompts where you collaborate with AI to plan, refine, and solve app ideas. Start a new conversation for each new app you want to create. Not every conversation leads to a published app.An app is the finished product you publish from a conversation. Once published, the app is installed in your Zendesk account for agents and admins to use.
Conversation allowances only limit how many builds you can have in progress at a time. You can publish and deploy as many apps as you need. There’s no cap on the number of published apps, only on how many conversations you can have simultaneously.
- Deleting a conversation does not delete the published app itself. The app will remain available and usable in Zendesk for agents and admins. However, once you delete the conversation, you won’t be able to edit or update that app. To make further changes, you’ll need to create a new conversation and build a new version of the app.
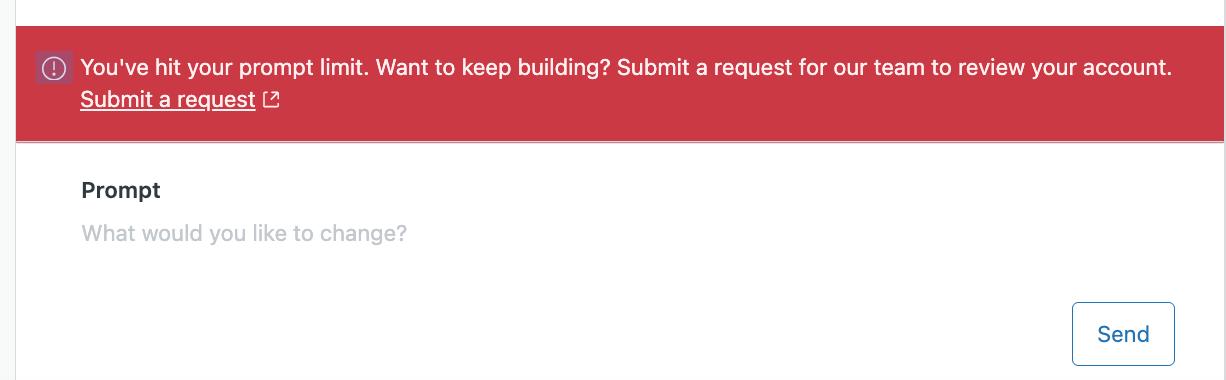
- All eligible customers with access to App Builder receive approximately 3,600
prompts at no cost. The limit is an approximation. See the next bullet for more
information. When you reach this prompt limit, a banner appears above the prompt
box with a “Submit a request” link to submit your request. If approved, your
limit increases one time to a maximum of approximately 7,200 prompts, depending
on your eligibility. If your request is not approved or you reach the higher
limit, you’ll need to wait until the annual prompt limit resets on February 1 to
continue building apps with App Builder.
- The maximum number of prompts allowed is based on the expected length and complexity of each prompt. If you submit larger prompts, the total number of prompts you can send will decrease accordingly.
- App Builder doesn't track or display prompt usage in the user interface.
- App Builder currently limits input prompts to 50,000 characters and allows up to 200 messages per conversation. Actions are also rate-limited to 6–12 requests per minute per user. These limits are enforced at the conversation level.
- Only one OAuth provider per app. You cannot connect to multiple OAuth services (for example, Google) in the same app.
- You can only build and use apps within a single environment. You cannot move an app from sandbox to production or between environments, so you’ll need to manually recreate your app if you want it elsewhere.
- You cannot import an existing app into App Builder to edit or enhance it. You can only create new apps or continue work on apps originally started in App Builder.
- App Builder supports only four app locations: Ticket Sidebar, New Ticket Sidebar, Top Navigation, and Side Navigation. When you start a new app, you must choose one location, and you cannot change it after the conversation starts.
- Each app can only include code for a single location. If you want the same functionality in multiple locations, you’ll need to build and manage a separate version of the app for each one.
- You can attach up to five files per prompt. Supported file types are PNG, JPG, TXT, DOCX, PDF, CSV, and JSON. Uploaded files are used as LLM context to generate app UI and logic only. They cannot be used to generate images or replace app asset logos.
- If your app runs into an error while testing, App Builder will not automatically resolve it. Instead, you’ll need to copy the error details and ask AI for help in fixing it.
- As your conversations grow longer, you may notice slower performance because full pagination isn’t supported yet.
- The change log only tracks details for the ten most recent versions. Very long files may not be fully tracked, so you may not always see the full history of every change in your app.
- When you download your app, you’ll receive the compiled code, not the separate source files or full configuration details, which means editing outside App Builder isn’t possible at this time.
- App Builder can only generate inputs for secure settings parameters. If your app requires additional (non-secure) customer-configurable parameters, you must add and manage those settings manually in the app's source code. Secure settings are values that are encrypted and hidden from end users (for example, API keys or secrets). Non-secure settings are regular, visible configuration values (for example, feature flags, labels, or URLs).
- Third-party pdfjs-dist, tesseract.js, and charting libraries are currently supported.