Verified AI summary ◀▼
Manage call recording options to automatically record calls, voicemails, and transfers, with settings for opt-in or opt-out consent. Control access by allowing agents to pause recordings and decide if customers can listen to them. Delete recordings from tickets when needed, and download them using the API or directly from tickets. Ensure compliance with applicable laws regarding recording consent.
When call recording is on, by default all calls are automatically recorded and attached to the ticket associated with the call. You can, however turn off recording for any number or give callers the ability to opt-in or opt-out of call recording.
This article contains the following topics:
Understanding call recording
Whenever a ticket is created for a phone call and the Always record calls option is turned on for that number (a Zendesk number or an external number), the call is recorded.
What is recorded?
- Voicemails
- Calls answered by an agent on a web browser or on an agent forwarding number
- Calls transferred to an external phone number by an agent (unless the Stop call recording after transfer option is selected)
What is not recorded?
- The portion of the call while the user is on hold and waiting for an agent to become available
- Any consultation, usually before transferring a call to another party (warm transfers)
- A call which routes to an IVR phone tree branch that directs the call to an external phone number (Professional and Enterprise). Not applicable to digital or SIP-IN lines.
- When an agent pauses the call recording (Professional and Enterprise)
- The caller opts-out of the call recording (Professional and Enterprise). Not applicable to digital or SIP-IN lines.
Configuring call recording options
You configure call recording settings for each number individually. The available options depend on the line type you are configuring.
To turn on call recording and configure options
- In Admin Center, click
 Channels in the sidebar, then select Talk and email > Talk.
 - On the Settings page, click the Lines tab.
- Click the line you want to configure.
- On the number settings page, click the Call recording tab.
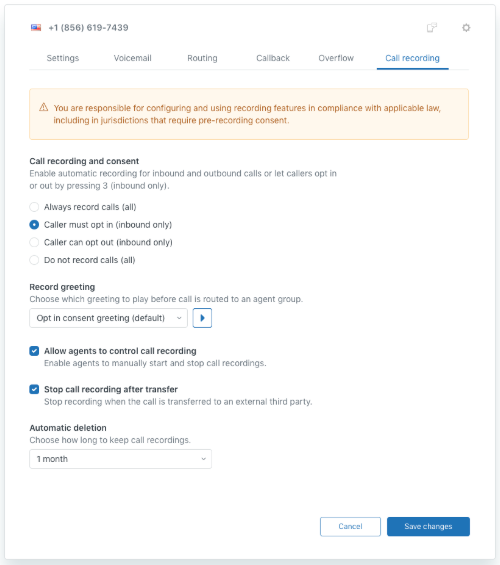
- Configure the following options as required:
-
Call recording and consent: Configures call recording opt-in or
opt-out permissions for callers. This works with both group routing and
IVR routing.
- Always record calls (all): All inbound and outbound calls are recorded.
- Caller must opt-in (inbound only): By default, calls (including outbound calls) aren't recorded. Callers can opt-in to the recording by pressing 3. If you're using a digital line, callers can opt-in or opt-out using a checkbox in the Web Widget.
- Caller must opt-out (inbound only): By default, calls (including outbound calls) are recorded. Callers can opt-out of the recording by pressing 3. If you're using a digital line, callers can opt-in or opt-out using a checkbox in the Web Widget.
- Do not record calls (all): No inbound or outbound calls are recorded.
Regardless of these settings, if the caller chooses to leave a voicemail, this is always recorded and a ticket is created.
For more information about call recording opt-in and opt-out, see Understanding call recording permissions (opt-in and opt-out).
-
Record greeting: If call recording opt-in or opt-out is turned
on, choose the greeting that will be played to callers. You can add a
custom greeting from the Call recording category in the Greetings tab of
the Settings page. Make sure the greeting informs the caller how they
can opt-in or opt-out. Not applicable to digital lines.Note: This greeting is played when you use group routing. If you are using IVR routing, you'll need to record a separate IVR greeting. For details, see Understanding call recording opt-in and opt-out.
- Allow agents to control call recording: Agents can pause and resume call recordings for Zendesk or external numbers. For details, see Pausing and resuming call recordings with agent recording controls.
- Stop call recording after transfer: When call recording is turned on for a Zendesk number or external number, select this option to stop the recording when a call is transferred to an external number when using group routing.
- Automatic deletion: From the drop-down list, choose the length of time you want to keep call recordings for or choose Never to keep them indefinitely.
-
Call recording and consent: Configures call recording opt-in or
opt-out permissions for callers. This works with both group routing and
IVR routing.
- Click Save changes.
Zendesk number recording configuration
External number recording configuration

Digital line recording configuration

Configuring customer access to call recordings
You can allow or block customers from listening to call recordings associated with their tickets. If you select this option, it applies to calls received from all of your Zendesk phone numbers.
To determine whether customers can listen to call recordings
- In Admin Center, click
Channels in the sidebar, then select Talk and email > Talk.
- On the Settings tab, turn on or off the New live call recordings are public? option.
- Click Save.
Deleting call recordings from tickets
To delete a recording from a ticket
- In Zendesk Support, open a ticket.
- In the conversation area of the ticket, locate the call recording, then click
delete recording.

- In the Confirm box, click OK to confirm you want to delete the recording.
The recording is deleted and replaced by "recording not available".

Downloading call recordings
If you want to download call recordings and access them offline, use one of the following methods:
- In a ticket that contains a call recording, right-click the attached voicemail, then click Save as.
- Use the recording_URL parameter in the Zendesk API to download the recording.