
There may be times when you need to open a ticket on someone else's behalf. For example, you may be providing support to someone using a telephone (and not Zendesk Talk, which creates a ticket for you when you take the call), and you want to capture the support request in a ticket. You can create a new ticket and then set the person you're providing support to as the ticket requester.
Also known as proactive tickets, tickets created on behalf of an end user can be public (the end user for whom it was created can view the ticket) or private (the end user cannot view the ticket until it's manually made public).
This article contains the following topics:
Creating a public ticket for an end user
When an agent creates a public ticket for an end user, they will need to add the end user as the requester. If the Requester field is not completed, the agent will be set as the requester. When the end user is added to the ticket as the requester, they can view and update the ticket.
When you create a public ticket for an end user, it triggers the following events:
- The end user receives a notification that a ticket was created on their behalf, if you have a trigger enabled for this action.
- The ticket appears in the end user's My Activities list.
- The ticket appears in the end user's help center searches.
In most cases, a public ticket cannot be made private. However, in some cases, it's possible. See Changing a ticket from public to private.
To create a ticket on an end user's behalf
- Hover over the +Add tab in the top toolbar, then select Ticket.

- If private ticket creation is enabled, click Public Reply so the end user can
access the ticket immediately. If private ticket creation is not enabled, the ticket is
accessible by default, and no action is necessary.

- If the requester is an existing user, begin entering the user's name, email domain,
phone number, or organization name in the Requester field, and the relevant results
appear. Select a user. Note: Alternatively, you can open the user's profile, then click User options in the bottom toolbar and select New ticket. The user's name automatically appears in the Requester field.
If the requester does not yet have an account, add them by clicking +Add user at the bottom of the search results.

- Enter the ticket data, then click Submit as New.
The requester receives the new ticket email notification, if you have a trigger enabled for this action.
Creating a private ticket for an end user
Agents can open a private ticket that is not visible to the end user for whom they are creating it, and can choose when (or if) to allow the end user to access the ticket. You can create private tickets in the ticket interface or through a create event using the Tickets API. Private tickets cannot be created through an inbound email message.
If private tickets are not enabled in your account, you might need to have an administrator enable this feature (see Enabling private ticket creation).
When a private ticket is created for an end user, the end user is included as the ticket requester; however, some notifications and other ticket-related events are not triggered. For instance:
- The end user is not notified that a ticket has been created on their behalf.
- Private tickets do not appear in the end user's My Activities list or help center searches.
These events are triggered when the ticket is made public.
Once your admin enables private ticket creation, you can create a new ticket on behalf of an end user.
To create a private ticket on an end user's behalf
- Hover over the +Add tab in the top toolbar, then select Ticket.
The Internal note option should be selected by default.

- If the requester is an existing user, begin entering the user's name, email domain,
phone number, or organization name in the Requester field, and the relevant results
appear. Select a user. Note: Alternatively, you can open the user's profile and click New ticket. The user's name automatically appears in the Requester field.
If the requester does not yet have an account, add them by clicking +Add user at the bottom of the search results.
- Enter the ticket data, then click Submit as New.
All comments default to Internal note (private) from then on, including comments added via email, voice recordings, and the like, until you make the ticket public.
Using private tickets internally
There are a number of internal uses for private tickets. You can:
- Make records of calls and meetings with your customers. These can be stored as tickets, meaning you get a more accurate picture of your Support team's effort, without bothering your customer.
- Take action on issues that you can't share. Sometimes tasks need to be carried out on behalf of a customer account -- investigations or corrective actions -- that might be sensitive. With a private ticket, it can remain internal.
- Prepare for an interaction before communications open up. Because private tickets can be shared just by adding a public comment, you can use the ticket to gather materials, prepare, or take notes, then make the ticket public when you're ready to address it with the end user.
- Send someone else a task. Throw together a private ticket, record some steps or actions that need to be taken, and assign it to someone else, or set it in a queue for the next available person.
You can associate a private ticket with a customer, meaning the record is there for future reference. You get the value of reporting, whether that's accurate accounting of what your team is doing, or the amount of work you're doing on behalf of a particular customer or organization, without involving the end user until you're ready.
Changing a ticket from private to public
Private tickets can be made accessible to the requester and any newly added CC'd end users. Once a ticket is made public, it cannot be made private again. However, internal notes remain hidden from end users, as usual.
To change a ticket from private to public
- Above the comment entry box, click Public reply.
- Enter your comment, then click Submit.
Changing a ticket from public to private
If a public ticket has only one comment, you can make the ticket private by changing the Public reply to an Internal comment. This works only on tickets where there is a single public comment.
Note that when you change a Public reply to an Internal comment, you cannot make it public again.
47 comments
Joyce
The First Reply Time metric works as below:
If your agents are creating proactive tickets with a private comment, it is expected for the First Reply Time metric to still run on the ticket after the first public response from the end user.
As a workaround, you can build a separate SLA Policy with no First Reply Time metric for proactive tickets created with a private comment. Create a trigger that will add a tag to the ticket and use the ticket tag as your SLA condition.
This is the sample trigger conditions and action:
And this is for your SLA:
Do not forget to rearrange your SLA policies and if possible, put this on top of your list so other SLA policies will not run on the proactive private comment tickets.
Hope this helps!
1
Client Manager
Hello, Brett,
Still haven't solved problem with first e-mail delivery to end user, so attaching the screenshot of my "Notify requester of received request" trigger. My Zendesk interface is in russian language, so I will translate it for you below:
ALL of the following conditions are met: Ticket = Created, Status = New, Comment = Open
ANY of the following conditions are met: Current user = (agent), Current user = (end user)
0
Noly Maron Unson
Hi Sabina,
Zendesk comes with a default trigger called "Notify requester of new proactive ticket". This is the trigger responsible for sending the message to the end user if you are the one who initially reach out to them. If you do not have this trigger, you can create a new one with the same conditions and actions as below:
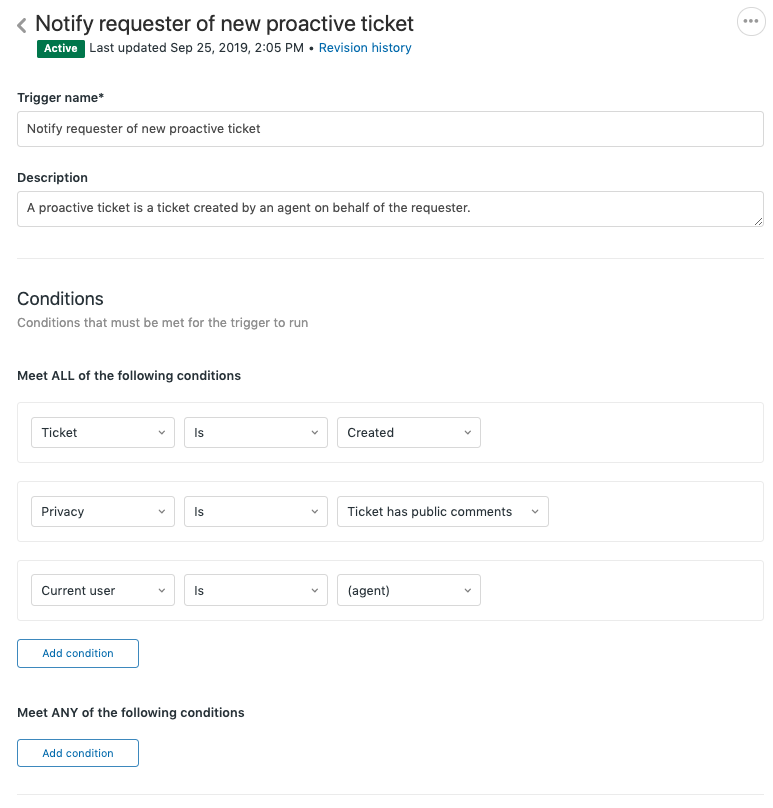
Hope this helps.
0
mfg
I need to set up a trigger based on whether the ticket was a proactive ticket, created on behalf of the requester. I expect that it will likely be using the 'channel' condition, but I'm not sure which option applies here. What channel would I refer to in my trigger?
Alternatively, if channel isn't the right way to condition the trigger, what's a condition unique to this feature that I can use?
0
Zsa Trias
Hello mfg,
There's no "channel" condition specifically for proactive tickets, but you should be able to use this combination of conditions instead, as tickets created by agents are proactive tickets:
0
Devika
Hi, What is the trigger for sending out emails?
0
Cheeny Aban
We have several default triggers that send out email notifications to users. You may access them here: About the standard Support triggers
I hope that helps!
0
Jim Allred
In a similar vein to what Dave B said, it would also be nice to have tickets created on behalf of the customer default to start off with an internal comment. This makes it easier to take notes and provide context for any agents looking at the ticket. You can manually select an internal comment, but that's annoying to do every time, especially if you are multitasking with a customer already.
0
Zsa Trias
Hello Hannah,
You can check out this article about Defining SLA policies
As mentioned there:
However, for your question about moving tickets from one team/another, SLA should not be dropped when a ticket is moved between groups unless there is a condition in the SLA that is not met after the group has been changed.
You can see the section "Setting up SLA policies" under that same article link to guide you on how your SLA policies are applied to tickets.
0
ilker devrim
I need to get support from Zendesk on something. How can I register?
0
ilker devrim
I need to get support from Zendesk on something. How can I register?
0
ilker devrim
I need to get support from Zendesk on something. How can I register?
0
Nhia Lor
The best way to get in touch with us and raise a support request is in product using our Get help option. You can find more detailed instructions to follow here. This will ensure that we can direct your concern to the appropriate resource to best assist with the issue or concern you may have.
0
Raida Lopez
Hi! How can I remove the
This ticket was created on your behalf.
To add additional comments, reply to this email.
that appears on the end user email every time I initiate the email? TIA!
0
Aleksandrs Galiullins
You can remove the mentioned text by updating the appropriate trigger called "Notify requester of new proactive ticket" which is responsible for proactive ticket notification. For reference "About the standard Support triggers".
0
Christine Diego
You could take a look at the triggers section under Admin center > Business rules and see if you can find something labeled as proactive ticket.
0
Jp
Hi Team,
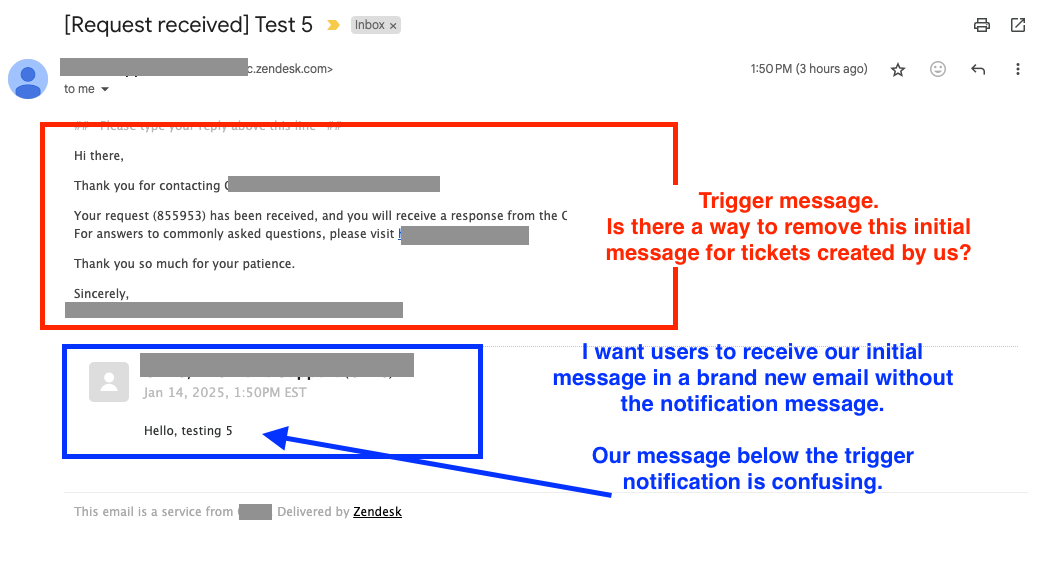
Users are not receiving my initial message when we create tickets on their behalf (like you would expect when sending a brand new email to someone).
Following these directions I am able to have users getting my initial message BUT they also receive the Trigger message ("Your request has been received").
For NEW tickets created by us, is there a way for users get my initial message but without the notification message ?
For reference, this is what users see. I want to remove the trigger notification message (red part) and have they see just my initial message (blue part) for new tickets created by us. I don't want to remove the trigger notification for tickets created by users.
0