Triggers allow you to set up and automate ticket management and email notifications easily. However, sometimes you need to send an email notification to someone other than a Zendesk Support agent or requester, such as a shipping partner, a colleague in Finance who handles refunds, or an external email address to a different department or company.
Use notify target to notify an external system about a new ticket or an important state change to a ticket. These systems include X Corp, JIRA, Salesforce, and many others. For example, when a ticket is set to urgent, you can send an SMS to your CEO or an update to X Corp, Yammer, or Flowdock. Or, when your customer creates a ticket and selects "Sales" from a drop-down field, it creates a case in Salesforce. These scenarios are possible with notify target.
This article contains the following sections:
- Overview of the steps in the process
- Example: Email the CEO when a ticket is set to urgent
- Example: Email the Security Department when the "About" field is "Security"
For other uses of notify target with other systems, see Notifying external targets.
Overview of the steps in the process
To get started, do some planning. Here are some useful questions you can ask yourself to plan the notifications you want to create:
- Who do I want to notify? (Target)
- When do I want them notified? (Custom field)
- Do I want this triggered by an agent or end-user action? (Custom field restrictions)
- What information do I want to be sent in the notification? (Trigger)
When you're ready to implement, here's a summary of the process:
- Create a target for the email address where you want to send the notification.
- Create a custom field to initiate the notification. Make the field editable, or it won't display on the "Submit a request" form.
- Create a trigger to send the notification.
- Test to make sure it works.
Example: Email the CEO when a ticket is set to urgent
In our first example, we will start with an agent-initiated notification. Since the priority field can only be set by an agent, this notification can only be initiated by an agent.
To set this up, first create a target:
-
In Admin Center, click the Apps and integrations icon (
 ) in the sidebar, then select Targets > Targets.
- Click add target.
- Select Email target.
- Fill in the fields, like in the example below.
- Select Create target and click Submit.

Next, create a trigger:
-
In Admin Center, click the Objects and rules icon (
 ) in the sidebar, then select Business rules > Triggers.
- Click Add trigger.
- Fill in the conditions and actions, like in the example below.
- Click Create.

When you are done, follow these steps to test:
- Open an existing ticket.
- Change the priority field to urgent.
- Click Submit as open.
- Reopen ticket.
- Click on Events.
- Notice that an email has been sent to the target.

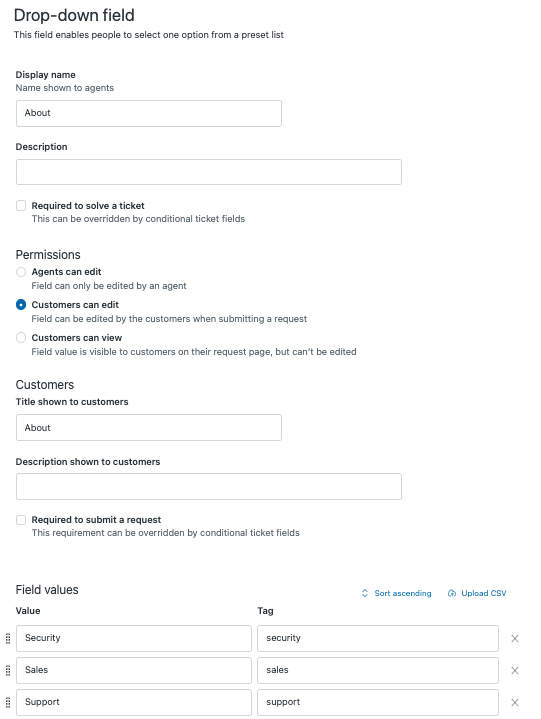
Example: Email the Security Department when the "About" field is "Security"
In the next example, we will create an end-user editable custom field called "About" with a "Security" option. This field will then display on the "Submit a request" form, so when an end-user selects it, a notification is sent to your Security Department. This is an example of an end-user initiated notification.
To set this up, first create a target:
-
In Admin Center, click the Apps and integrations icon () in the sidebar, then select Targets > Targets.
- Click Add target.
- Select Email target.
- Fill in the fields, like in the example below.
- Select Create target and click Submit.

Next, create a custom drop-down field:
-
In Admin Center, click the Objects and rules icon () in the sidebar, then select Tickets > Fields.
- Click Add field.
- Select Drop-down.
- Enter About as the Display name.
- Select Customers can edit.
- Enter the values for the drop-down field, including one for Security.
- Click Save.
For more information on creating custom ticket fields, see Adding custom fields to your tickets and support request form.
Then create a trigger that will notify the target:
-
In Admin Center, click the Objects and rules icon () in the sidebar, then select Business rules > Triggers.
- Click Add trigger.
- Fill in the conditions and actions, like in the example below.
- Click Create.

When you are finished, follow these steps to test:
- Log out of your agent interface and go to the web portal.
- Click Submit a request.
- Select Security in the drop-down field.
- Click Submit.
- Log in to your agent interface.
- Open ticket that was just created.
- Click Events.
- Notice that a notification was sent to your security department.