Verified AI summary ◀▼
Workstreams help organize your team's workload by grouping tickets based on specific conditions, like email or regional calls. They inform forecasts and schedules, ensuring efficient resource allocation. You can create, edit, and delete workstreams, and even combine or prioritize them through the Early Access Program. This flexibility allows you to tailor workstreams to match your team's unique needs and priorities.
Workstreams are part of your organization structure and serve as one of Zendesk Workforce Management’s (WFM) main building blocks. They're sets of tickets that agents work on and are similar to your regular Zendesk channels, such as tickets, chats, and voice.
You define workstreams based on specific conditions to create custom channels or segmentations that reflect your team's work. For example, your team might respond to emails from a specific ticket form or take calls from a particular region.
Your forecasts are generated based on workstreams, which in turn inform your schedule. See Forecast overview and About the Schedule page to learn more.
This article contains the following sections:
Related articles
Understanding workstreams
Workstreams capture tickets created after you buy the Zendesk WFM add-on.
Workstreams take into account each time a ticket enters a workstream, including changes made from one workstream to another.
When you run preview conditions on Workstreams, it shows how many tickets have entered a workstream over the past 30 days.
The workstream's preview match does not reflect unique tickets entering a workstream. Each time a ticket enters that workstream, it's counted, including when a ticket is reopened.
The Forecast (where your historical volume lives) is recalculated when you change workstream conditions.
The example below illustrates the workstream count:

Tickets created before you buy the WFM add-on aren't matched to workstreams in the agent activity page, but are counted towards the historical volume in the forecast.
If the matching criteria are met only in an update made after the ticket is set to Solved, the ticket fails to match the workstream.
Creating workstreams
When you first add Zendesk WFM to your account, ticket, voice, and chat workstreams are created by default. You can also create additional workstreams.
You must be an admin or user with permission to access the Workstreams page.
For the best results, don't exceed 50 workstreams or assign more than 5000 agents to a single workstream.
When selecting workstream conditions, keep in mind that Meet ALL of the following conditions uses the and operator. This means that each condition in this section must be true for a ticket for the workstream to identify it. Conditions in the Meet ANY of the following conditions use the or operator. This means that at least one condition in this section must be true for a ticket to be calculated in the workstream.
Workstream conditions logic
| Condition | Logic | Behavior |
|
Meet ALL of the following conditions |
include | All specified values must be present. |
| don’t include | All specified values must be absent. | |
|
Meet ANY of the following conditions |
include | At least one specified value must be present. |
| don’t include | At least one specified value must be absent. |
When a ticket doesn't meet the conditions of any workstreams, it’s labeled No Workstream in black under your Agent Activity. The No Workstream status is also displayed in the Agent Status and in your Reports.
If a ticket meets the conditions for two or more workstreams simultaneously it’s labeled Multiple Workstreams.
To create workstreams
- In Workforce management, click
 Settings in the navigation bar, then select Organization structure.
 - Click Workstreams.
- Cick the plus sign (+) icon, then select Workstream.

- Enter a Workstream name.
- (Optional) Describe the purpose of the workstream.
- Choose a color for the workstream or add a custom color by clicking the palette icon.
The color you select is used in the forecast visualization.

- Click the Conditions tab.
- Choose a Contact via type.
For example, tickets, chat or voice. You can define by type with more granularity for tickets and voice channels.

- Select additional conditions by choosing a specific group, tag, brand, or form that you use in Zendesk.
- Click Preview to verify the conditions and that the workstream will show you the expected values.
- Click the Agents tab and select which agents to assign to the workstream. You can
filter the agents list by group, team, and location.Tip: Choose the team members that have the skill to perform the type of work you're specifying for the workstream. This doesn't affect the forecast calculations, but is used with the automated schedule.
- Click Save.
Editing workstreams
When you edit a workstream and change its conditions, the updates are visible on the ticket tracking only after a user updates the ticket.
To edit a workstream
- In Workforce management, click
Settings in the navigation bar, then select Organization structure.
- Click Workstreams.
- Select the workstream you want to edit.
- Make any changes, then click Save.
Deleting workstreams
When you delete a workstream, your existing schedules that include the workstream are affected.
To delete a workstream
- In Workforce management, click
Settings in the navigation bar, then select Organization structure.
- Click Workstreams.
- Select the workstream you want to edit.
- Click Actions, then select Delete.
- Click Delete workstream to confirm. This action can't be undone.
Creating combined workstreams (EAP)
Combined workstreams allow admins and users with permission to schedule multiple workstreams at the same time and ensure adherence is properly tracked, regardless of which workstream the agent is working in.
When generating schedules, the algorithm decides whether it's best to schedule a user for a single workstream or a combined workstream for that specific period to ensure the most efficient resource allocation.
You can also control how combined workstreams are used when generating schedules using the Scheduling settings. When the Schedule combined workstreams option is activated, the scheduling algorithm uses only combined workstreams when creating a schedule. It will consider any individual workstreams that are not part of any combined workstream afterwards.
General tasks and workstreams defined in your intraday variants are still scheduled as defined in your location shifts.
To create combined workstreams
- In Workforce management, click
Settings in the navigation bar, then select Organization structure.
- Click Workstreams.
- Click the plus sign (+) icon, then select Combined workstream.
- Enter a name for the combined workstream.
- Select the Workstreams you want to combine.

- (Optional) Describe the purpose of the combined workstream.
- Choose a color for the workstream or add a custom color by clicking the palette icon. The color you select is used in the forecast visualization.
- Click Save.
The algorithm will now decide whether it’s best to schedule a user for a single workstream or a combined workstream.
You can identify combined workstreams in the All workstreams panel by their icons.

To use only combined workstreams activate the Schedule combined workstreams setting. Instead of the default behavior where the algorithm decides whether it’s best to schedule a user for a single workstream or a combined workstream when creating a schedule, it will consider only combined workstreams and any individual workstreams that aren't part of any combined workstream afterward.
To activate the Schedule combined workstreams setting
- In Workforce management, click
Settings in the navigation bar, then select Organization structure.
- Click Workstreams.
- Click the Scheduling settings icon
 next to All workstreams.
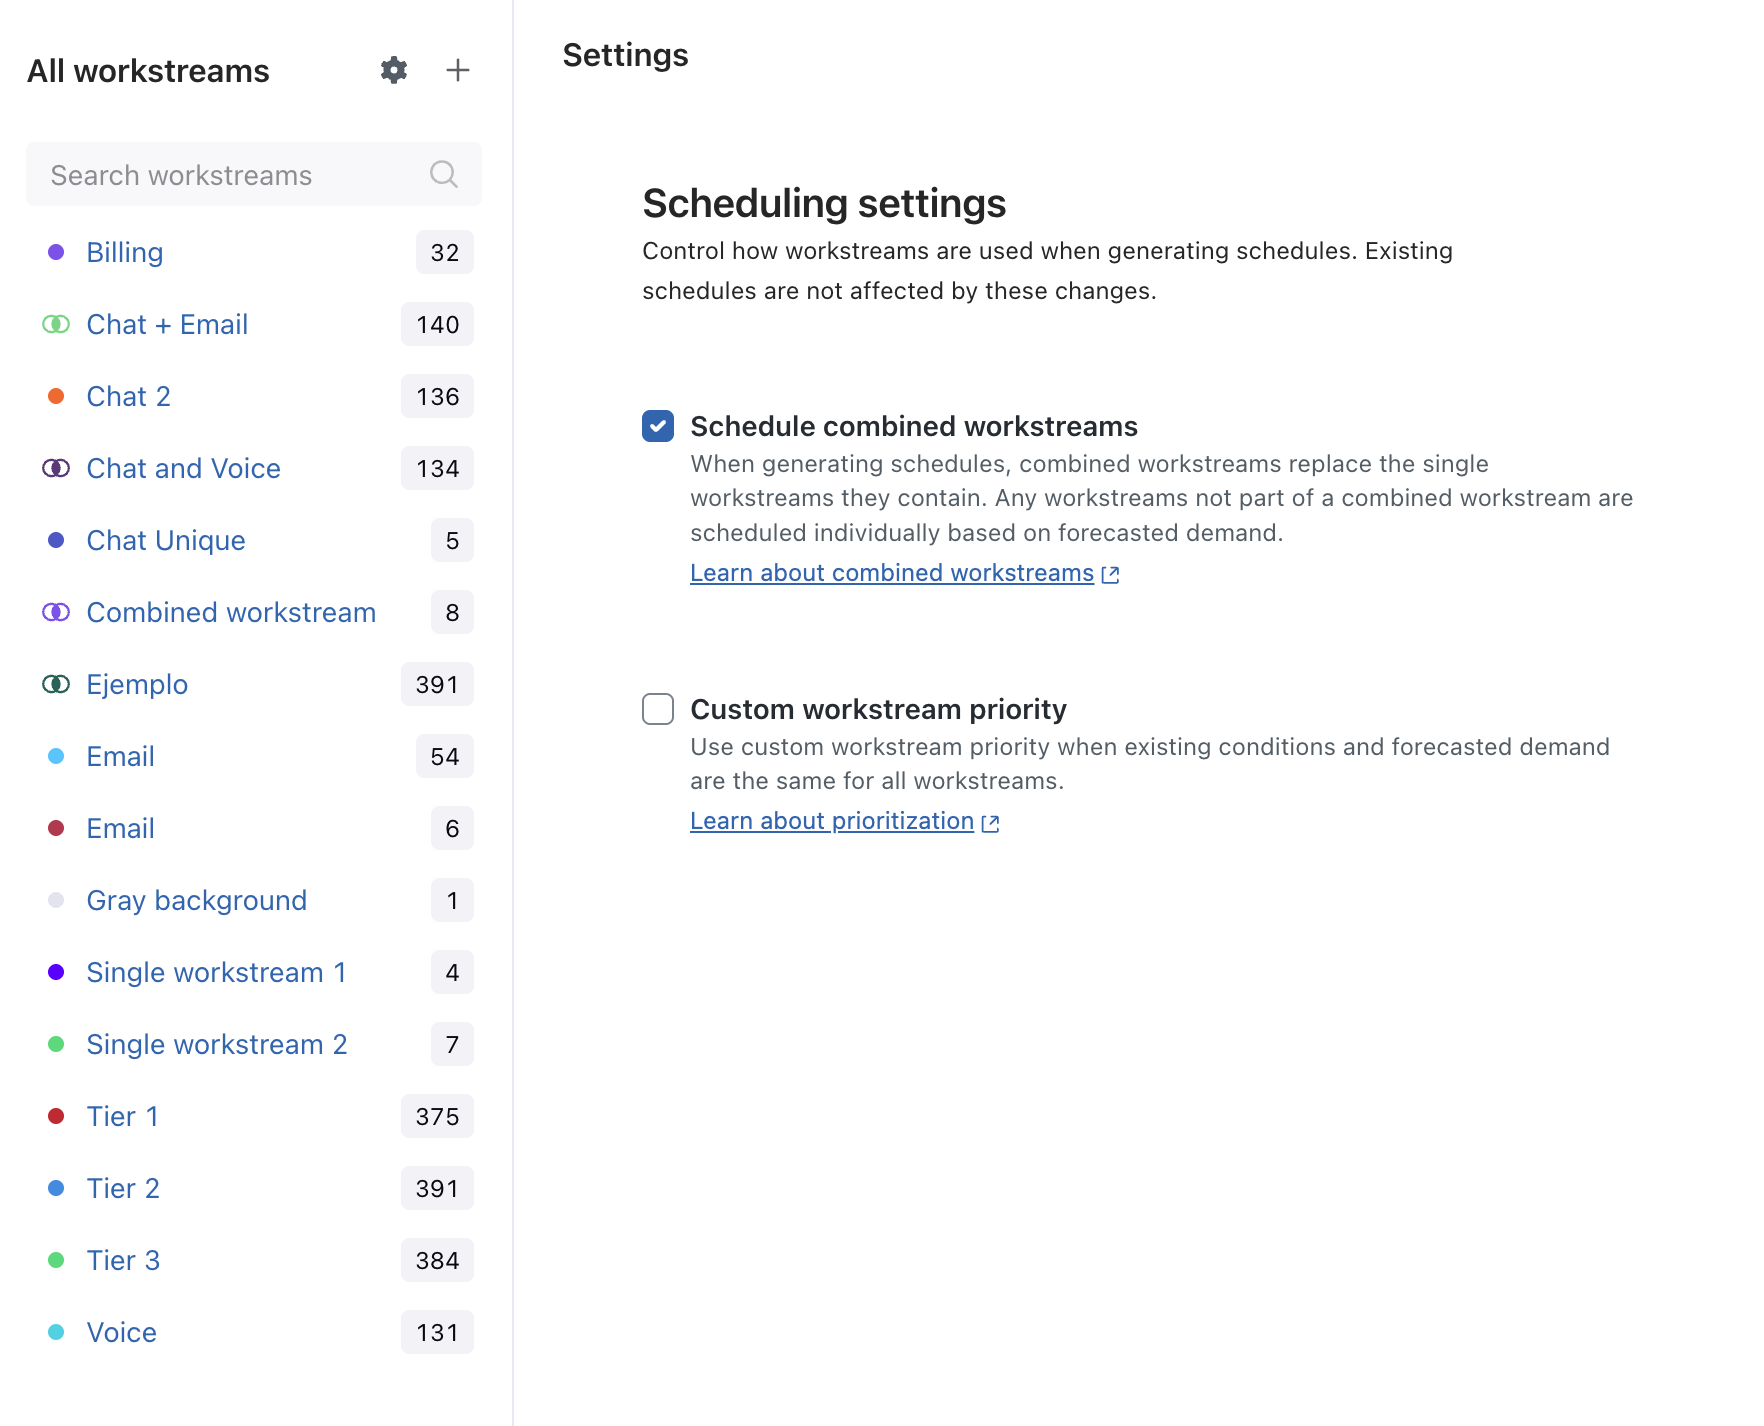
- Select Schedule combined workstreams.
- Click Save.
The scheduling algorithm starts using only combined workstreams when creating a schedule. It will consider any individual workstreams that are not part of any combined workstream afterwards. Existing schedules are not affected by these changes.
Prioritizing workstreams (EAP)
You can prioritize your workstreams from highest to lowest. Prioritize workstreams whose channels or nature of work are most important to your business. For example, you may want to prioritize your Voice workstream first since phone calls can't wait like emails.
The algorithm will still schedule all workstreams based primarily on the forecast; however, priority adds a "bonus point" for a workstream to be selected by the algorithm.
Setting the priority matters only when the forecasted demand is similar between two workstreams or when the demand is fulfilled or really small. In these cases, priority helps in the decision making to schedule the higher priority workstream first until their forecasted demand is covered. Your other workstreams are then scheduled in sequence based on their priority level. However, if the lowest priority workstream has highest demand, it still gets scheduled before other workstreams.
To prioritize workstreams
- In Workforce management, click
Settings in the navigation bar, then select Organization structure.
- Click Workstreams.
- Click the Scheduling settings icon next to All workstreams.
- Select Custom workstream priority.
- Click the dropdown menu next to a workstream and select a priority level.
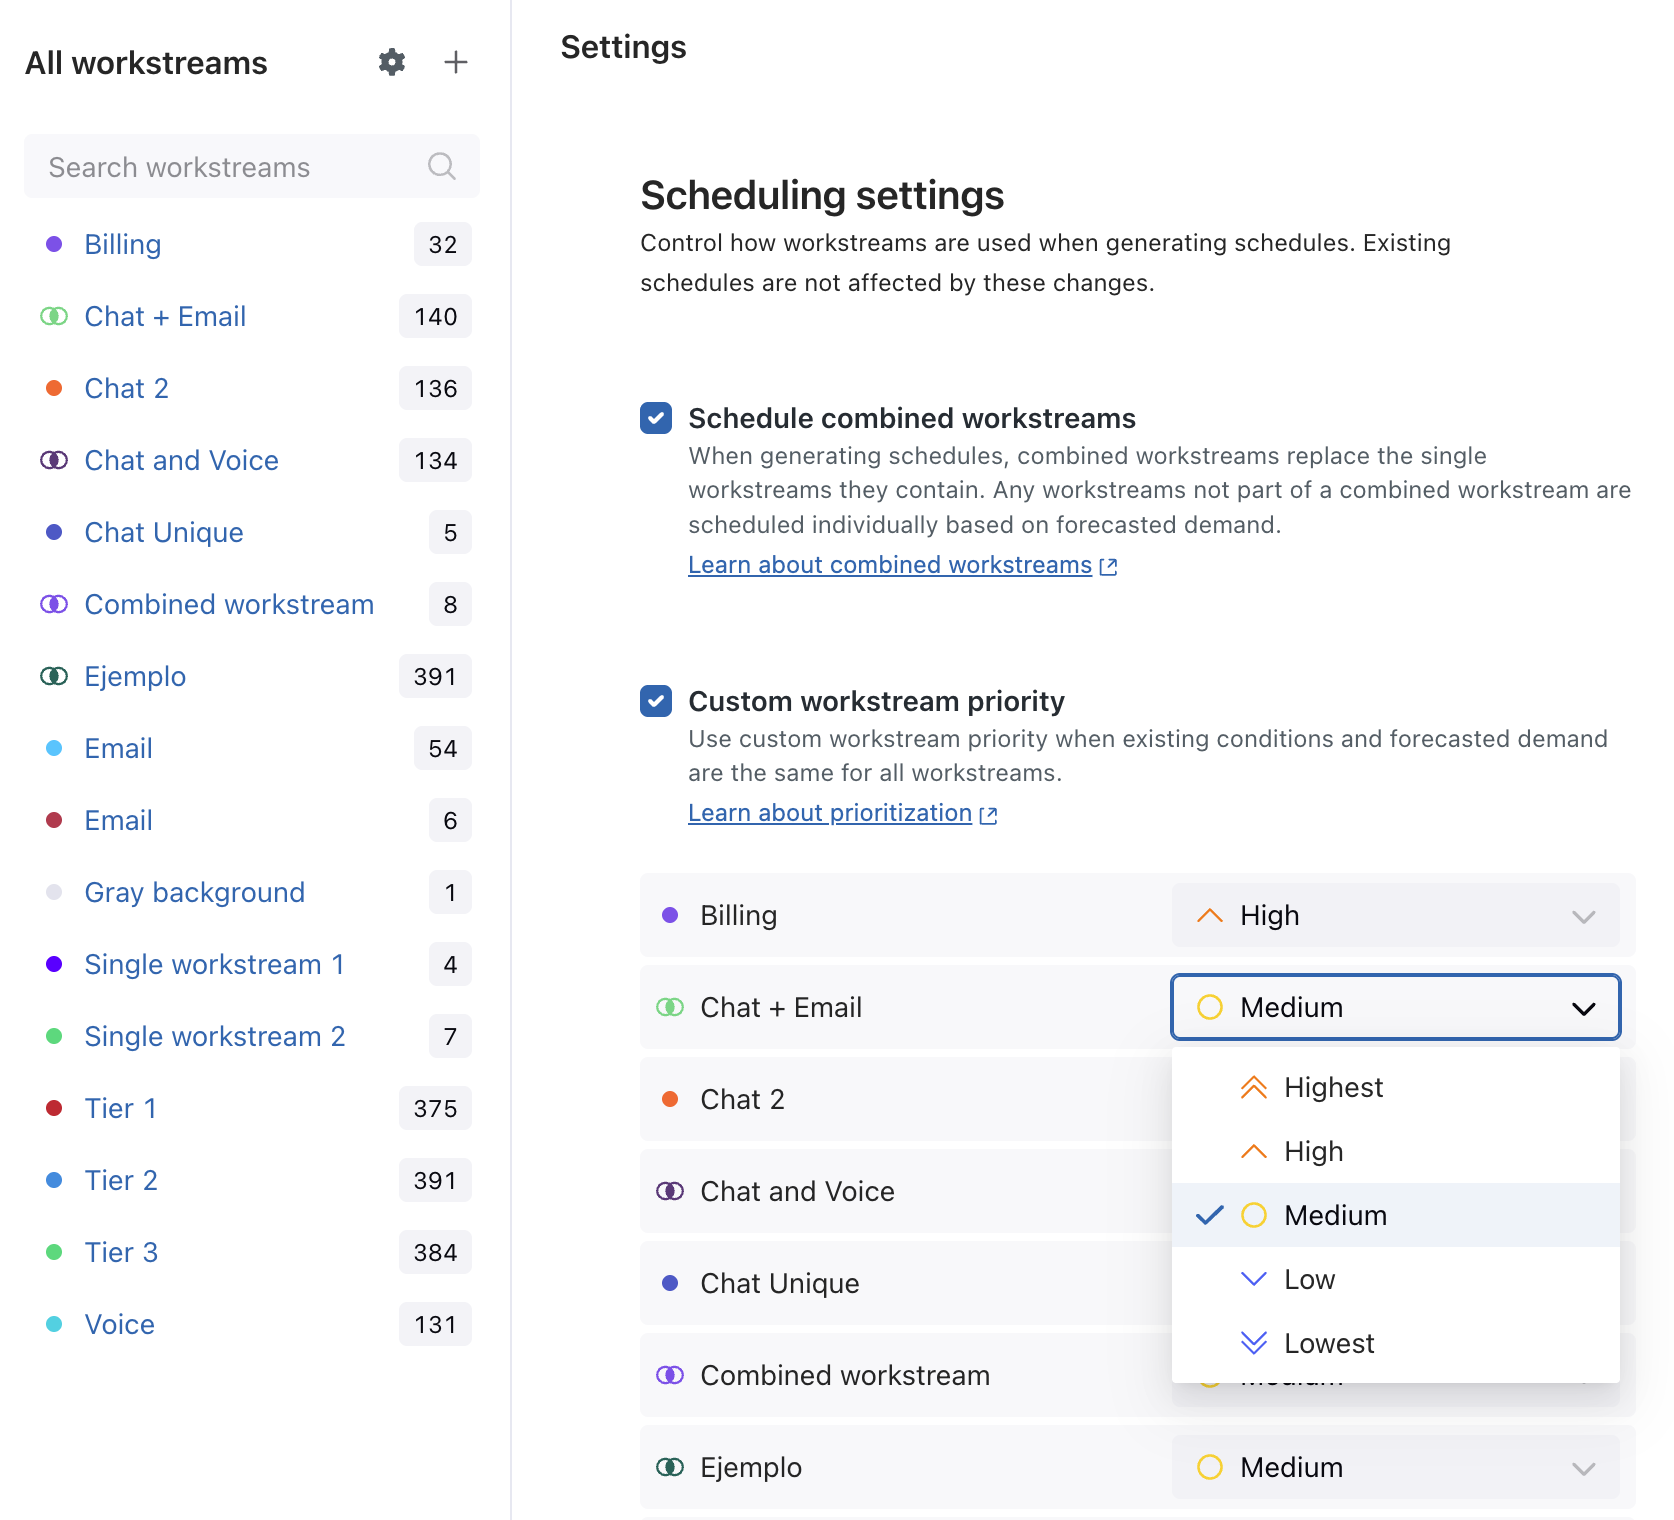
- Continue to set the priority for all of your workstreams, then click Save.