Summary: ◀▼
You can restrict agents' ticket access by assigning them to specific brands, ensuring they only see tickets for their assigned brands. This helps maintain data privacy and focus support efforts. Admins manage brand memberships, which control ticket visibility, and can configure default brand assignments for new team members. Removing agents from brands removes their ticket access for those brands, while admins always have access to all brands.
If you support multiple brands, Zendesk allows team members (agents) to manage tickets associated only with their assigned brands. By assigning agents to brands, administrators can control which tickets agents can access based on their brand membership, ensuring focused support, enhancing data privacy, and promoting specialized product knowledge. Segmenting access to branded tickets this way is called department spaces.
If all agents are assigned to all brands, then department spaces is not in use, and brand does not control agent visibility of tickets. Removing agents from brands removes their ability to view, search, and access tickets with that brand.
Consider how removing access might impact your workflow. If you don't want to use this feature, you don't have to take any action because team members are assigned to all brands by default. You can ensure team members are assigned to all brands by viewing their brand memberships.
Watch the video below to learn more about department spaces.
Department spaces: Segment access to tickets by brand or department (3:30)
This article covers the following topics:
- Limitations
- Understanding brand membership
- Viewing team member brand memberships
- Filtering team members by brand
- Adding or removing team members from brands
- Viewing and updating brand memberships from the agent profile
- Configuring brand membership settings for new team members
Related articles:
Limitations
- Restricting agent ticket access by brand (also called department spaces) cannot
be used with the following:
- Legacy messaging through Chat
- Legacy Talk plans
- Triggers can assign tickets to agents who shouldn't have access to them. When this occurs, the agent will see a message stating they don't have access to the ticket. This includes messaging tickets when omnichannel routing is not enabled. In this scenario, the error is returned when the agent clicks Accept. See Why can't I access this ticket? for more information.
Understanding brand membership
You can assign team members to brands, which sets their brand membership. Team members can only view, search, and access tickets within their assigned brands. Assigning a team member to all brands gives them access to tickets across all brands. If they aren't assigned to any brands, then they won't have access to tickets. See Considerations for exceptions.
Initially, new team members are assigned to all brands and, therefore, will have access to all tickets. Administrators can control which tickets agents can access by removing them from the brands they shouldn't have access to. Admins are automatically assigned to all brands and can access all tickets across all brands. When a new brand is created, all admins are automatically added to it and cannot be removed.
A team member’s role can further refine their access. For example, a team member’s role might limit them to only tickets in their groups.
When creating and updating tickets, the Brand drop-down field in the Agent Workspace is limited to the brands for which the agent is a member. Agents in a custom role with permission can assign tickets to any brand, including brands they don’t belong to.

Considerations
- An upgraded agent initially belongs to no brands and, therefore, will have no access to tickets. You must add the agent to brands to give them access to tickets within those brands.
- Team members can be CC’d or added as followers on tickets outside their brand membership. When this happens, they will only have access to the specific ticket, not all tickets within that brand.
- If an agent in a custom role has permission to manage suspended tickets, they can manage the suspended tickets in their brands only, plus any suspended tickets without a brand.
- Tickets shared via a direct link are inaccessible if the agent isn’t a member of the ticket’s brand.
- Omnichannel routing respects the brand memberships of your agents. If you’re using this feature, tickets are only assigned to agents who are members of the ticket's brand.
Viewing team member brand memberships
Brand memberships for all your team members appear on the Team members page. You can also filter the list of team members by brand.
To view brand memberships
-
In Admin Center, click
 People in the sidebar, then select Team > Team members.
The brand associated with each team member appears in the Brand column.

If a team member belongs to multiple brands, click the +more link to view additional brand memberships.

Filtering team members by brand
Filtering the team list by brand helps you verify that team members have the appropriate brand memberships. For example, you might periodically filter for team members with no brand memberships to ensure that no one's brand membership has been accidentally removed.
To filter the team list by brand membership
- In Admin Center, click
People in the sidebar, then select Team > Team members.
- Click Filter.
- Under Brand membership, select the brands by which you'd like to filter
team members.
Selecting multiple brands filters team members who are part of all the selected brands. To filter team members with no brand memberships, select No brand.
- Click Apply filters.
Adding or removing a team member from brands
When you add team members to brands, they can view, search, and access tickets within their assigned brands. Removing a team member from brands removes their access to tickets within that brand.
You cannot remove admins from brands. Admins must be members of all brands.
To add or remove brand memberships
-
In Admin Center, click
People in the sidebar, then select Team > Team members.
The team member page opens.
-
Search for the team members you want
to update, then select them in the list.
You can select one or many team members. Admins are members of all brands and will be excluded from any bulk operations.

- Click Manage brand membership.
The Manage brand membership link displays at the bottom of the page after you select team members.

- In Add to brand and Remove from brand, select the brands you'd
like to add or remove the team member.

- Click Save.
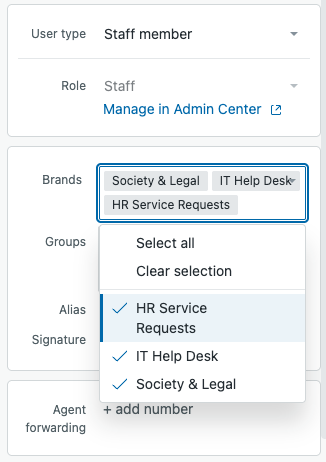
Viewing and updating brand memberships from the agent profile
To view or update brand memberships for a single agent, you can do so from the agent's profile.
To view or update brand memberships from an agent's profile
- In Support, click the Search
icon (
 ) in the upper-right of the top toolbar.
 - Begin typing the agent's name, then select the agent from the drop-down list.
- Click the Brands menu in the left pane to expand it, then select or deselect brands for the team member.
Configuring brand membership settings for new team members
Admins can configure brand assignments for new team members and upgraded users, ensuring team members get relevant brand access from the start.
By default, new team members are assigned to all brands, but this setting can be changed. For example, you may want team members to have no brand assignments initially, requiring a manual selection each time.
To configure brand membership settings for new team members
- In Admin Center, click
 Account in the sidebar, then select Brand management > Brands.
 - Click Manage settings.
- Select an option for Choose how new team members get assigned to
brands.This setting only controls the default selection when adding new team members. You can still change brand assignments when adding a team member.
- Manually assign brands: No brands are pre-selected.
- Assign new team members to all brands: All brands (active and inactive) are pre-selected.
- Select an option for Choose how end users are assigned to brands when
upgraded to team member. This setting will automatically assign the
upgraded user to brands based on your selection.
- Assign to no brands: The upgraded team member will have no brand assignments.
- Assign upgraded team member to previously assigned brands: The upgraded team member will be assigned to the brands they were originally assigned to before they were downgraded to an end user.
- Assign new team members to all brands
- Click Save.