Verified AI summary ◀▼
The authenticated SMTP connector allows you to use your own email server for outbound-only email relay, ensuring secure and encrypted communication. It supports auto-forwarding for inbound emails and requires setting up secure credentials. Considerations include testing in a sandbox, managing email headers, and using DKIM signatures. Avoid using the same support address in sandbox and production to prevent inconsistencies.
The authenticated SMTP connector lets you connect a non-Zendesk email server to your Zendesk Support instance. It is specifically designed for organizations that prefer to use their own email servers or cannot use third-party email servers due to internal corporate policies, data regulations, or encryption needs.
In addition to two-way authenticated relay, the connector can be set up for outbound-only authenticated email. This setup allows for standard auto-forwarding of inbound email traffic to Zendesk. All outbound sending for the connected addresses occurs through your domain or email service through an authenticated outbound connection. Although this option uses standard auto-forwarding, it requires a different setup that cannot leverage existing addresses using standard auto-forwarding.
- Understanding how email is transmitted with outbound-only authentication
- Considerations
- Important information about email headers
- Configuring the connector for outbound-only authenticated email relay
- Setup recommendations when using Microsoft cloud-based email services
- Signing your outbound email traffic with your DKIM signature
- Rotating or changing credentials
- Disconnecting the connector
Understanding how email is transmitted with outbound-only authentication
SMTP is not new to Zendesk; Zendesk currently uses an SMTP relay for all inbound and outbound emails (except Gmail connector).
The outbound authenticated SMTP connector functions like the current SMTP process for email traffic, except that it relays email to your company mail server from Zendesk and passes secure credentials (username and password) as part of the outbound relay. The inbound portion of forwarding uses standard Zendesk auto-forwarding. Services like Office365 Cloud, Exchange Online, and Google Workspace can use standard auto-forwarding to Zendesk but can let Zendesk pass the authenticated outbound traffic for those services to send to the intended recipients.
The main advantage of this solution is that it allows you to send and receive email traffic to and from your customers using your domain’s email services, taking advantage of the sending and security features while ensuring encrypted and secure relays from Zendesk.
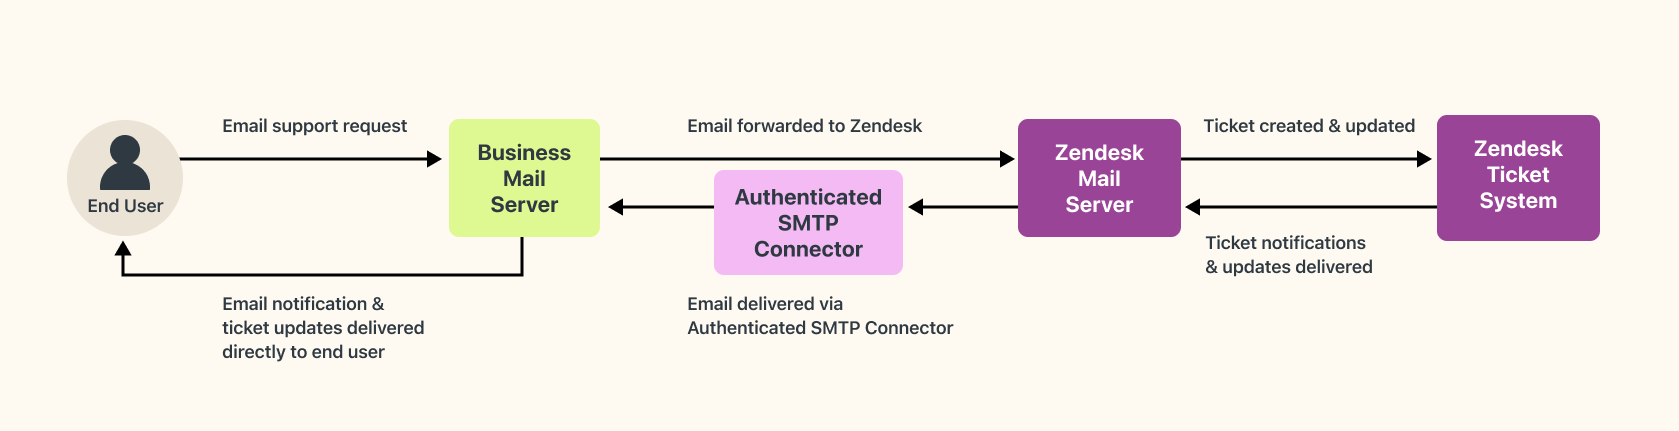
Once configured, here’s how the authenticated SMTP connector works in a typical email workflow with outbound-only authentication:
- User submits support request: When an end user or agent emails a support request to your domain’s support address, the email will be forwarded to Zendesk using standard auto-forwarding.
- Ticket created: The email is received, and a ticket is created in Zendesk.
- Ticket notifications: Notifications are sent back to your email domain or service using your designated and authenticated SMTP-ready support address for outbound sending.
Considerations
- You should turn off the Allow agents to attach files in emails setting when using this feature with Microsoft. Microsoft rejects email traffic that includes actual attachments when using their SMTP AUTH service.
- It's very important that you do not make a newly added address the default support address until you've verified that it is functioning correctly. You risk locking yourself out of your account if you can't receive password reset and access emails.
- CCs and followers must be turned on in your account.
- Because the connector relies on outbound authenticated relays to occur, we recommend testing this feature in your Zendesk sandbox environment before using it in production. This is to give your domain admin, IT team, or email provider time to understand the workflow and relationship between the two resources fully.
- Do not add the same support address in your sandbox and production accounts. This might result in inconsistent behavior with Zendesk or your email server. Use your sandbox environment to test, then delete all the test domains and support addresses before adding them to your production account.
- During initial setup, email sent through your existing support addresses for the account or brand will not be interrupted and continue to function normally.
- After you add a support address for outbound sending through the authenticated SMTP connector and the address is verified, Zendesk will begin sending email through the authenticated domain.
- Up to 50 support addresses can be added to Zendesk for outbound sending through a single SMTP domain. You can add up to 10 domains for a total of 500 addresses, but only 50 support addresses can be added for each domain.
- Adding unique credentials is recommended for each address or brand so you can track traffic with greater specificity. Although this requires more work and credentials to manage, it can be helpful when rotating credentials or mitigating a possible security issue in which a set of credentials might have become compromised.
- Graylisting for this traffic is not recommended, particularly for verification emails. These emails complete the outbound relay and confirm to Zendesk that traffic is successful.
- You should add the Zendesk IPs to your network allowlist to ensure a reliable connection.
- You will want to verify that your email service is signing your outbound traffic with your DKIM signature.
- If you disable the support addresses using the feature and continue to forward traffic to Zendesk, it will still create and update tickets, though any updates for those tickets will not be using an authenticated outbound connection. Those notifications will be sent from our servers.
Important information about email headers
Email headers, (such as To, From,
CC, and Reply-To) contain important data and
metadata about an email message.
Your administrator might want to change email headers for several reasons. However, it’s important to note that some header fields should never be altered since they are critical for ensuring the correct delivery and integrity of the message. Changing standard headers at the account's email domain before outbound sending is not supported. Any issues that emerge as a result of this should be investigated and corrected at the external domain.
The below headers should persist throughout the outbound relay process:
Auto-Submitted: auto-generated
X-Auto-Response-Suppress: All
X-Mailer: Zendesk Mailer
X-Zendesk-From-Account-Id: ******
X-Zendesk-Email-Id: ************************
Changing your email header fields doesn’t change how Zendesk works; it only changes how you send your outbound messages and how you might receive responses. The relationships between the requester, agents, and CCs in the email and subsequent ticket should not change.
The authenticated SMTP connector doesn't give you the ability to send email on behalf of your Zendesk system support addresses (example: support@yoursubdomain.zendesk.com).
Configuring the connector for outbound-only authenticated email relay
Share these configuration steps with your domain admin or IT team, as they involve obtaining and providing credentials that must be securely transferred and added to your business email servers and Zendesk account.
Forwarding email to Zendesk
Set up forwarding on your business mail server to forward emails to Zendesk.
Zendesk Support does not support multi-forwarding, or forwarding that goes through multiple locations before being sent to the Zendesk support address. If multi-forwarding is configured, the requester will be the first address that Zendesk can find in the Reply:To or From: fields in the email headers. This could produce inconsistent results and is not supported.
Adding a forwarding address
Add your external support address to Zendesk. When you add your support address, your email will be verified, and you'll know whether you've set up email forwarding correctly.
To add a forwarding address
- In Admin Center, click
 Channels in the sidebar, then select Talk and email > Email.
 - Click Manage support addresses.
- Click Add address, then click Connect external address.
- If you have multiple brands, select the brand for the email address from the drop-down menu.
- Select Email forwarding/Authenticated SMTP Connector, then click Next.
- Enter your outbound credentials, then click Next.
You will need the secure credentials for your domain (host, username, and password) obtained from your domain administrator, IT team, or service provider to complete this step. This information allows Zendesk to relay outbound traffic to your domain for sending outbound traffic to your users and ensures outbound TLS encryption.
- The next step instructs you to set up auto-forwarding. If you haven't already set this up, see Forwarding email to Zendesk.
- Click Save.
Zendesk sends a test verification email that might take a few minutes to complete. If there are problems with the test verification email for auto-forwarding, you might see a message that the setup couldn't be completed. You might need to contact your email admin or service provider to ensure you have set up auto-forwarding correctly. If you have confirmed with your provider that forwarding is functioning as expected, you can contact Zendesk Customer Support.
Setup recommendations when using Microsoft cloud-based email services
Outbound email relay using the authenticated SMTP connector is compatible with Microsoft Exchange Server and Microsoft 365. Microsoft email services don't allow the addition of SMTP authentication credentials for inbound email relay. Accounts wishing to use Microsoft cloud-based email services can configure auto-forwarding to Zendesk and create an authenticated connection for outbound sending, as described in this article.
Prior to setup in Zendesk, you’ll need to enable SMTP authentication for the address in Exchange Online. See Enable SMTP AUTH for specific mailboxes. This is likely a missing step for many customers, and you might need to work with your Microsoft admin to enable the setting.
The following is an example setup, as described in How to set up SMTP AUTH client submission.
| Device or application setting | Value |
|---|---|
| Server/smart host | smtp.office365.com |
| Port | Port 587 (recommended) or port 25 |
| Username/email address and password | Enter the sign-in credentials of the hosted mailbox being used |
Also, review the "Block access for unknown or unsupported device platform" administrative page in Microsoft cloud-based email services. Even though you might have enabled SMTP authentication, you might have to check other settings, such as ensuring that Linux is not excluded from access as a device platform. If you need assistance, contact Microsoft for more specific recommendations.

Signing your outbound email traffic with your DKIM signature
As described in Digitally signing your email with DKIM, Zendesk Support allows DKIM authentication. DKIM provides a way to authenticate that an email was sent from the domain it claims to be from. This is done by attaching a digital signature to the outgoing emails, which can be verified against a public cryptographic key published in the domain's DNS records.
When using the authenticated SMTP connector, Zendesk will not sign outbound
traffic with our d=zendesk.com DKIM tag within the header. If you
have enabled digital signatures in Zendesk after adding the required CNAME records
at your domain, we will sign the outbound traffic on your behalf and add the
d=yourdomain.com DKIM tag to the outbound
header.
Your domain can re-sign with your DKIM signature, if you choose. If you opt not to do this, test and ensure you’re not inadvertently overwriting the signature we’ve added for your domain before sending outbound production traffic.
Your domain might need to ignore SPF authority when we relay outbound traffic from Zendesk to your email service, as we will be creating a “trusted sender” relationship with your email service, and you will be doing the final authoritative outbound sending (SPF and/or DKIM) to your users.
Zendesk strongly recommends testing in a sandbox environment with test end users to validate that the SPF/DKIM/DMARC checks are all passing.
Rotating or changing credentials
If you need to change the credentials associated with one or many support addresses, you will need to edit or delete the addresses and update or re-add them with the new credentials. If there was no change to your auto-forwarding rules, then you should only need to add the new credentials (for the outbound connection).
Disconnecting the connector
If you want to discontinue use of the connector, consider doing so during a low-traffic time. The process will take a few minutes, and you might need to coordinate with your Zendesk team to pause making ticket updates until the feature has been disconnected and support addresses have been re-added to maintain the use of your branded addresses.
Depending on how many connected support addresses you have, you might want to leverage the API’s support addresses endpoint for faster results. Only one address can be deleted at a time, but once you have the list of SMTP-connected address IDs, the calls can be made rapidly. Authenticated SMTP connector support addresses cannot be added through the API. Credentials must be added in Admin Center to create the necessary connection.