CRM actions allow communication between advanced AI agents and your CRM platform.
Add tag
Adds a tag to tickets for easier management.
The following example shows how to set the Add tag action at the AI agent level. In this case, the tag bot_reviewed set at the AI agent level applies to all tickets coming through the AI agent. If this is set at the intent level, it applies only to tickets that have triggered that intent, as opposed to all tickets.

The following example shows how to set the Add tag action at the content level. In this case, the tag payment_terms_change is added to all the messages that triggered the intent Changes to payment terms.

You can automatically update ticket forms by combining the Add tag action in the AI agents - Advanced dashboard and a trigger. Let's consider an example where all tickets for login issues are tagged and the ticket forms are updated.
To tag tickets for login issues and update the ticket forms
- In the AI agents - Advanced dashboard, set up an Add tag action at the intent
level to add a login_problem tag.
Make sure this action comes before all other actions

-
Create the trigger.
- Name the trigger to match the intent.
- Add a condition for tickets with the "login_problem" tag.
- Add an action to select the form you want to update.

Add internal note
Adds an internal note to keep your agents in sync. Internal notes are not visible to customers.

Get user info
Retrieves customer information in Zendesk. You can use this information to personalize your messages or to create reply variations. This action works with the Ticket Received event only.

The following user information can be retrieved:
- id
- name
- created_at
- locale
- locale_id
- organization_id
- phone
- shared_phone_number
- photo
- role
- time_zone
- updated_at
- url
- verified
- custom fields
email --> customerEmail; locale_id --> customerLocale_id.{{customerEmail}} .Get ticket info
Retrieves ticket information based on ticket fields. To retrieve a system field, use the
field name as key. To retrieve a custom field, add custom_fields as the
prefix followed by the custom field id.

Update ticket info
Updates ticket fields to streamline your processes. Set this at the intent/reply level as opposed to the AI agent level. This action works with Ticket Created and Ticket Received events only.
- Assignee ID
- Assignee email
- Group ID
- Type
- problem
- incident
- question
- task
- Priority
- urgent
- high
- normal
- low
- Status
- new
- open
- pending
- hold
- solved
- closedNote: When using the Update ticket Info action to change the status to solved or closed, all required fields must be completed.
Both system ticket fields and custom ticket fields can be selected in the dashboard directly once your AI agent is authorized.
You can also update a custom field by adding a custom ticket field, then selecting the field type you'd like to update and entering the value to be updated to the ticket. For drop-down fields, you need to add the "Field Value" tag to the "Value" field in the custom field action. Follow the steps below to update the field:
The following example updates the type, priority, status (all system fields), and phone number (a custom field) when a ticket is received. The system fields can be selected, but you need the custom ticket field ID to update the custom field. The value customerPhone needs to be added in entities so the AI agent recognizes it when a user enters their phone number.


The following example is useful for incident ticket management. When an incident occurs, any ticket coming in can be linked to the problem ticket. Solving that one problem ticket solves all the incident tickets linked to it. To set it add the Update ticket info action with the fields set as follows:
- Event: Ticket Received
- Action: Update Ticket Info
- Type: Incident
- Problem Ticket ID: <problem ticket ID>

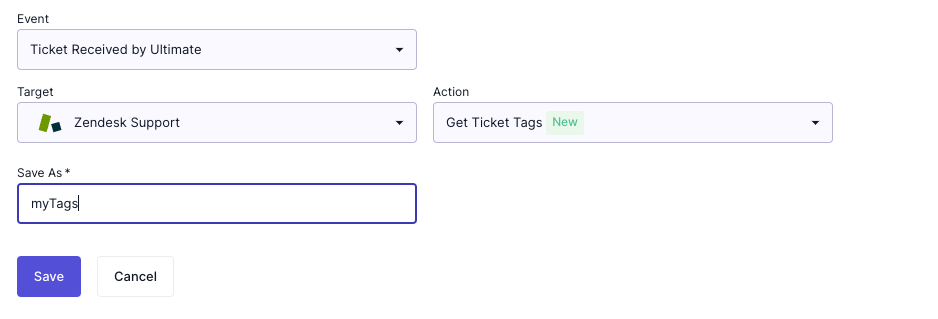
Get ticket tags
Gets the tags associated with the ticket and saves the tags in the session as a string, where each tag is separated by a comma. The action is available on the AI agent level for the event Ticket Received by Ultimate. It can also be configured on the intent, reply, and block level.
In the following example, the action gets the tags in the ticket and saves it under the
session parameter myTags, where the value is vip,premium. All the tags
fetched are saved under a string, where each tag is separated by a comma.
Merge tickets
Merges tickets that are from the same customer (that is, the same requester) in a short period of time to ensure your agents are aware of all the messages coming from that customer.
- Find tickets from the same customer email.
- Check the tags on the tickets and finds common tags.
- Merge the tickets "based on certain Zendesk tags" and "Zendesk tags to ignore" conditions set in the AI agents - Advanced dashboard into the oldest ticket found.
Mandatory fields are:
- Status
- New
- Open
- Pending
- On-hold
- Solved
- Number of days back (1 day is 24 hours)
- Requester (customerEmail)
- Tags
You can further customize this by specifying which existing ticket tags should be included or excluded when performing this action.
In the following example, consider you want to merge the newly created ticket with tickets that have the same email and are still open in the past 48 hours. Note that the value customerEmail under Requester is captured through the Get Customer Info action.

Example: Merge tickets based on ticket tags
- Ticket 1: refund, EN, bot_reviewed
- Ticket 2: package_location, EN, bot_reviewed
- Ticket 3: refund, FR, bot_reviewed
- Ticket 4: refund, FR
The AI agent looks at the tickets that have the tag refund (Ticket 1, 3 and 4), and merges Ticket 3 and 4 to the oldest ticket (Ticket 1). In this example, Ticket 2 remains untouched.
Example: Merge tickets based on ticket tags to ignore
In this example there are ticket tags to ignore. Keep in mind that after finding all the tickets from the same customer email, the AI agent looks for common tags and merges those tickets into the oldest ticket.
Consider the same four tickets from our previous example:
- Ticket 1: refund, EN, bot_reviewed
- Ticket 2: package_location, EN, bot_reviewed
- Ticket 3: refund, FR, bot_reviewed
- Ticket 4: refund, FR
- refund is on three tickets
- bot_reviewed is on three tickets
- EN is on two tickets
- FR is on two tickets
- package_location is on one tickets
- EN
- FR
- bot_reviewed
- refund is on three tickets
- package_location is on one tickets
From these two tags, the AI agent chooses the tag with the most tickets, which is the refund tag on three tickets. The AI agent next checks which of the three tickets with the tag refund is the oldest ticket. In this case Ticket 1 is the oldest, so Tickets 3 and 4 are merged into Ticket 1. Ticket 2 remains untouched.
Get organization info
- User belongs to only one organization: If the user belongs to Organization A only, the AI agent gets the info from Organization A.
- User belongs to multiple organizations and has a default oranization: If the user belongs to Organization A (default) and Organization B, but Organization B is at top of the list, the AI agent still gets the info from Organization A because it’s the user’s default organization.
- User belongs to multiple organizations with no default organization: If the user belongs to Organization A and Organization B, neither are the user's default organization, and Organization B is at top of the list, the AI agent gets the info from Organization B.
The action can be created at the AI agent, use case, and block levels. At the AI agent level, the action is available only on the event Ticket is received by Ultimate.
You can choose from a list of fields to fetch. The custom fields available to get are labeled as custom field. You can add more fields as needed.

Add macros
