This guide provides you with the instructions you need to configure and manage Agent Home to optimize how it works for your agents and your ticket workflows. This guide assumes you have Agent Home activated on your account.
This article contains these sections:
- About Agent Home interactions and deployment
- Interactions that admins can configure
- Interactions your agents can control
- Agent Home monitoring
Related articles:
About Agent Home interactions and deployment
- They use ticket priorities to focus their work
- They have a seamless way to view and manage their tickets
- They have a personalized tool to view and manage their SLAs.
- They have visibility into tickets and side-conversations they are following.
- They can prevent tickets from being lost or overlooked.
For more information about how Agent Home works for your agents, see Using Agent Home.
When your account is configured properly, Agent Home enables you to leverage your agents visibility into their own work assignment to help you manage workflow across all your tickets. With your agents and AI managing the front-line assignments, it frees you up to have a broader, high-level overview of how Zendesk is working for you.
Agent Home makes the most of Zendesk's routing and prioritization capabilities to help your agents focus on what matters most. By optimizing these capabilities, you can increase customer satisfaction and agent handle times.
Agent Home relies on tickets being assigned to agents so that the tickets show up on their dashboard. Ticket appearances on Agent Home are influenced by a variety of Zendesk features. Once you understand how these features interact, you can configure each feature as needed to make sure ticket assignment on Agent Home is optimized.
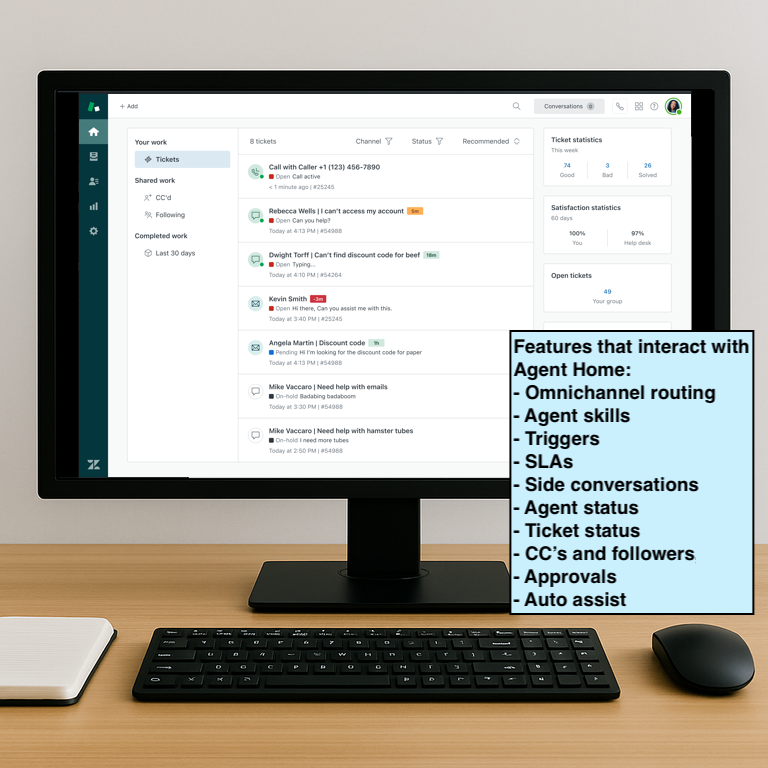
Interaction: Many features and configurations in your Zendesk account can influence which tickets appear on Agent Home for each agent.
Interactions that admins can configure
This section describes interactions that you, as an admin, can configure to make sure ticket assignment on Agent Home is optimized. See also Interactions your agents can control.
Using ticket triggers
If you aren't using omnichannel routing, the traditional flow of assigning tickets in Zendesk is based on triggers. Triggers are business rules you define that run immediately after a ticket is created or updated and automatically perform actions if specified conditions are met.

Interaction: Use triggers to automatically reply to customers and to assign tickets to agents.
For Email-based tickets, you can assign tickets to the first responding agent, or you can create triggers to assign to specific people. For example, all Return tickets go to Zachery. For Messaging tickets you have the benefit that they require someone to "take" the ticket to reply, so assignment is built-in.
Steps for deploying ticket triggers
If you’re not using omnichannel routing, make sure email tickets are automatically assigned to an agent. This topic contains some examples. Ticket triggers are available by default in all Suite plan types.
To automatically assign email tickets to the first agent that responds
- In Admin Center, click
 Objects and rules in the sidebar, then select Business rules >
Triggers.
Objects and rules in the sidebar, then select Business rules >
Triggers. - On the triggers page, click the Ticket tab.
- Click Create trigger.
- Enter a Name and Description for your trigger.
- Select, or create, a Trigger category for your trigger.
- Set the following for Meet all of
the following conditions:
- Object | Ticket | Channel is Email
- Object | Ticket | Ticket is Updated
- Object | Ticket | Assignee is -
- Object Ticket | Comment is present, and requester can see the comment
- Set the following action for the
trigger:
- Object | Ticket | Assignee | Object | Ticket | (current user)
- Click Create trigger.
In this example, any ticket sent from an email channel will be assigned automatically to the first agent that adds a public reply or internal note to the ticket.
To automatically assign tickets to a specific person
- In Admin Center, click
Objects and rules in the sidebar, then select Business rules >
Triggers.
- On the triggers page, click the Ticket tab.
- Click Create trigger.
- Enter a Name and Description for your trigger.
- Select, or create, a Trigger category for your trigger.
- Set the following for Meet all of
the following conditions:
- Object | Ticket | Channel is Email
- Object | Ticket | Status is New
- Object | Ticket | Subject text > Contains at least one of the following words: return returns refund
- Set the following Action for
the trigger.
-
Object | Ticket | Assignee | Ticket | David Chan
-
- Click Create trigger.
In this example, any ticket sent from an Email channel that contains the words return, returns, or refund will be assigned automatically to David Chan.
Using omnichannel and skill-based routing
The recommended option to assign tickets to agents is to use omnichannel and skill-based routing in your instance. Omnichannel routing automates ticket assignment based on the availability and skill of agents and the priority of tickets. This ensures you will have the best available agent working a ticket at any given time.
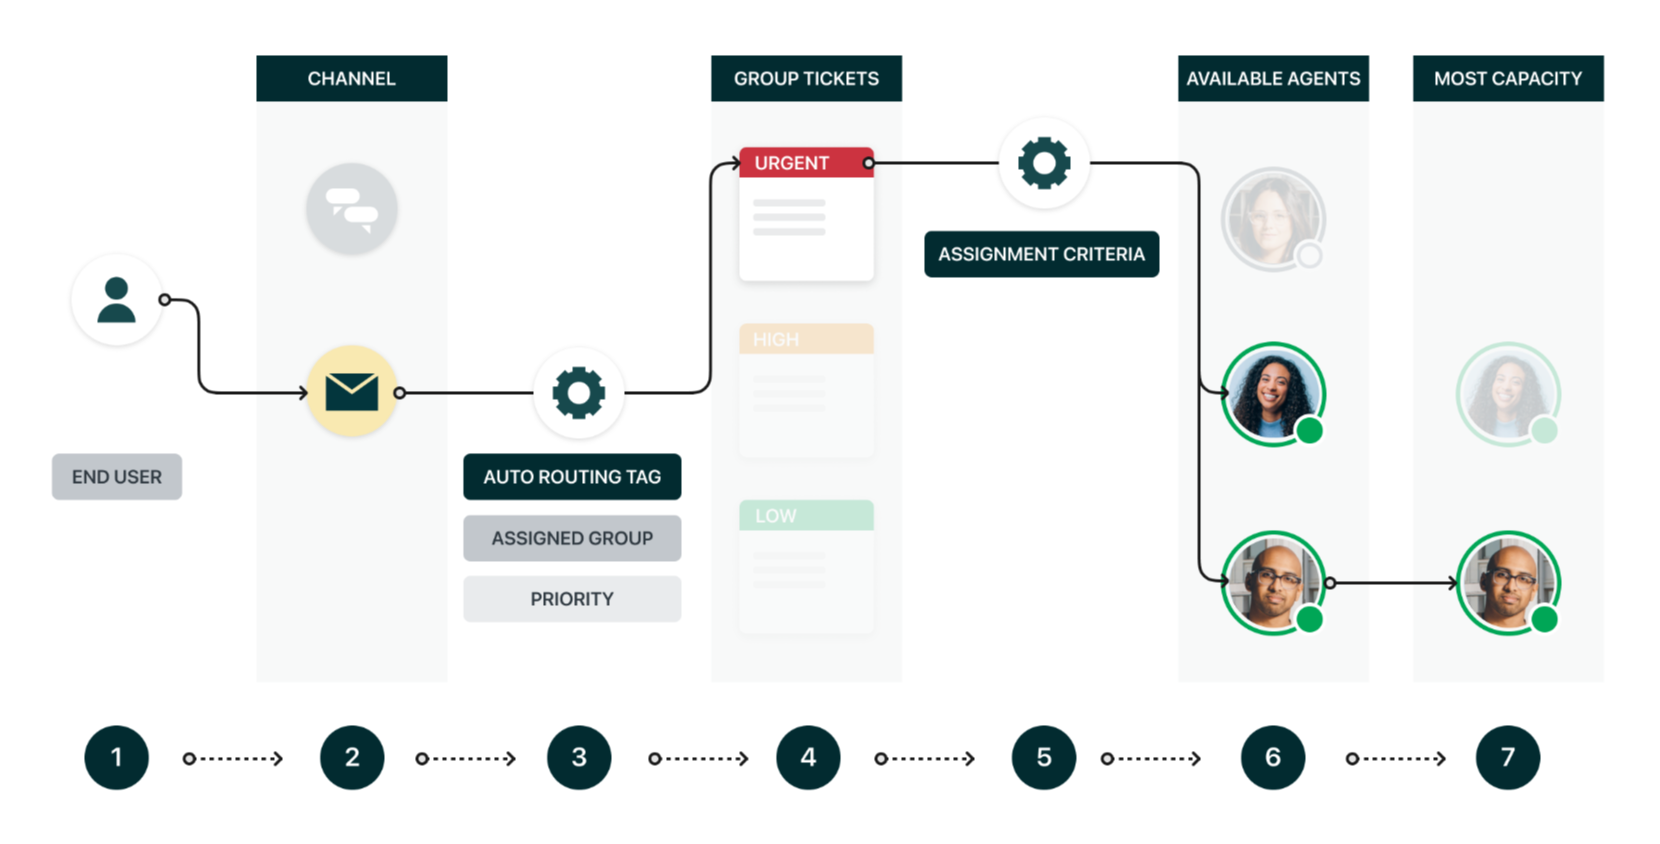
Interaction: Configure omnichannel routing to ensure all tickets to get to Agent Home for the right agent at the right time.
Each ticket gets a routing tag via triggers, then Zendesk automatically routes the ticket to the best person available to handle the ticket. Omnichannel and skills-based routing requires some set up, but it leverages Zendesk’s most advanced features to make sure tickets are handled correctly.
When you set up omnichannel routing, make sure to look at the reassignment and idle timeout settings. This will reassign tickets to other agents if an agent goes offline.
Steps for deploying omnichannel routing (OCR)
Omnichannel routing automatically assigns tickets to available agents based on their capacity and skills. It helps distribute work evenly across your team and ensures tickets reach the right agents.
To turn on omnichannel routing
For most accounts omnichannel routing is automatically turned on. Use this procedure to make sure it's activated in your account.
- In Admin Center, click
Objects and rules in the sidebar, then select Omnichannel routing > Routing
configuration.
- Click Manage settings.
- Make sure Turn on omnichannel routing is selected.
- Click Save.
To set agent capacity limits
Capacity rules define how many tickets each agent can handle simultaneously.
- In Admin Center, click
Objects and rules in the sidebar, then select Omnichannel routing > Routing
configuration.
- Click Capacity rules.
- Click Add capacity rule.
- Enter a Name and
Description for the rule.
For example, you might create separate capacity rules for new hires and another set of capacity rules for members of a senior triage team.
- Click Add assignees to specify which groups or team members should be covered by this capacity rule.
- Enter a limit to the number of Email, Messaging, and Talk conversations that can be auto assigned at any given time.
- Click Save.
To configure reassignment timeouts
Timeouts control when tickets should be reassigned if agents don’t respond.
- In Admin Center, click
Objects and rules in the sidebar, then select Omnichannel routing > Routing
configuration.
- In the Initial routing configuration, click Edit.
- In Messaging routing, select Reassign if an agent doesn’t accept within the time limit.
- Enter a time limit in seconds.
- In Talk routing, select Reassign if an agent doesn’t accept within the time limit.
- Enter a time limit in seconds.
To configure routing tags for email tickets
Email tickets must have a unique routing tag to be routed through the standard omnichannel routing queue. Talk and messaging tickets are routed automatically.
- In Admin Center, click
Objects and rules in the sidebar, then select Omnichannel routing > Routing
configuration.
- Click Manage settings.
- In Routing email tickets, enter
an Auto-routing tag for email tickets.
You can use the default tag or enter one of your own.
- Click Save.
To configure custom agent statuses (optional)
Unified agent statuses provide a way for agents to control availability for email, voice, and messaging from a single menu. In addition to the standard unified agent statuses available on all plans, admins on Professional plans and above can also define custom unified agent statuses to suit their workflows. See Creating custom unified agent statuses.
To configure routing skills (optional)
Skills let you match tickets to agents with specific expertise. You can create skill types and assign them to both agents and tickets. Skills are most valuable when you have specialized teams or complex support needs. See About using skills to route tickets.
Using agent statuses
Unified agent status allows agents to control availability for email, voice, and messaging from a single menu. There are four standard agent statuses: online, away, transfers only, and offline.
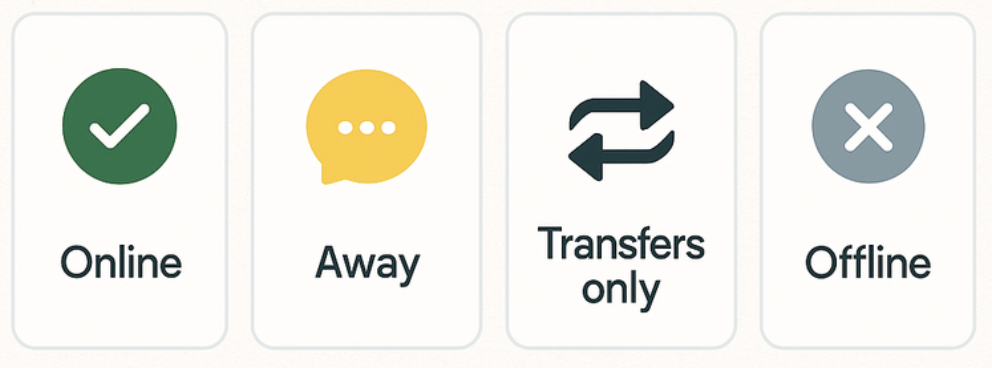
Interaction: Setting the proper agent status helps to route tickets to Agent Home for an available agent.
When you configure omnichannel and skill-based routing, or when you have messaging tickets, it's important to show your agents how to use the agent status feature. When an agent is online they can get tickets assigned. For messaging conversations, new and active conversations will appear on top of the Agent Home ticket list for your agents.
If your account supports custom unified statuses, consider adding an “Email only” status for agents who work on tickets that typically don’t require time intensive interactions and an "Interactive conversations only" status for messaging-first agents who work on quick, interactive conversations. See Using omnichannel and skill-based routing for details.
Reopening side conversations
Side conversations are areas of a ticket where agents can have a targeted conversation with a specific group of people or discuss a specific area of concern without including this information in the main ticket conversation. Side conversations help to compartmentalize information in a ticket. You need a Customer Services Suite Professional plan or above, an Employee Services Growth plan or above, or the Collaboration add-on to use side conversations.
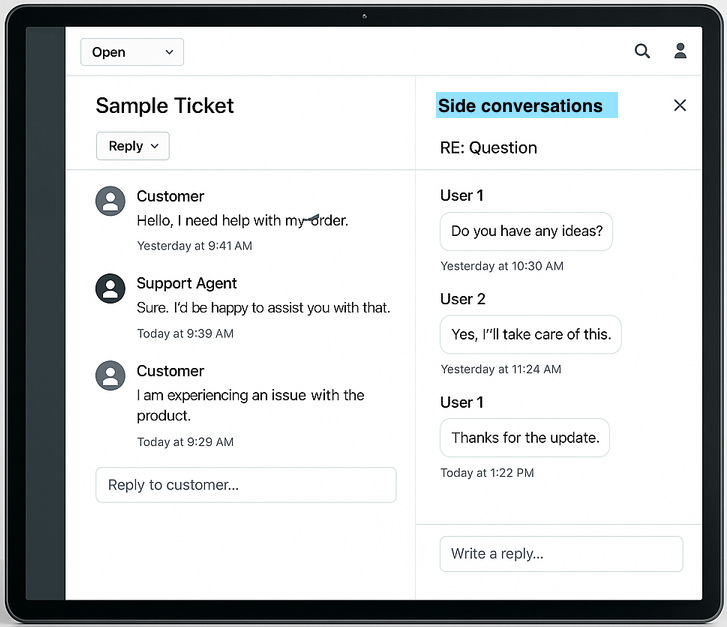
Interaction: Use triggers to track replies to side conversations on Agent Home.
By default, side conversations that get a reply do not re-open their parent ticket, and they stay in their respective status. You can use triggers to set the status to Open and resurface those tickets in Agent Home once they get a reply.
Similarly, remind your agents to put these tickets back On-hold after they reply. This keeps them out of sight until they get another reply.
Steps for deploying side conversations
After you activate side conversations, you can create trigger conditions for side conversations so that assignees know when a side conversation is replied to. This condition applies to the parent ticket that contains the side conversation. Without this condition, the agent assigned to the parent ticket (who, ideally, is also the creator of the side conversation) may have a hard time knowing what’s going on with a particular issue.
To activate side conversations in your account
- In Admin Center, click
 Workspaces in the sidebar, then select Agent tools > Side
conversations.
Workspaces in the sidebar, then select Agent tools > Side
conversations. - Select Turn on emails outside the main conversation.
- Click Save.
To reopen the parent ticket
- In Admin Center, click
Objects and rules in the sidebar, then select Business rules >
Triggers.
- On the triggers page, click the Ticket tab.
- Click Create trigger.
- Enter a Name for your trigger.
- Enter a Description for your trigger.
- Select, or create, a Trigger category for your trigger.
- Set the following for Meet all of
the following conditions:
- Ticket | Side conversation | is | Replied to.
- Set the following Action for
the trigger:
- Ticket | Status category | Open.
- Click Create trigger.
Using Service Level Agreements (SLAs)
A service level agreement, or SLA policy, is an agreed upon measure of the response and resolution times that your support team delivers to your customers. Agent Home helps your agents track and manage tickets that have SLA targets. Agent Home can provide agents with visibility into pending SLA breach times and provide suggestions on which tickets to address first to prevent a breach.
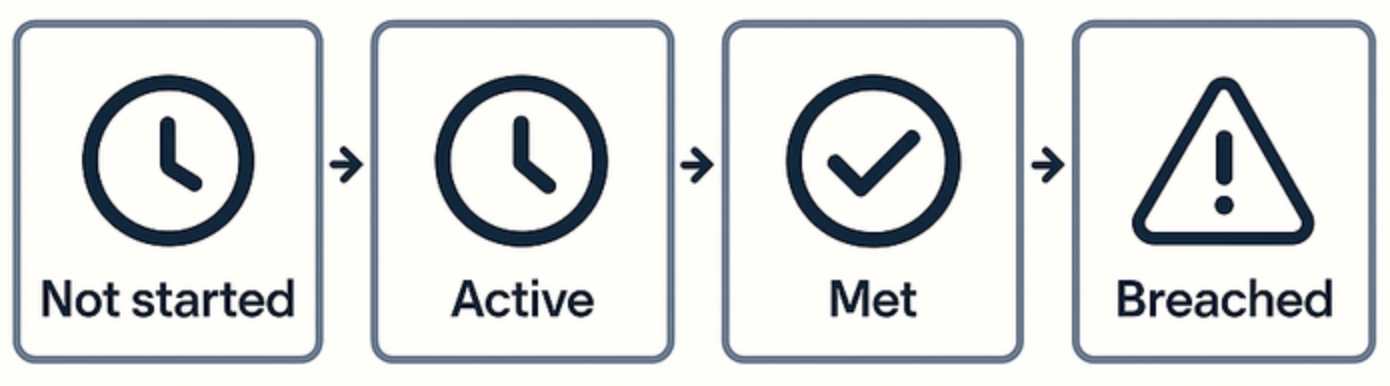
Interaction: Configure SLAs targets to show agents their most-relevant tickets on Agent Home.
A good configuration suggestion for setting up SLAs includes the following:
- Create triggers for the following
conditions:
- If the ticket type isn't set, set the type to Question.
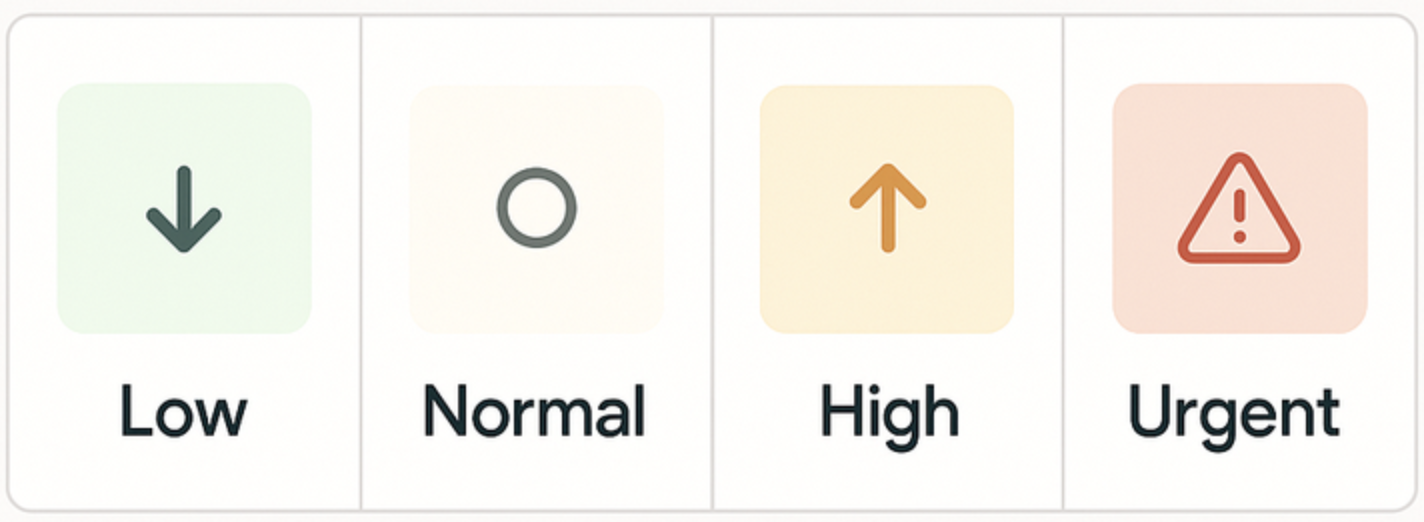
- If the ticket priority isn't set, set the priority to Normal.
- Enterprise plans only) If the ticket schedule isn't set, select a schedule.
When set, you can configure SLAs to add time-based rules to your tickets. We recommend setting SLAs for First reply time and Next reply time based on ticket priority and Hours of operation.
When activated, the tickets in Agent Home are sorted based on the SLA times. The tickets that meet the nearest reply time breach, will be offered first regardless of the ticket priority.
SLAs can make sure that an urgent ticket created this morning is on top of the list, but an older, low priority ticket from two days ago might need to be handled first if the more-recent high priority ticket still has a few hours to spare. This will happen when the low priority ticket has a shorter time to SLA breach.
Agent Home sees and uses these SLA reply time requirements by default. After these SLAs are set, agents can work on a mix of tickets and they will be better able to use SLAs to give a timely response to all ticket types, instead of always handling the most urgent or the most recent.
Steps for deploying SLAs
To configure SLAs to work well with Agent Home, first configure triggers to make sure all the correct information is available in the tickets to work with the SLAs.
To configure triggers for the SLAs
First trigger
- In Admin Center, click
Objects and rules in the sidebar, then select Business rules >
Triggers.
- On the triggers page, click the Ticket tab.
- Click Create trigger.
- Enter a Name for your trigger.
- Enter a Description for your trigger.
- Select, or create, a Trigger category for your trigger.
- Set the following for Meet all of
the following conditions:
Ticket | Type | Is | -
- Set the following Action for
the trigger:
Ticket | Type | Question
- Click Create trigger.
Second trigger
- In Admin Center, click
Objects and rules in the sidebar, then select Business rules >
Triggers.
- On the triggers page, click the Ticket tab.
- Click Create trigger.
- Enter a Name for your trigger.
- Enter a Description for your trigger.
- Select, or create, a Trigger category for your trigger.
- Set the following for Meet all of
the following conditions:
Ticket | Priority | Is | -
- Set the following Action for
the trigger:
Ticket | Priority | Normal
- Click Create trigger.
Third trigger (Enterprise only)
- In Admin Center, click
Objects and rules in the sidebar, then select Business rules >
Triggers.
- On the triggers page, click the Ticket tab.
- Click Create trigger.
- Enter a Name for your trigger.
- Enter a Description for your trigger.
- Select, or create, a Trigger category for your trigger.
- Set the following for Meet all of
the following conditions:
Ticket | Schedule | is | (blank)
- Set the following Action for
the trigger:
Ticket | Set schedule | Schedule name
- Click Create trigger.
Once the triggers are set, you can configure SLAs to add time-based rules to your tickets. For simple SLAs, we recommend setting SLA targets for:
- First reply time: The time between the first customer comment and the first public comment from an agent.
- Next reply time: The time between the oldest, unanswered customer comment and the next public comment from an agent.
To configure an SLA policy for email tickets
In this example, you’ll configure first and next reply times for email tickets. You can use your own values for the target times.
- In Admin Center, click
Objects and rules in the sidebar, then select Business rules > Service level
agreements.
- Click Create policy.
- Enter a Policy name and Description for your SLA.
- Click Next.
- Set the following for Meet all of
the following conditions:
Ticket | Channel | is | Email
- Click Next.
- Add targets for Reply metrics.
- Click Add target > First reply time.
- Enter a first reply time target for
each ticket priority.
For example:
- Urgent | 30 | Minutes
- High | 2 | Hours
- Normal | 8 | Hours
- Low | 24 | Hours
- (Enterprise only) Select calendar or business hours for the Hours of operation.
- Click Add.
- Click Add target > Next reply time.
- Enter a next reply time target for
each ticket priority.
For example:
- Urgent | 1 | Hours
- High | 4 | Hours
- Normal | 24 | Hours
- Low | 48 | Hours
- (Enterprise only) Select calendar or business hours for the Hours of operation.
- Click Add.
- Click Save policy.
Depending on your account, you might have stricter SLA reply times for messaging tickets.
To configure an SLA policy for messaging tickets
In this example, you’ll configure first and next reply times for messaging tickets. You can use your own values for the target times.
- In Admin Center, click
Objects and rules in the sidebar, then select Business rules > Service level
agreements.
- Click Create policy.
- Enter a Policy name and Description for your SLA.
- Click Next.
- Set the following for Meet all of
the following conditions:
Ticket | Channel | is | Messaging
- Click Next.
- Add targets for Reply metrics.
- Click Add target > First reply time.
- Enter a first reply time target for
each ticket priority.
For example:
- Urgent | 30 Seconds
- High | 2 | Minutes
- Normal | 10 | Minutes
- Low | 2 | Hours
- (Enterprise only) Select calendar or business hours for the Hours of operation.
- Click Add.
- Click Add target > Next reply time.
- Enter a next reply time target for
each ticket priority.
For example:
- Urgent | 1 | Hours
- High | 4 | Hours
- Normal | 24 | Hours
- Low | 48 | Hours
- (Enterprise only) Select calendar or business hours for the Hours of operation.
- Click Add.
- Click Save policy.
Using triggers to fine-tune priorities
Even though the basic three triggers in the SLA configuration make SLAs work for all tickets, you should also set up a series of triggers to raise or lower the priority of specific tickets to influence their sorting in Agent Home. For example, you could set the priority of tickets of VIP users tagged to High.
Interaction: Use triggers to give important tickets a High or Urgent priority and increase visibility on Agent Home.
By adjusting priorities this way, you can use a single SLA policy and still fine-tune the sorting in Agent Home by shifting priorities with triggers.
Steps for deploying triggers to fine-tune priorities
Now that you have the basic triggers and SLA policies set, you can add additional triggers, if needed, to tweak the results and make sure important tickets have maximum visibility on Agent Home and are automatically assigned the best SLA targets.
To elevate the priority of tickets from VIP users
- In Admin Center, click
Objects and rules in the sidebar, then select Business rules >
Triggers.
- On the triggers page, click the Ticket tab.
- Click Create trigger.
- Enter a Name and Description for your trigger.
- Select, or create, a Trigger category for your trigger.
- Set the following for Meet all of
the following conditions:
Organization | Organization | Is | <company_name>
- Set the following Action for
the trigger:
Ticket > Priority | Is | High
- Click Create trigger.
In this example, any ticket from the organization you specify is automatically set to have a high priority and assigned the shortest SLA target times.
Using the Copilot add-on for intelligent triage and auto assist (optional)
As part of Zendesk’s AI capabilities, intelligent triage in Zendesk Copilot analyzes the topic, language, and sentiment For incoming tickets, and then automatically tags, categorizes, and routes them to the best-suited agent or group based on predefined skills and workload. This drastically reduces manual sorting and speeds up resolutions.
Additionally, auto assist in Zendesk Copilot is an AI-powered assistant that understands the contents of submitted tickets and suggests how to solve them. To help agents prioritize their work, the ticket list on Agent Home indicates which tickets have auto assist suggestions, so agents can quickly see which tickets they can open and potentially solve using auto assist. See Using Agent Home with auto assist.
Introduction to deploying Copilot for intelligent triage (optional)
When Copilot is configured, tickets can be routed to the right home page for the right agent and provide that agent with powerful information to help them solve the tickets quickly.
To configure Zendesk Copilot, do the following:
- Configure topics to analyze incoming tickets and route them to the best-suited agents.
- Add entities to define and automatically classify unique information in tickets and messaging conversations, then use that information to automatically route tickets.
- Set up auto assist to understand the content of submitted tickets and make suggestions to your agents on how to solve them.
Steps for deploying topics
Topics classify what a ticket is about. You can use the topics that appear in tickets to automate your workflows.
To set up the channels for topic classification
You can decide which ticket channels include topic classification.
- In Admin Center, click
 AI in the sidebar, then select Intelligent triage > Topic.
 - Click Manage settings.
- For topic classification, check the
Channels to make sure the channels you use
are listed.
Some channels are added by default, so you may not need to add any more.
- Add new channels if needed.
- Click Save.
To create ticket triggers based on topic
- In Admin Center, click
Objects and rules in the sidebar, then select Business rules >
Triggers.
- On the Triggers page, click the Ticket tab.
- Click Create trigger.
- Enter a Name and Description for your trigger.
- Select, or create, a Category for your trigger.
- In trigger Conditions, add the
topic you want to use as part of the trigger
condition.
For example:
Topic | Is | Account::Account activation::Add new user
- In trigger Actions, click
Add actions to add the actions you want to
perform when the condition is met.
For example:
Ticket | Group | Account services
- Click Create trigger.
Steps for deploying entities
Entities allow you to define and automatically classify unique information in tickets. You can then use that information to power automated workflows and reports.
To create an entity
An existing custom ticket field represents the piece of information you care about. This information is an entity. The values in the custom ticket field represent details about the entity.
- In Admin Center, click
AI in the sidebar, then select Intelligent triage > Entity.
- Click Create entity.
- Under Select field type, click either Drop-down, Multi-select, or Regex.
- Under Select custom field, select a custom field.
- Click Create entity.
When the entity is classified in tickets, the associated custom ticket field is populated or updated. You can use the associated custom ticket field's tag and value in triggers, automations, and reporting.
To create workflows based on entities
You can use ticket triggers and other business rules to automate workflows based on entities classified in tickets.
- In Admin Center, click
Objects and rules in the sidebar, then select Business rules >
Triggers.
- On the Triggers page, click the Ticket tab.
- Click Create trigger.
- Enter a Name and Description for your trigger.
- Select, or create, a Category for your trigger.
- In trigger Conditions, add the
entity you want to use as part of the trigger
condition.
For example:
Ticket | Tags | Contains at least one of... | Product_Web_Software
- In trigger Actions, add the
actions you want to perform when the condition
applies.
For example:
Ticket | Group | Product Team A
- Click Create trigger.
Steps for deploying auto-assist
Auto assist understands the content of submitted tickets and makes suggestions to your agents on how to solve them. Agents spend less time on repetitive tickets, solve tickets in a more consistent way, and ultimately close more tickets.
To activate auto assist
- In Admin Center, click
AI in the sidebar, then select Agent copilot > Auto assist.
- Select Show auto assist replies and actions in the agent composer.
- In the Who has access field, add the groups that should be able to use the suggested replies feature.
- Click Save.
To write a procedure
To identify a specific problem where you would like auto assist to suggest replies and write a procedure for it. Procedures are the instructions that auto assist follows when suggesting replies or actions to an agent in a ticket.
- In Knowledge admin, click Manage articles
(
 ) in the sidebar.
 - Select Procedures, then click Create procedure.
- In the Name field, enter a descriptive name for the procedure.
- Click below the Name field and enter
the content for your procedure.
To add specific actions to your procedure, click the Insert action (+) button in the toolbar.
- To publish your procedure, click the drop-down arrow next to Save draft and select Publish.
- In the window that appears, click
Publish.
Published procedures are automatically available for auto assist to use.
To add ticket tags for procedures
For auto assist to work, each ticket needs to have an “agent_copilot_enabled” tag. After writing a procedure for how to handle tickets with a specific topic, use triggers to add the copilot tag to tickets with that specific topic.
- In Admin Center, click
Objects and rules in the sidebar, then select Business rules >
Triggers.
- On the Triggers page, click the Ticket tab.
- Click Create trigger.
- Enter a Name and Description for your trigger.
- Select, or create, a Category for your trigger.
- In trigger Conditions, under
Meet ALL of the following conditions, add
the following conditions:
- Ticket | Status | Is | New
- Ticket | Tags | Contains none of the following | agent_copilot_enabled
This prevents the ticket tag from being added twice.
- In trigger Conditions, under
Meet ANY of the following conditions, add
conditions such as which channels or topics you
want the tag to be added to. For example:
Ticket > Channel | Is | <the channel you want the trigger to work on>
Ticket > Topic | Is | <a topic you have created a procedure for>
- In trigger Actions, add the
following action:
Ticket | Add tags | agent_copilot_enabled
- Click Create trigger.
Using approval requests to manage agent workflows
Approvals are requests that agents make on behalf of other agents and end users. Agents send requests to approvers. Approvers are other agents or end users who have the authority to review the request information and make a decision. Approvers might receive approval requests for various things, such as processing refunds or software access. Pending approval requests prevent tickets from being closed. You need a Customer Services Suite Professional plan or above or an Employee Services Growth plan or above to use approval requests.
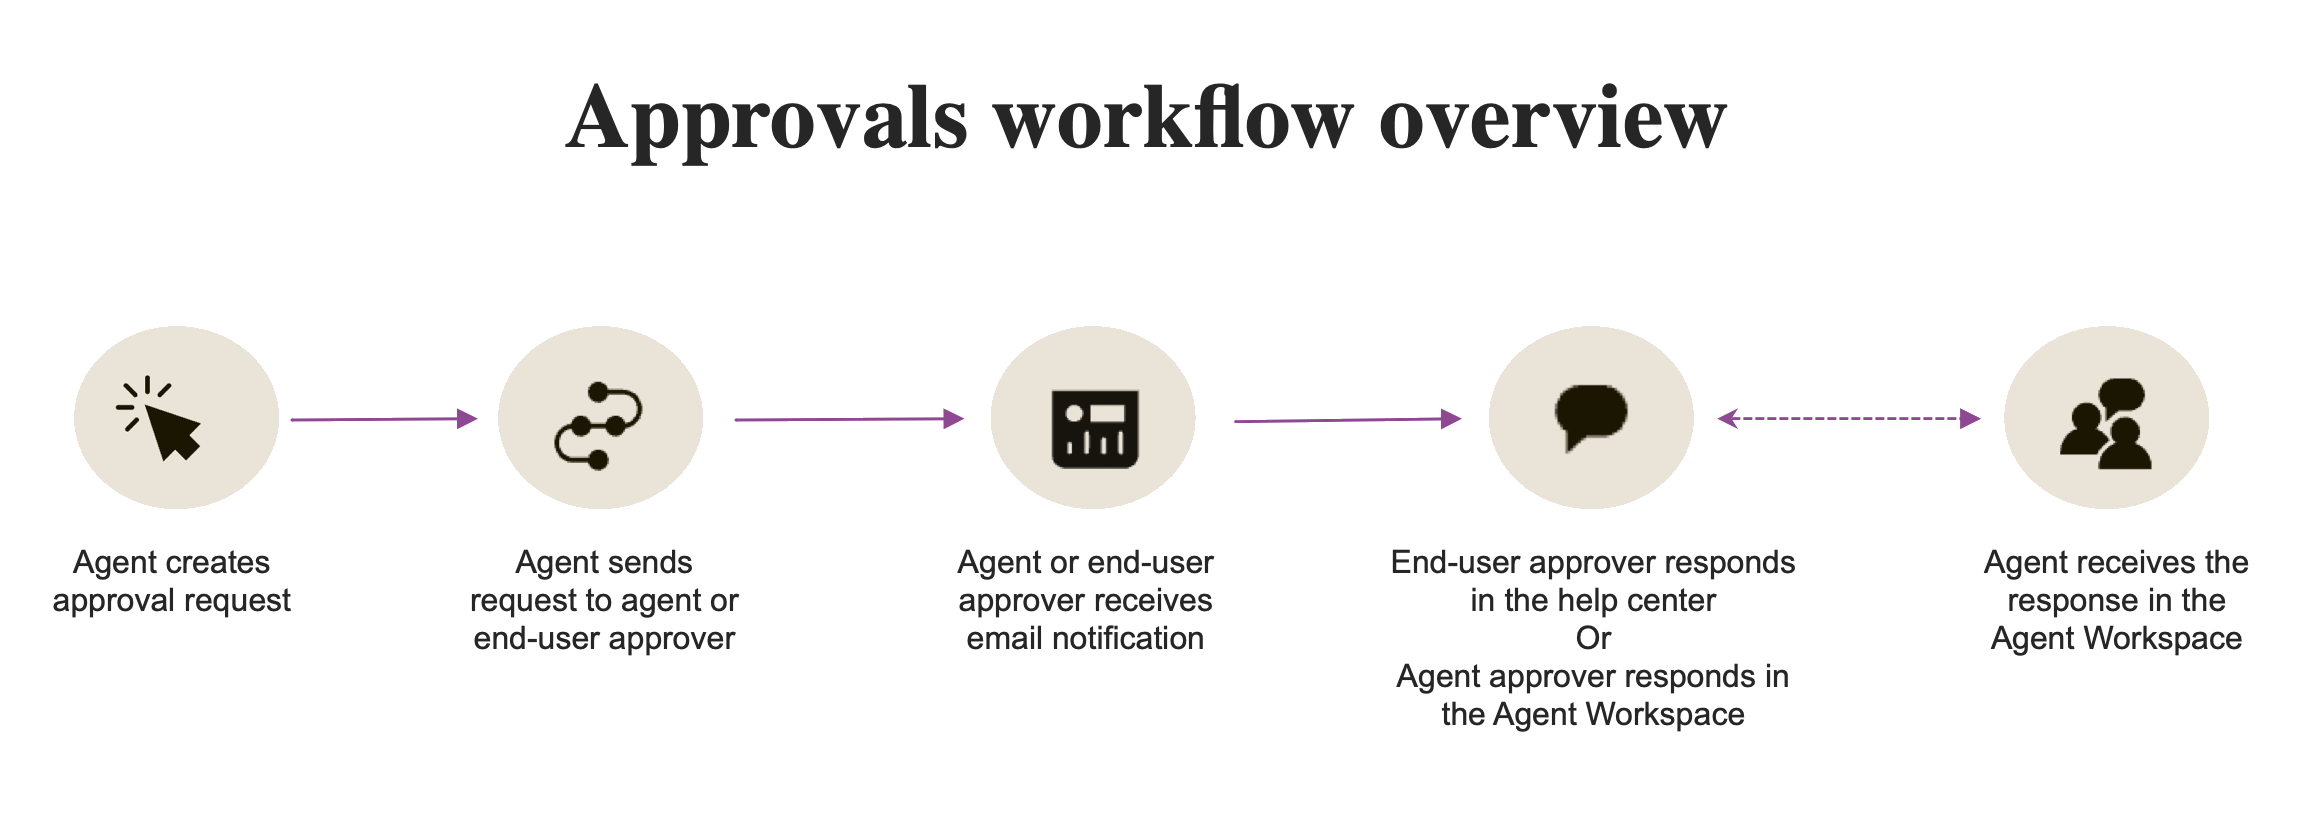
Interaction: Approvals appear automatically on Agent Home for the approving agent.
Approval requests are sent automatically to Agent Home. Agents can use Agent Home to view and manage approval requests awaiting their response. See Viewing approval requests. Agents can quickly work through their approvals from a single location.
Some examples of how you may want to use approvals include:
- Software and hardware procurement and access
- Employee promotions or job changes
- Long-term leave requests
- Payroll issues
- Refunds
Steps for deploying approval requests
Approvals are turned on in Admin Center by an admin, then agents can use the context panel in their tickets to view and create approval requests.
To turn on approval requests
- In Admin Center, click
Workspaces in the sidebar, then select Agent tools > Approval
requests.
- Select Allow creation of approval requests.
- Click Save.
To prepare tickets for approval requests
For approvals to work properly, add the "Approval status" field to your ticket forms. This field automatically tracks whether a ticket has a pending, approved, or denied approval request.
If you have only one ticket form, the "Approval status" field is added automatically and you can skip this task.
- In Admin Center, click
Objects and rules in the sidebar, then select Tickets > Forms.
- Select a ticket form to open it.
- In Available ticket fields, click Approval status to add that field to the form.
- Click Save.
Continue to add the Approval status to any ticket form you plan to use for approval requests.
To create an approval request
- In a ticket, click the Approval
request icon (
) in the context panel.
- In the Approver menu, select a group of agents or an individual who will approve the request.
- Enter a Subject and
Description for the approval request.
The description should include any relevant details the approver needs to make a decision.
- Click Send approval
request.
Agents assigned to the approval request will see the request in Agent Home, where they can open the request and Approve the request or Deny the request. They can also respond to the request with a comment before approving or denying it.
Responses to approval requests are stored as part of the ticket so you have a permanent record.
Interactions your agents can control
This section describes interactions that your agents can control to make sure ticket assignment on Agent Home is optimized. See also Interactions that admins can configure.
Keeping conversations in Zendesk
The more conversations that happen in Zendesk as email tickets, side conversations, or messages, the more relevant Agent Home becomes.
So instead of using Slack or Outlook to send out an email, your agents should @mention a colleague or use side conversations over Slack and Email to reach out. This way, if people reply, the work will show up in Agent Home.
Similarly, instead of getting IT requests over email from a colleague in an Employee environment, make sure all those requests are forwarded to Zendesk so an agent’s ticket queue reflects all their actual work.
Using the right ticket status
A ticket's lifetime is based on its status. A ticket moved from New to Open, can be set aside as Pending or On-hold, and hopefully becomes Solved quickly. Tickets can flow between statuses and can go from Pending to Open, and vice versa.
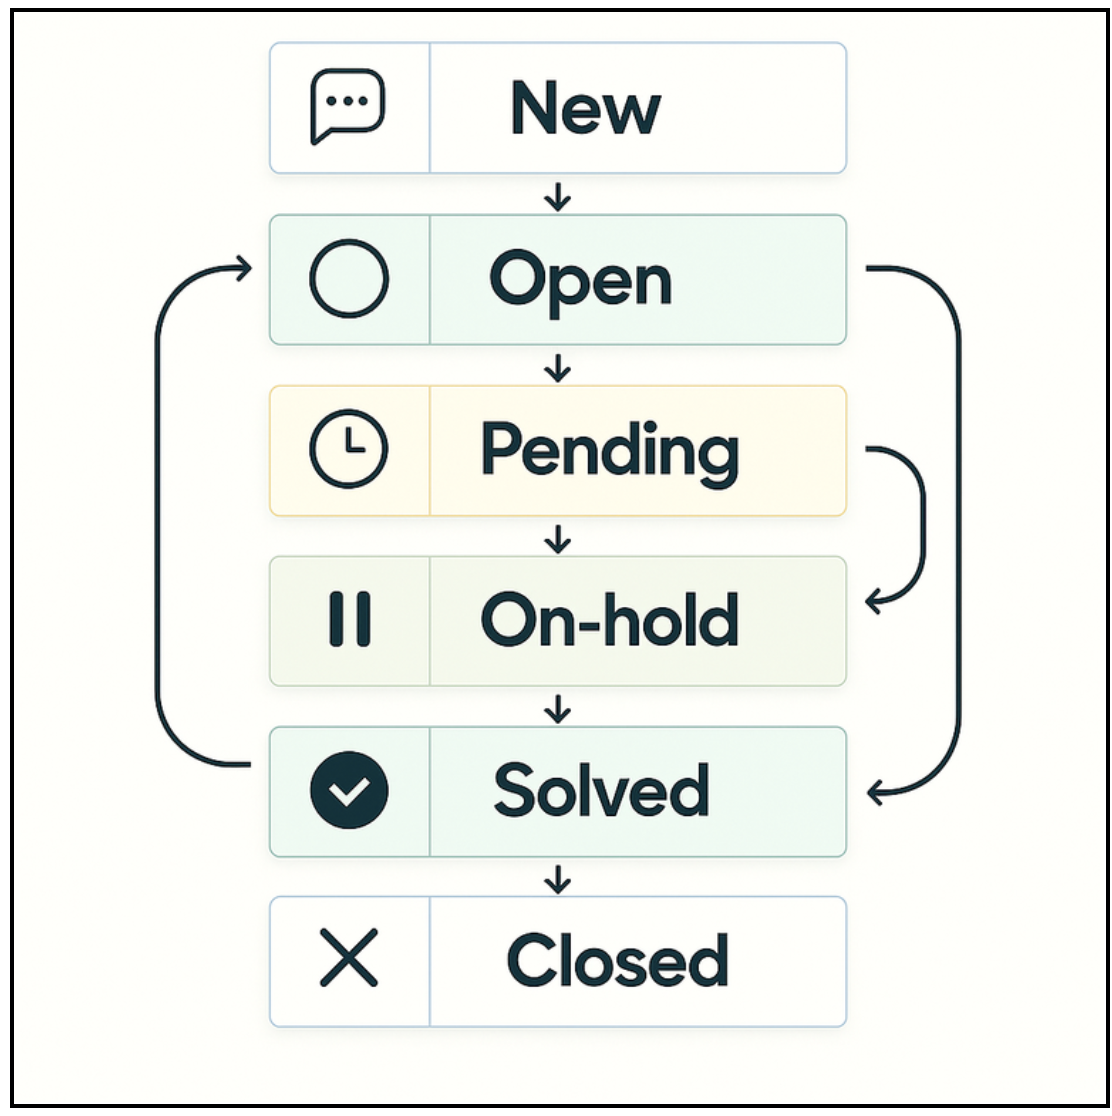
Interaction: After an agent replies to a ticket, they can change the ticket status to Pending, On-hold, or Solved to remove them from Agent Home.
The tickets that show up in Agent Home are almost always Open tickets or tickets where the agent was mentioned. To keep Agent Home clean for all your agents, remind your agents to move tickets they have handled to a status other than Open after they have replied to them.
Similarly, if an agent @mentioned a colleague and needs a reply, they should put the ticket On-hold. Make sure your agents put all tickets that require customer action to Pending.
With these suggestions, Agent Home will contain real actionable tickets only, automatically giving your agent a built-in list of tickets and priorities
Using followers and @mentions
Agents can add CCs and followers to tickets. Followers allow agents to include additional internal users (agents or administrators) on ticket notifications. They might do this if they want someone else to be aware of a ticket or provide some feedback on it.
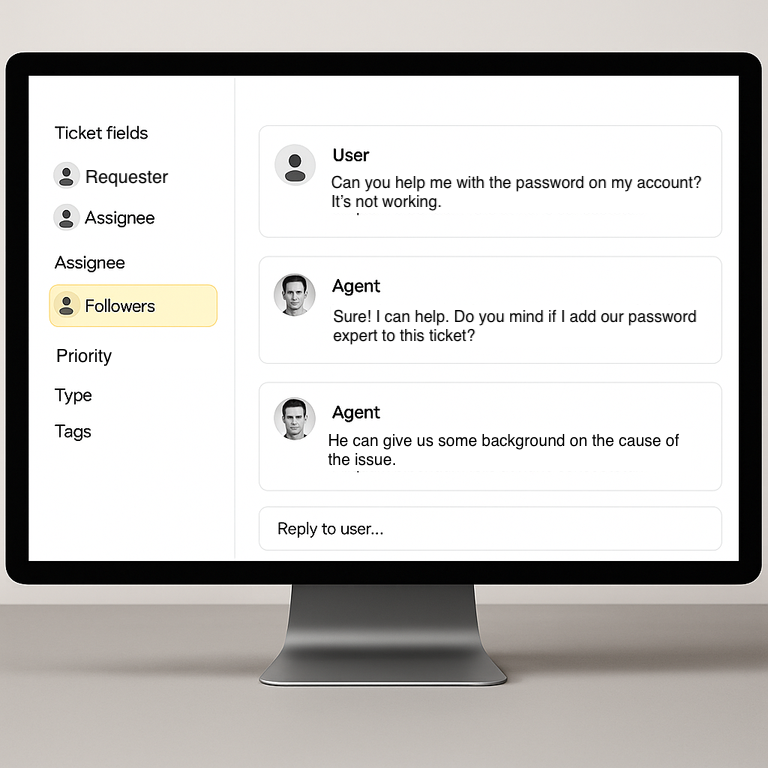
Interaction: Agents can use Agent Home to track tickets that list them as Followers.
Agent Home has a dedicated section for following tickets. This section contains all tickets where the agent has been added as a CC or follower.
Before Agent Home, an agent would often reassign a ticket to another agent whose attention was required so it would show up in their Action Needed view. Now with Agent Home as a dedicated spot for followed tickets, you can encourage your agents to add other agents as followers instead of reassigning the ticket. This gives the follower agents visibility into the ticket without cluttering their inbox.
Similarly, any @mention agents add to an internal note also appears on Agent Home for the mentioned agent.
Unfollowing tickets
Interaction: To clear up Agent Home, agents can unfollow tickets that are no longer relevant.
Similar to how assigning tickets and adding agents as followers make tickets appear in their Agent Home, it's best practice for agents to remove themselves as a follower from those tickets that no longer require their attention.
This keeps the agent’s Following list as short as possible and only those tickets that need attention stay in their queue. The list won't be cluttered with updates to tickets the agent no longer needs to see.
Also, it’s a good idea to encourage your agents to remove followers from a ticket after the follower has addressed the issue.
Agent Home monitoring
To help admins monitor the effectiveness of Agent Home, Zendesk includes built-in, real-time monitoring dashboards. You can use these dashboards to monitor agent performance before and after you configure your account and train your agents to optimize Agent Home.
These dashboards help you see short‑term trends, spot issues quickly, and act with confidence. They include information on:
- Incoming tickets: Recent history metrics to monitor omnichannel routing queue performance over time and spot trends.
- Agent productivity: Recent history metrics to track agent performance over time, plus a leaderboard view highlighting your best performing agents.
- SLA Live Reporting: Ticket‑level SLA target statuses are visible in all ticket tables, so you can quickly find breached tickets and take action to bring them toward resolution.
To view the real-time monitoring home page
- In Analytics,
click
 Real-time monitoring in the sidebar.
The real-time monitoring home page appears.
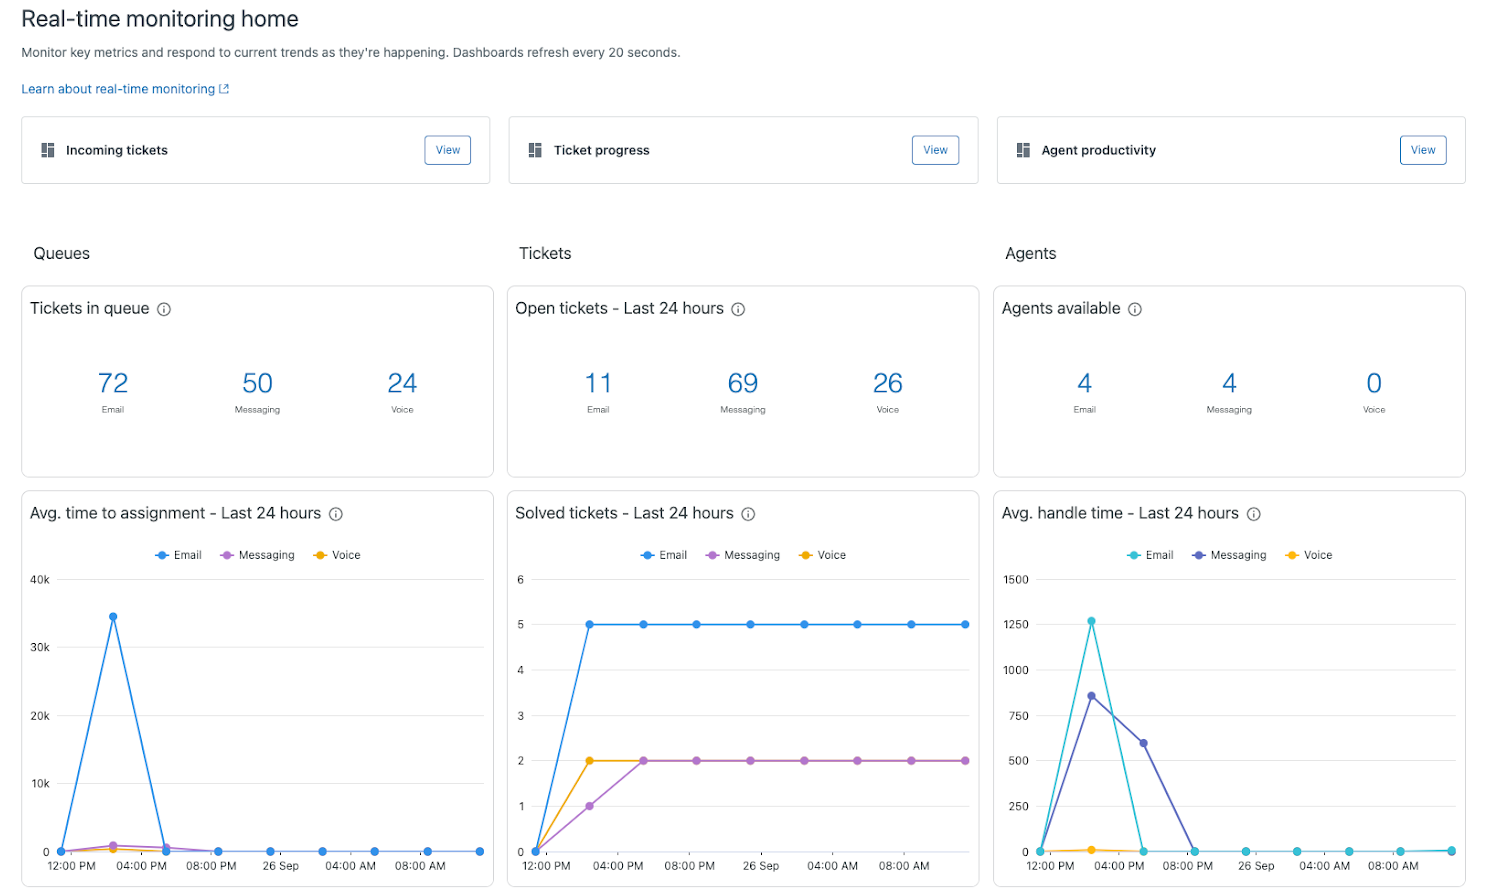
Some items to look for on the dashboards include:
- Customer wait times on the Ticket progress dashboard. You should see reductions in the average full resolution times.
- Average agent first reply time on the Agent productivity > Agent efficiency dashboard. You should see reductions in the average agent reply times.
- SLA status on the Ticket status dashboard. You should see fewer SLAs breached over time.
To learn more about using the real-time monitoring dashboards, see About real-time monitoring dashboards.