Verified AI summary ◀▼
Customize your email notifications using HTML and CSS to enhance brand consistency and improve customer engagement. This guide provides HTML recipes to add elements like logos, banners, footers, and social media links to your emails. Follow best practices for email design, test your changes, and ensure your emails reflect your brand identity while maintaining a clean and effective layout.
This cookbook contains HTML recipes to customize the look of the emails sent from your account. Customizing the look of your email can help you enhance brand consistency and improve customer engagement. For example, you can add your company logo or a call-to-action banner to the email layout to match your company brand identity or to more closely match the look of your help center.
The look and feel of the email notifications sent from your Zendesk account are largely determined by a pair a templates in Admin Center – one HTML and the other plain text. The plain text template doesn't support the kind of customization discussed in the cookbook. For details, see Customizing your email templates for notifications.
This cookbook includes the following topics:
- Common design patterns for notification email
- HTML guidelines and best practices for email
- Recipe: Add your company logo
- Recipe: Add a company banner
- Recipe: Add a call-to-action banner
- Recipe: Add a footer
- Recipe: Add social media links to the footer
- Recipe: Customize the email body
- Testing your changes
The recipes use HTML and CSS to customize email notifications. For an introduction and reference to CSS, see CSS: Cascading Style Sheets on the Mozilla Developer Network.
Common design patterns for notification email
Understanding common design patterns can help you create cohesive and effective email layouts that align with your brand.
Most notification emails consist of only a handful of components:
- Logo: A logo image.
- Company banner: An alternative to using a logo by itself.
- Content: The email body.
- Call-to-action banner: A call to action to join your community, use your help center, try a new product, and so on.
- Footer: Can contain various information, including contact information, social media links, and so on.
All the components are optional in the email template except for the content.
The recipes in this cookbook describe how to create and insert design elements in the email template. You can mix and match elements to create your own email design. The following are a few common design patterns:
| Company logo | Company logo with footer |
| Company banner with footer | Company banner with CTA banner and footer |
 |
 |
For some inspiration, see some email designs on the Lotus Themes blog.
HTML guidelines and best practices for email
Designing the look and feel of emails can be challenging because HTML and CSS can be rendered differently in different email applications. Certain types of formatting can even be interpreted as spam.
Follow these general guidelines when designing email:
- Keep it simple: Keep your design simple and avoid complex layouts.
- Use tables for layout: Some email applications may not render CSS-based layouts reliably. Creating layouts with HTML tables is more reliable.
-
Use inline CSS styles: Use inline styles, which are styles defined in
the
styleattribute of an HTML element, such as:<p style="width=400px;">. Imported stylesheets or styles defined in a<style>tag may not be supported in all email applications. - Use web-safe fonts: Use web-safe fonts fonts such as Arial, Verdana, or Georgia. Custom fonts may not be supported or not render correctly in all email applications.
- Keep text formatting to a minimum: Minimizing text formatting helps keep the layout clean and uncluttered. Also, lots of bold text can trigger spam filters.
For additional considerations for email content defined in triggers and other business rules, see Using HTML to format the content of email notifications.
Follow these guidelines for images:
- Use images sparingly: Fewer images help keep the layout clean and uncluttered. Also, lots of images can trigger spam filters.
- Set the size of images with CSS: Use inline styles to size the images in your layout. Images with no defined sizes often distort the layout of emails. For added peace of mind, physically resize the images using resampling.
- Use ALT tags on all images: ALT tags display a description of the images before users allow the images to be displayed.
- Don't link to images in a closed Zendesk account: The images will be broken if the intended recipient is not registered and signed in.
Recipe: Add your company logo
This recipe shows you how to add your company logo to the email template. Example:
![]()
Ingredients
- URL of your company logo image
Recipe
- Paste the following code block in an HTML or text editor:
<table width="100%" cellpadding="0" cellspacing="0" border="0" role="presentation"> <tbody> <tr> <td align="center" style="padding-top: 0px; padding-bottom: 0px;"> <img src="company_logo.png" alt="company logo" style="width: 100px; height: auto;"> </td> </tr> </tbody> </table> - Make any of the following changes to customize the logo:
Change Logo image
Element: img > src
Replace the placeholder value of the
srcattribute with the URL of your logo image.Example:
img src="https://www.example.com/images/logo_acme.png"Logo size
Element: img > style > width
Change the
widthvalue to resize your logo.Example:
img style="width: 120px; height: auto; ..."Space around logo
If you have too much space around the logo, you might have to crop the white space around the image with an image editing tool.
If there's too little space around the image, you can increase the padding of the table cell.
Element: td > style
Add
paddingto thestyleattribute and adjust its value.Example:
td style="padding: 10px; ..."Horizontal alignment of the logo
Element: td > align
Choose center, left, or right.
Example:
td align="left"Vertical spacing of the logo
Element: td > style > padding-top
Change the
padding-topvalue to add space above the logo.Element: td > style > padding-top
Change the
padding-bottomvalue to add space below the logo.Example:
td style="padding-top: 15px; padding-bottom: 5px; ..." - Adjust other values as needed.
- Save the file with an .html extension and preview your changes in a browser often.
- Preview the logo in a test email template before adding it to the email template in your account.
- When you're ready to go live, insert the logo code block at the following location in
the HTML email template in Admin Center (Admin Center > Channels >
Email).

Recipe: Add a company banner
This recipe shows you how to add a company banner to the email template. A company banner typically consists of the company's logo and name set on a background color. Example:

Ingredients
- URL of your company logo image
- color values for your brand identity
Recipe
- Paste the following code block in an HTML or text editor:
<table style="background-color: #c0c7d8;" width="100%" cellpadding="0" cellspacing="0" border="0" role="presentation"> <tbody> <tr> <td align="left" style="display: flex; padding-top: 0px; padding-bottom: 0px;"> <img src="company_logo.png" alt="company logo" style="width: 100px; height: auto; margin-right: 10px;"> <p style="font-family: Verdana, Arial, sans-serif; font-size: 24px; font-weight: bold; color: #333; margin-top: 50px;">Company name</p> </td> </tr> </tbody> </table> - Make any of the following changes to customize the company banner:
Change Logo image
Element: img > src
Replace the placeholder value of the
srcattribute with the URL of your logo image.Example:
img src="https://www.example.com/images/logo_acme.png"Logo size
Element: img > style > width
Change the
widthvalue to resize your logo.Example:
img style="width: 120px; height: auto; ..."Space around logo
If there's too much space around the logo, you might need to crop the white space around the image with an image editing tool.
If there's not enough space around the image, you can increase the padding of the table cell.
Element: td > style
Add
paddingto thestyleattribute and adjust its value.Example:
td style="padding: 10px;
                      ..."
Format of the company name
Element: p > style
Change any of the text styles or add your own.
Example:
p style="font-size: 30px; color: #553e3e; ..."Space between the logo and the company name
Element: img > style > margin-right
Increase or decrease the
margin-rightvalue to increase or decrease the space between the logo and the name.Example:
img style="margin-right: 15px; ..."Vertical alignment of the company name relative to the logo
Element: p > style > margin-top
Increase or decrease the
margin-topvalue to move the company name higher or lower relative to the logo.Example:
p style="margin-top: 40px; ..."Background color of the banner
Element: table > style > background-color
Replace the hex value of #d3d3d3 of the
background-colorstyle with your own value. Consult your branding guidelines or an online color picker such as html-color.codes.Example:
table style="background-color: #d8e3fb; ..." - Adjust other values as needed.
- Save the file with an .html extension and preview your changes in a browser often.
- Preview the banner in a test email template before adding it to the email template in your account.
- When you're ready to go live, paste the banner code block at the following location in
the HTML email template in Admin Center (Admin Center > Channels >
Email).
Recipe: Add a call-to-action banner
This recipe shows you how to add a call-to-action (CTA) banner to the email template. A call-to-action banner is usually located after the email body. It typically invites the user to do something such as join your community, use your help center, try a new product, and so on. It consists of a graphic, text, and a link set on a background color. Example:

Ingredients
- text of your call to action
- URL of a call-to-action image
- URL for a link to help users accomplish the call to action
- color values for your brand identity
Recipe
- Paste the following code block in an HTML or text editor:
<table style="background-color: #d8e3fb; margin-top: 12px;" width="100%" cellpadding="0" cellspacing="0" border="0" role="presentation"> <tbody> <tr> <td align="left" style="display: flex; padding-top: 0px; padding-bottom: 0px; padding-left: 50px; margin-top: 12px; margin-bottom: 8px;"> <div id="cta-text" style="width: 300px;"> <p style="font-family: Verdana, Arial, sans-serif; font-size: 18px; font-weight: bold; color: #333; margin-top: 6px;">Take a hand, lend a hand</p> <p style="font-family: Verdana, Arial, sans-serif; font-size: 14px;">Join our worldwide community to ask expert users for advice or share your own.</p> <p style="font-family: Verdana, Arial, sans-serif; font-size: 12px;"><a href="#">Ask the community</a></p> </div> <div id="cta-image" style="padding-left: 20px;"> <img src="cta_image.png" alt="cta_image" style="width: 140px; height: auto; border-radius: 50% 50% 0 0;"> </div> </td> </tr> </tbody> </table> - Add your call to action in the three paragraph tags. Add or remove paragraphs as needed.
- Make any of the following changes to customize the call-to-action banner:
Change Call-to-action image
Element: img > src
Replace the placeholder value of the
srcattribute with the URL of your call-to-action image.Example:
img src="https://www.example.com/images/cta_image.png"Image size
Element: img > style > width
Change the
widthvalue to resize your image.Example:
img style="width: 120px; height: auto; ..."Format of the call-to-action messages
Element: p > style
Change any of the text styles or add your own.
Example:
p style="font-size: 30px; color: #553e3e; ..."Space between the messages and the image
Element: div id="cta-image" > style > padding-left
Increase or decrease the
padding-leftvalue to increase or decrease the space between the messages and the image.Example:
div id="cta-image" style="padding-left: 30px; ..."Background color of the banner
Element: table > style > background-color
Replace the hex value of #d8e3fb of the
background-colorstyle with your own value. Consult your branding guidelines or an online color picker such as html-color.codes.Example:
table style="background-color: #d3d3d3; ..." - Adjust other values as needed.
- Save the file with an .html extension and preview your changes in a browser often.
- Preview the banner in a test email template before adding it to the email template in your account.
- When you're ready to go live, paste the banner code block at the following location in
the HTML email template in Admin Center (Admin Center > Channels >
Email).

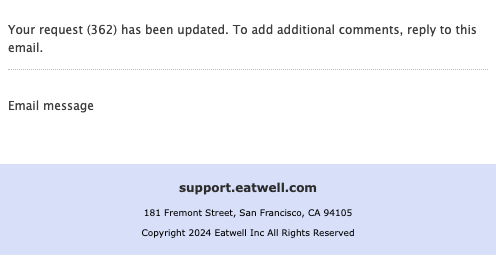
Recipe: Add a footer
This recipe shows you how to add a footer to the email template. A footer can contain a variety of information, including contact information, social media links, and so on. For social media links, see the next recipe, Recipe: Add social media links to the footer.
The standard email template already provides the following placeholders for a footer:
-
{{footer}}: Displays the following line: "This email is a service from Acme.", where "Acme" is the name of your company. -
{{footer_link}}: Displays the following line in the email: "Delivered by Zendesk.", with a link on "Zendesk" back to zendesk.com.
You can replace or supplement these placeholders with your own footer.
In this recipe, you'll create a footer that provides contact information. It'll replace the
{{footer}} and {{footer_link}} placeholders.
Example:
Ingredients
- your company's contact information
- color values for your brand identity
Recipe
- Paste the following code block in an HTML or text editor:
<table style="background-color: #d8e3fb; margin-top: 12px;" width="100%" cellpadding="0" cellspacing="0" border="0" role="presentation"> <tbody> <tr> <td align="center" style="padding-top: 4px; padding-bottom: 8px; margin-top: 12px; margin-bottom: 8px;"> <p style="font-family: Verdana, Arial, sans-serif; font-size: 12px; font-weight: bold; color: #333;">support.eatwell.com</p> <p style="font-family: Verdana, Arial, sans-serif; font-size: 9px;">181 Fremont Street, San Francisco, CA 94105</p> <p style="font-family: Verdana, Arial, sans-serif; font-size: 9px;">Copyright 2024 Eatwell Inc All Rights Reserved</p> </td> </tr> </tbody> </table> - Change the contact information in the three paragraph tags.
- Make any of the following changes to customize the footer:
Change Background color of the footer
Element: table > style > background-color
Replace the hex value of #d8e3fb of the
background-colorstyle with your own value. Consult your branding guidelines or an online color picker such as html-color.codes.Example:
table style="background-color: #d3d3d3; ..."Text color
Element: p > style > color
Change the
colorvalue.Example:
p style="color: #553e3e; ..."Text formatting
Element: p > style
Change any of the text styles or add your own.
Example:
p style="font-family: Georgia, sans-serif; ..."Space from the top and bottom borders
Element: td > style > padding-top
Increase or decrease the
padding-topvalue to change the space between the top border and the text.Example:
td style="padding-top: 8px; ..."Element: td > style > padding-bottom
Increase or decrease the
padding-bottomvalue to change the space between the text and the bottom border.Example:
td style="padding-bottom: 8px; ..." - Adjust other values as needed.
- Save the file with an .html extension and preview your changes in a browser often.
- Preview the footer in a test email template before adding it to the email template in your account.
- When you're ready to go live, paste the code block at the following location in the HTML
email template in Admin Center (Admin Center > Channels >
Email).

Recipe: Add social media links to the footer
This recipe shows you how to add social media links to a custom footer.
{{footer}} placeholder display buttons for your social media channels. See
Adding social media buttons to your emails. Example:

Ingredients
- URLs to social media images to use as buttons
- links to your social media accounts
Recipe
- Paste the following code block in an HTML or text editor:
<table style="background-color: #d8e3fb; margin-top: 12px;" width="100%" cellpadding="0" cellspacing="0" border="0" role="presentation">
  <tbody>
    <tr>
      <td align="center" style="padding-top: 4px; padding-bottom: 8px; margin-top: 12px; margin-bottom: 8px;">
          <p style="font-family: Verdana, Arial, sans-serif; font-size: 12px; font-weight: bold; color: #333;">support.eatwell.com</p>
          <p style="font-family: Verdana, Arial, sans-serif; font-size: 9px;">181 Fremont Street, San Francisco, CA 94105</p>
          <p style="font-family: Verdana, Arial, sans-serif; font-size: 9px;">Copyright 2024 Eatwell Inc All Rights Reserved</p>
      </td>
    </tr>
  </tbody>
</table>
This is the recipe for creating a footer with contact information (Recipe: Add a footer).
- Add your social icons to the HTML before the first paragraph tag. Example:
<div style="padding-top: 12px; padding-bottom: 0px;"> <a href="#"><img style="width: 30px; padding-right: 10px;" src="https://www.example.com/images/icon_facebook.png"/></a> <a href="#"><img style="width: 30px; padding-right: 10px;" src="https://www.example.com/images/icon_x.png"/></a> <a href="#"><img style="width: 30px;" src="https://www.example.com/images/icon_instagram.png"/></a> </div> - For each social media link, change the URL for the link (
href="...") and the icon image (src="...") for each social media link. - Make any of the following changes to customize the icons:
Change
Size of the icons
Element: img > style > width
Make sure all the icons have the same value for width.
Example:
img style="width: 24px; ..."Spacing between the icons
Element: img > style > padding-right
Change the value of the
padding-rightstyle for each social media link except the last one.Example:
img style="padding-right: 8px; ..."Space above and below the icons
Element: div > style > padding-top
Increase or decrease the
padding-topvalue to adjust the space above the icons.Example:
div style="padding-top: 8px; ..."Element: div > style > padding-bottom
Increase or decrease the
padding-bottomvalue to adjust the space below the icons.Example:
div style="padding-bottom: 10px; ..." - Adjust other values as needed.
- Save the file with an .html extension and preview your changes in a browser often.
- Preview the footer in a test email template before adding it to the email template in your account.
- When you're ready to go live, paste the code block at the following location in the HTML
email template in Admin Center (Admin Center > Channels >
Email).
Recipe: Customize the email body
This recipe shows you how to customize the email body. You'll change the typeface and size of the text, as well as the space around the email body.
The email consists of the notification message and the email conversation. In the email
template, the email body is represented by the {{content}} placeholder.
Zendesk replaces the placeholder with the HTML before sending out the email. Example:

Some of the HTML inserted by Zendesk contains styles that cannot be modified or overridden. For details, see Limitations to customizing the email body.
Recipe
- Paste the
{{content}}placeholder and its parent div tag in an HTML or text editor. Example:<div style="padding: 10px; line-height: 1.5; font-family: 'Lucida Grande',Verdana,Arial,sans-serif; font-size: 12px; color:#444444;"> {{content}} </div> - Make any of the following changes to the styles of the parent div to customize the email
body.
Change Size of message text
Element: div > style > font-size
Change the
font-sizevalue.Note that this change won't change the text size of the user name or the time the email was sent.
Example:
div style="font-size: 11px; ..."Text font
Element: div > style > font-family
You can change the font within limits. Use web-safe fonts such as Trebuchet MS, Verdana, or Georgia. Other fonts may not be supported in all email applications.
Example:
div style="font-family: 'Trebuchet MS', sans-serif; ..."Space around the email body
Element: div > style > padding
Increase or decrease the
paddingvalue to change the space around the email body.Example:
div style="padding: 15px;
                    ..."
If you want to change the space on the left and right sides (say to 25px), specify two values for
paddingstyle. The first value is the padding for the top and bottom and the second value is the padding for the left and right.Example:
div style="padding: 15px 25px; ..." - Add other inline styles or adjust other values as needed.
Note that certain properties of the email body can't be changed. See Limitations to customizing the email body.
- Save the file with an .html extension and preview your changes in a browser often.
- Preview the changes in a test email template before adding it to the email template in your account.
- When you're ready to go live, paste the code block at the following location in the HTML
email template in Admin Center (Admin Center > Channels >
Email).

Limitations to customizing the email body
Zendesk replaces the {{content}} placeholder with its own HTML when it
sends out the email. However, the system-generated HTML contains inline styles for certain
elements of the email body. Unfortunately, you can't access these styles to modify them.
You also can't override them using inline styles in the email template. In CSS, the inline
styles of child elements take precedence over the inline styles of parent elements such as
divs.
This section outlines some of the limitations to customizing the email body. Make sure to take these settings into consideration when you make your design decisions about the rest of the email body.
Body text
You can't change the following styles for the body text:
- font color
- line height
- margins around the text
The settings for these styles are as follows:
color: #2b2e2f; line-height: 22px; margin: 15px 0Name and date sent text
You can't change the following styles for the name and date sent text:
- font color
- font family
- font size
- line height
- margins around the text
The settings for the name text are as follows:
color: #1b1d1e"; font-family: Verdana, Tahoma, sans-serif; font-size: 15px;
line-height: 18px; margin-bottom: 0; margin-top: 0;padding: 0; color: #1b1d1e"
The settings for the date sent text are as follows:
font-family: Verdana, Tahoma, sans-serif; font-size: 13px; line-height: 25px;
margin-bottom: 15px; margin-top: 0; padding: 0; color: #bbbbbb"
Testing your changes
You can test your changes with the test email template attached to this recipe.
Changes made directly to the email template in Admin Center go live immediately. Therefore, you should thoroughly test your changes in the test template to make sure they work as expected before adding them to the email template in your account.
To test your changes
- Download the test email template, test_email_template.html attached below, and open it in a HTML or text editor.
- Paste the code block for your component at the indicated location in the test email
template. Example:
<!-- Paste logo or company banner code block here --> - Open the test template in a browser and make the browser window narrower to emulate an email application.
- Make adjustments to the code in the test template then refresh the browser page to see the effect of your changes.
- Continue to make iterative changes until you're satisfied with the design.
- When ready to go live, paste the code block for your component in the same location in the email template in Admin Center (Admin Center > Channels > Email).