Use cases are the mechanism by which AI agents understand what a customer is asking about and connect them with the right generative procedure or dialogue. After you create a use case, you can manage it from the Use cases page.
This article contains the following topics:
- Viewing all use cases
- Categorizing a use case
- Copying a use case to another AI agent
- Deactivating a use case
- Deleting a use case
- Resolving conflicts between duplicate use cases
- Restoring a previous version of a use case
- Configuring whether a use case uses a generative procedure or a dialogue
Related article:
Viewing all use cases
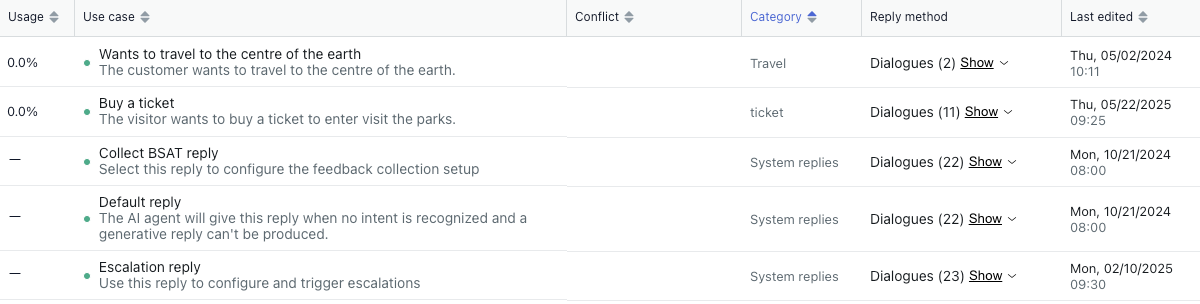
On the Use cases page, you can view all the use cases for an AI agent.
To view all use cases
- In the AI agents workspace, select the AI agent you want to work with.
-
Click
 Content in the sidebar, then select Use cases.
On this page, you can see all the use cases you've created, including the following details:
- Usage: The percentage of customer messages matched to the given use case over the last seven days, including today.
- Use case: The name and description of the use case.
- Conflict: Whether a conflict exists between this use case and another one. See Resolving conflicts between duplicate use cases.
- Category: The category assigned to the use case. See Categorizing a use case.
- Reply method: Whether the use case uses a dialogue or procedure. See Configuring whether a use case uses a generative procedure or a dialogue.
-
Last edited: The date and time the use case was last
edited.
Categorizing a use case
Categorizing use cases makes managing them easier, but it doesn’t affect how an AI agent connects use cases with a customer’s message (only use case names and descriptions do that).
In the list of use cases, the Category column shows a use case’s category.
To categorize a use case
- In the AI agents workspace, select the AI agent you want to work with.
- Click
Content in the sidebar, then select Use cases.
- Click the use case you want to categorize.
The use case details page opens.
- In Category, select an existing category, or start typing to enter a
new category and click Add a category.
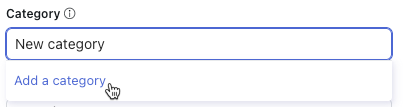
- Click Save.
Copying a use case to another AI agent
To save time when configuring multiple AI agents, you can copy a use case from one AI agent to another.
Any actions linked at the use-case level aren't automatically copied. After you copy a use case to another AI agent, make sure you recreate the actions in the target AI agent (if they don't exist already) and add them to the use case.
To copy a use case to another AI agent
- In the AI agents workspace, select the AI agent you want to work with.
- Click
Content in the sidebar, then select Use cases.
- Find the use case you want to copy.
- Click the options menu (
 ) on the right-hand side and select
Duplicate.
) on the right-hand side and select
Duplicate.The "Copy use case to another AI agent" dialog appears.
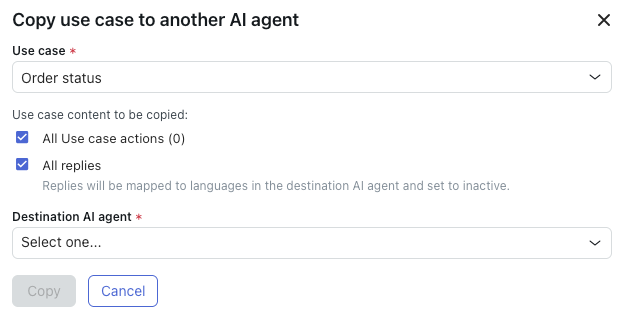
- In Use case, confirm the use case you want to copy is selected.
If not, select the desired use case.
- (Optional) Deselect All use case actions if you don't want to copy
the actions that have been added at the use
case level for this AI agent.
The number in parentheses tells you how many actions will be copied.
-
(Optional) Deselect All replies if you don't want to copy the replies that have been created for this AI agent.Note: System replies can't be copied.
- In Destination AI agent, select the AI agent you want to copy the use
case to.Note: If the destination AI agent doesn't have the same supported languages as the source AI agent, an error message appears. Add the languages to the destination AI agent and try again.
- Click Copy.
The use case is copied to the specified AI agent.
Deactivating a use case
Deactivating a use case allows you to retain its configuration (nothing is deleted), but your AI agent won’t use it to connect customers with a dialogue until you reactivate the use case.
To deactivate a use case
- In the AI agents workspace, select the AI agent you want to work with.
- Click
Content in the sidebar, then select Use cases.
- Find the use case you want to deactivate.
- Click the options (
 ) menu, and select
Deactivate.
) menu, and select
Deactivate. Your use case is immediately deactivated. You can reactivate it by clicking the options (
) menu again and
selecting Activate.
Deleting a use case
To delete a use case
- In the AI agents workspace, select the AI agent you want to work with.
- Click
Content in the sidebar, then select Use cases.
- Find the use case you want to delete.
- Click the options () menu, and select
Delete.
Your use case is immediately deleted.
Resolving conflicts between duplicate use cases
If multiple use cases have names or descriptions that are too similar, they may be considered duplicates. Duplicate use cases cause confusion in AI agent conversations, as the wrong use case might be detected or the wrong reply might be triggered. To prevent this confusion, you should review and resolve conflicts between duplicate use cases.
To resolve conflicts between duplicate use cases
- In the AI agents workspace, select the AI agent you want to work with.
- Click
Content in the sidebar, then select Use cases.
- Look for use cases that have an entry in the Conflict column.
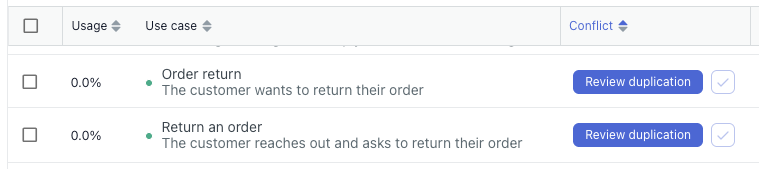 Tip: When you hover over a use case with a conflict, any conflicting use cases in the list are highlighted.
 - Click Review duplication.
A new window appears and shows the details of the conflict.
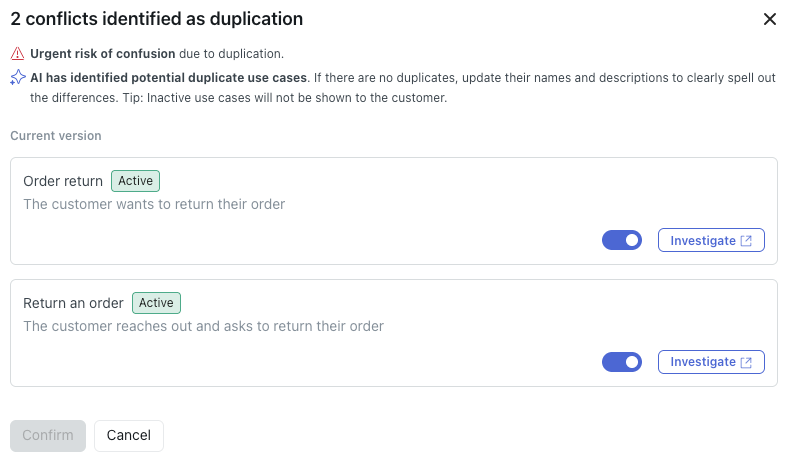
- Resolve the conflict by taking one of the following actions:
- Click Investigate and update the name and description of one or both of the use cases so they're more distinct.
- Click the toggle to deactivate one of the use cases. Inactive use cases aren't analyzed for duplicates.
-
Click Confirm.
Restoring a previous version of a use case
Any updates made to a use case’s name or description are tracked and can be rolled back if necessary, making it safer to test changes or recover from errors.
To restore a previous version of a use case
- In the AI agents workspace, select the AI agent you want to work with.
-
Click
Content in the sidebar, then select Use cases.
- Click the name of the use case you want to restore a previous version of.
- In either the Name or Customer request reason field, click the
Show version history (
 ) icon.
The Version History panel appears on the right, showing you the changes made to the use case’s name or description. The panel shows which user made the changes and when, and which version of the use case is the current version. You can expand the version history entries to see the content of the Name or Customer request reason field for each saved change.

- (Optional) Click the Type drop-down field, select the types of use case changes you want to see (name, description, or both), and click Apply.
- Find the version of the use case name or description you want to restore and
click the Restore (
 ) icon.
- Click Save.
Configuring whether a use case uses a generative procedure or a dialogue
You can decide whether an individual use case should use a generative procedure or a dialogue:
-
A dialogue is a scripted conversation flow that uses branching logic to
determine an AI agent's responses and actions during a conversation with a
customer. This lets you determine the exact flow that an AI agent should
follow for a particular use case.
Dialogues give you a lot of control, but also require more maintenance than a procedure. Consider using dialogue for use cases where customer issues need to be handled in very specific ways and even small deviations from an exact process can’t be tolerated.
See Creating dialogues to define scripted conversation flows for AI agents.
-
A generative procedure is a flexible conversation flow that uses agentic
AI to guide an AI agent's responses and actions during a conversation with a
customer. This gives the AI agent the freedom to determine the best way to
resolve a customer’s issue in line with your business policies.
Procedures require less setup and maintenance from you, but they also offer less direct control over very fine details. Consider using procedures for use cases where customer issues are less sensitive and can be handled in a number of flexible ways.
See Creating generative procedures to shape flexible conversation flows for AI agents.
The table below offers additional guidance on when to use a generative procedure or a dialogue.
| Use a generative procedure when… | Use a dialogue when… |
|
|
If a use case has neither an active dialogue nor a generative procedure, or if no appropriate use case exists for a conversation, the AI agent forms responses using only the content of your imported knowledge source, not dialogues or procedures. You can configure a use case this way if you want to trigger some actions or track a certain topic in analytics, but still let the response be purely generative.
To configure whether a use case uses a dialogue or procedure
- In the AI agents workspace, select the AI agent you want to work with.
- Click
Content in the sidebar, then select Use cases.
- Click the use case you want to configure.
- Under Reply method, click the drop-down field and select one of the
following options:
- Use procedure: (Default) The AI agent generates its own messages based on the associated generative procedure.
-
Use dialogue: The AI agent follows the script you create in a
dialogue.

Your changes are automatically saved.
Next, you must create a generative procedure or a dialogue for the use case.