Verified AI summary ◀▼
Admins can set up inactivity reminders to notify end users when a conversation becomes inactive. You can configure up to three reminders, adjust wait times, update ticket statuses, and add tags. These reminders help manage conversations across Web Widget, iOS and Android SDKs, and supported social channels. Customize messages and use tags in business rules and reporting to enhance support operations.
Admins can configure up to three reminders to be sent to end users when their messaging conversation becomes inactive, and tag conversations when reminders are sent. Configuration options for inactivity reminders are part of the capacity release settings in Admin Center.
This article includes the following sections:
About inactivity reminders
For newer messaging accounts, inactivity reminders are turned on and configured by default for the Web Widget, iOS and Android SDKs, and Zendesk-supported social messaging channels. The default configuration sends three reminders with simple message text in the account’s default language, and adds tags to a conversation. You can keep these default settings or customize them as needed.
By default:
- The First reminder is sent after five minutes of end-user inactivity. This reminder updates the ticket’s status to Pending, and adds the tag messaging_reminder_1 to the conversation.
- The Second reminder is sent after another five minutes of end-user inactivity. This reminder does not update the ticket’s status, but adds the tag messaging_reminder_2 to the conversation.
- The Third reminder is sent after one additional minute of end-user inactivity. This reminder updates the ticket’s status to Solved, and adds the tag messaging_reminder_final to the conversation.
- The messaging session does not end automatically when a ticket becomes inactive.
Consider the following when using inactivity reminders:
- You must be an admin to configure inactivity reminders.
- Inactivity reminders are available for the Web Widget, iOS and Android SDKs, and Zendesk-supported social messaging channels.
- It can take up to 10 minutes for updates to the inactivity reminder setting to begin working.
- If an AI agent is in use, inactivity reminders are sent to end users from that AI agent, and the avatar and bot name associated with it are displayed with the reminder message. If no AI agent is in use, the logo associated with the Web Widget appears with the message.
- Reminder tags can be used in business rules, views, reporting, and as conditions in messaging triggers. See About tags for more information.
Configuring inactivity reminders
You can set up inactivity reminders when you configure your messaging capacity release settings, or update the setting at a later date.
To customize your inactivity reminder settings
- In Admin Center, click
 Channels in the sidebar, then select Messaging and social >
Messaging.
Channels in the sidebar, then select Messaging and social >
Messaging. - Click Messaging settings.
- Under Advanced, expand the Capacity release section.
- Under Remind customers about inactive conversations, select 1
reminder, 2 reminders, or 3 reminders. Subsequent
reminder settings are displayed based on this selection.
To turn off inactivity reminders, select Do not remind.
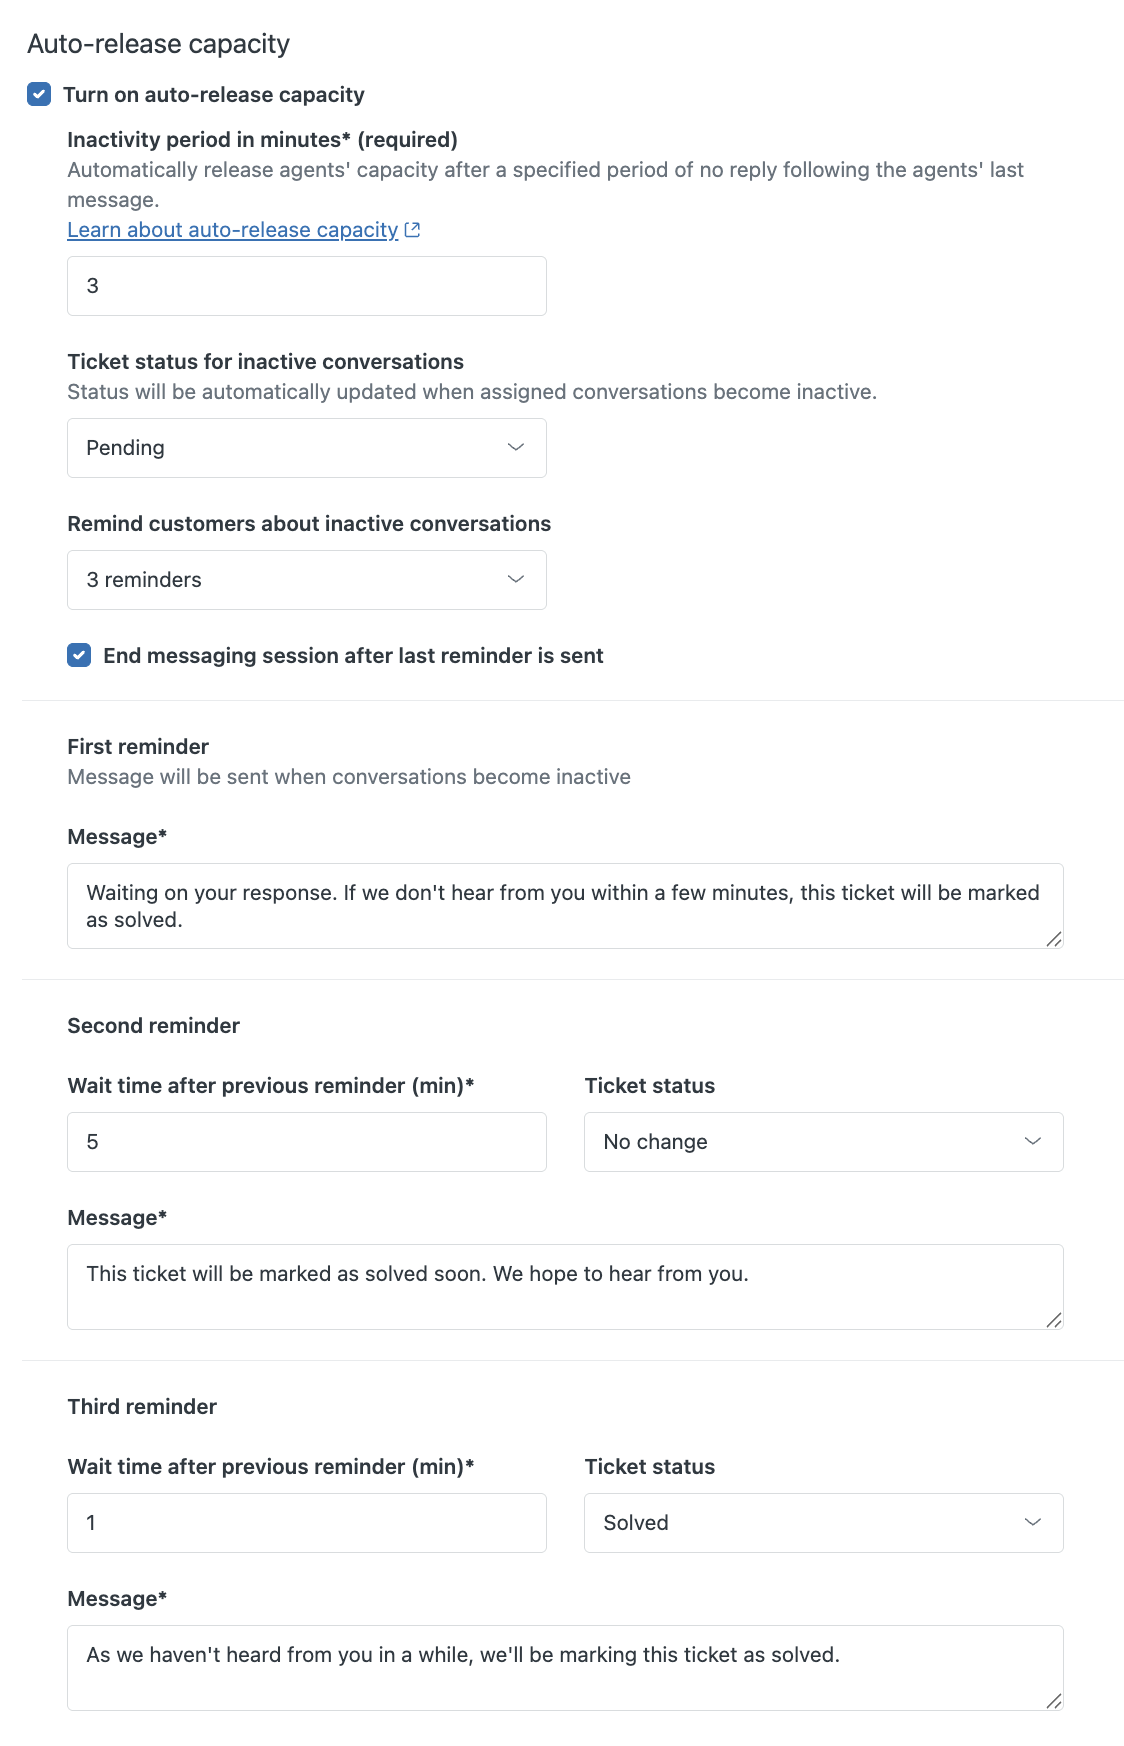 Note: If you selected Solved as the ticket status for the initial inactivity period, you will only be able to select Do not remind or 1 reminder.
 - Select End messaging session after last reminder is sent to automatically end the messaging session when the ticket becomes inactive.
- Configure the reminders’ messages, inactivity periods, ticket status
changes, and tags as needed: Note: You can use dynamic content in reminder messages to automatically translate or customize the messages for end users.
-
First reminder:
- Enter the message you want to send when the initial inactivity period is reached, or use the default message. This reminder uses the wait time and ticket status configured for the initial messaging capacity release settings.
- Update the tag or add additional tags as needed. Clear the Tags field to prevent tags from being added to the ticket.
-
Second and Third reminders (if applicable):
- Enter a whole number between 1 and 15 for the Wait time after previous reminder in minutes.
- Enter the message you want to send.
- Enter the status change you want to apply to the ticket when each subsequent inactivity period is reached. You can select No change, Pending, On-hold, Solved, or a custom status mapped to these ticket status categories. Note that support ticket triggers using the selected ticket status as a condition will fire when the status is applied.
- Update the tag or add additional tags as needed. Clear the Tags field to prevent tags from being added to the ticket.
Note: The second and third reminders aren't sent if an agent solves the ticket after the first reminder.
-
First reminder:
- Click Save settings.