Summary: ◀▼
You can search support data like tickets, users, articles, and organizations using text queries and filters. Customize search results by selecting columns and applying filters to focus on relevant information. Share search queries with others by copying links. Search results respect your permissions, showing only accessible tickets and users. This helps you quickly find and organize support data for better customer service management.
In Zendesk Support, you can search for data, such as ticket properties, user properties, comments, tags, messaging transcripts, help center articles, and so on by using the search tool or the search page in Support.
Administrators can search everything and agents can search the tickets and users that they have permission to see. For example, if as an agent you are limited to only seeing tickets in the groups that you belong to, you will only be able to see those tickets in your search results.
This article covers the following topics:
Performing a search
You can perform a text search and filter your search by content record type. As you enter your search query text, the menu suggests results based on the text you’ve entered and any filters you’ve applied.
You can access the suggested results directly from the search menu. You can also access a list of all results related to your query.
In addition to full text search, you can perform a search using common search operators combined with data property keywords and values to narrow your results.
- In Support, do
one of the following:
- To open the search tool, click the
Search icon (
 ) in the top
toolbar.
) in the top
toolbar.The search tool opens, and your most recent searches and viewed content records appear in a menu.
- To open the search page, hover your cursor
over the +Add button, then select
Search.
The search page opens.
- To open the search tool, click the
Search icon (
- Optionally, select a content record type to filter by in
the search tool or on the search page.
If you're using the search tool, depending on which filter you click, subfilters might appear for you to further refine your search.
If you’ve turned on AI agent tickets, when you filter by Tickets, you can use Support type to further filter by All tickets, AI agent only tickets, or Agent only tickets.

- Enter your search term and any data property
keywords or operators you want in the
search box, then press Enter.
There is a 64-word limit in a search query. As you type, results appear that match your search term. See About search and search terminology. Search returns only the first 1,000 results, even if there are more results.
Note: It can take a few minutes to index tickets, users, and other resources, so they might not appear in search results right away. For newly created messaging conversations, it can take as long as 10-to-12 minutes. - Optionally, when the search results appear, click a
content record type in the left side panel to filter
results.
The search results default to showing the results for tickets. See About the search results by content record type.
- Optionally, click Filters to open the right-side
filter panel and apply additional filters to refine
your search.

Available filters vary depending on the content type you've selected on the search results page and whether you've customized your filters.
- Review your search results and do any of the
following:
- Open any item in a new tab by clicking it.
- Preview any ticket by hovering over it.
- Sort results by clicking the Requested or Updated columns, then click again to toggle between ascending or descending order by date. You can customize columns in the search results as needed.
- Take any of the following actions from the search results page, as needed:
About the search results by content record type
Your search results are sorted into categories for tickets, users, articles, and organizations. Each category contains different columns, icons, and other elements, to help you identify, filter, sort, or otherwise organize your search results.
Tickets
The Tickets category returns a list of support requests that have your search term(s) in their subject line or comments. This category contains the most options for organizing your results. The Ticket category's columns display the following relevant ticket information:
- ID, the ticket's numeric identifier.
- Subject, the text from the ticket's subject line.
- Requested, the date the ticket was submitted.
- Updated, the last time the ticket was updated.
- Requester, the name of the user who submitted the ticket.
- Group, the group assigned to handle the ticket.
Each result is preceded by an icon indicating that ticket's current status:

Closed tickets are identified by an icon (![]() ) in front of the subject. You can
exclude closed tickets from your results by clicking the
Filter menu and deselecting Include closed
tickets.
) in front of the subject. You can
exclude closed tickets from your results by clicking the
Filter menu and deselecting Include closed
tickets.
If you currently have a ticket open, and similar tickets is turned on, filtering by Tickets shows you a Similar tickets header that includes any tickets related to the ticket you’re currently working on, if applicable.
Users
The Users category returns a list of accounts who include your search term(s) in their names, or elsewhere in their profiles. This doesn't include custom user fields in profiles (see Searching custom user and organization fields).
The results for this category contain the following columns:
- Name, the user's submitted name.
- Email, the user's email address.
- Organization, the company or group the user works for.
- Role, the role assigned to that user (agent, admin, end-user, and the like).
- Updated, the last time the user's profile was updated.
Articles
The Articles category returns a list of knowledge base entries that mention your search term(s). The results for this category contain the following columns:
- Title, the article's title.
- Updated, the date the article was last updated.
- Created, the date the article was posted to the knowledge base.
Organizations
The Organizations category returns a list of organizations that include your search term(s) in their names or elsewhere in their profiles. This doesn't include custom organization fields in profiles (see Searching custom user and organization fields).
The results for this category contain the following columns:
- Name, the organization's name.
- Notes, any notes added to their profile.
- Created, the date the organization first registered.
- Updated, the last time the organization updated its profile.
Customizing columns in search results
You can select and organize the columns you want to display in your search results to focus on the data you need. Available columns are based on the object type you’re searching for. You can include up to 10 columns in your search results. Custom fields can’t be added to search results.
Your column customizations remain in place until one of the following occurs, after which your search results will revert back to the default columns:
- You sign out of Zendesk
- You delete your browser cache
- You do a hard browser refresh
- You close your browser
To customize columns in your search results
- On the Search results page, click the Manage
columns icon (
 ).
). - In the right-side Manage columns panel, the current
column selections are displayed.
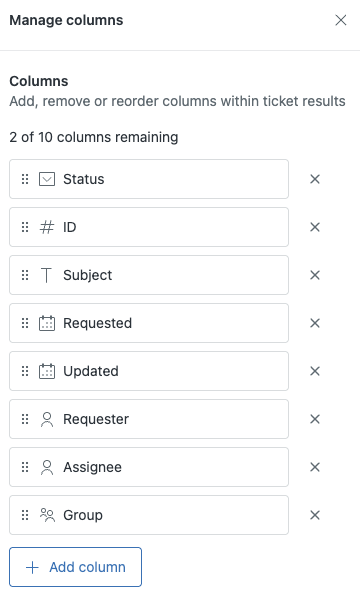
Customize the columns as needed:
-
To add a column, click the Add column button.
-
To remove a column, click the x next to that column’s name.
-
To change the column order, click a column’s grabber icon (
 ) and drag it to the
desired position.
) and drag it to the
desired position.
-
- Click Apply.
Customizing search result filters
You can customize the properties used to filter your Support search results. You can apply up to 20 filters for each object type.
The filters available to add to a search depends on the selected content record type.
To customize the search filter
- On the left-side filter panel, Select the object type you want to filter on (tickets, articles, users, organization, or side conversations).
- On the Search results page, click the Filters
button.
- Click +Add filter and select the property you
want to add. The options that appear here depend on
the content type you've selected on the search
results page.
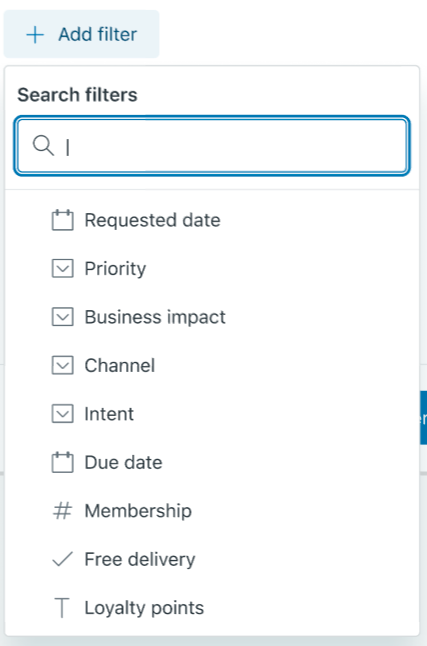
- Select or enter the attribute on which you want to filter.
- Repeat for any additional filters you want to add, and remove any unneeded filters by clicking the X next to the filter’s name.
- Click Apply.
The selected filters persist until one of the following actions occurs, at which point the search reverts to the default filters:
- You sign out of Zendesk
- The browser cache is deleted
- There’s a hard browser refresh
- The browser is closed
You can save the custom filters by saving the search.
Sharing your search
You can copy search query strings you create so you can then share them with other users. When the other user clicks the search query you shared, the search is performed using the same query you created.
- On the Search results page, click the Actions menu, then select Copy link.
-

The search query is copied to your clipboard. You can send the query to other users, for example, by pasting it into an email.