

Omnichannel routing with unified agent status allows you to direct tickets from email (including web form, side conversations, and API), calls, and messaging to agents based on their availability and capacity. On Professional plans and above, tickets can also be routed based on priority and skills. Using omnichannel routing means agents can set a single unified status for all channels, and important tickets are assigned to the agents who are most available to work on them. This provides the following benefits:
- Agents can respond to tickets faster
- You can prioritize work from high-value customers, including calls
- Agents are automatically assigned tickets and don’t have to go looking for them
- Agents can’t "cherry pick" the tickets they want to work on
- Agents can work on multiple ticket channels at once
- You can route calls to specific groups of agents based on the caller's country code of callers or other attributes
You can use capacity rules to limit the amount of work that’s assigned to agents at one time. However, regardless of these rules, agents can assign themselves work in excess of these limits if they want to (see Creating capacity rules to balance agent workloads).
With omnichannel routing, instead of setting status individually by channel, agents can set a single unified status for Support, Talk, and Messaging. On Professional plans and above, admins can also define their own custom statuses such as “Out to lunch” or “In a meeting.” This can assist you when deciding how you want to route work items (calls, tickets, and messages) based on the agent status and capacity. See Adding unified agent statuses.
To use omnichannel routing, you have to turn it on and configure it. If you decide to stop using it, you can turn it off.
This article contains the following sections:
Requirements and limitations of omnichannel routing
There are a few requirements for using omnichannel routing, as well as some limitations you should consider before enabling the feature.
Requirements
- The Agent Workspace must be activated for your account.
- If your account has a Chat subscription, native messaging or Sunshine Conversations must also be activated.
- Messaging must be activated to turn on omnichannel routing while using live chat. Limited support for Chat is provided for accounts migrating to Messaging and omnichannel routing.
Limitations
Omnichannel routing with unified agent status currently has the following limitations:
- Omnichannel routing can't be activated if you’re using only live chat. Messaging must be activated, too.
- Broadcast and hybrid modes for messaging aren't supported.
- The ability to set an agent's status if they don't accept a number of message assignments, known as automatic idle, isn't supported yet.
- When using agent statuses, operating hours won't automatically set an agent's status.
- Light agents can't be assigned tickets and can't set a status.
- The ability to change a Talk agent’s status from the Talk dashboard, mobile apps, or by using the Talk APIs isn't supported. Integrations that use Talk APIs to change agent statuses might also be impacted.
- For all channels, you can use custom queues to route tickets to multiple groups at a time, including configuring secondary or fallback routing options.
- Tickets are created for all calls as soon as they enter the queue.
The setting “Create tickets for abandoned calls” is no longer available.
Tip: You can create a workflow to automatically close tickets created for abandoned calls.
- If call forwarding is enabled and the status of an agent is automatically set to offline because the agent has been disconnected, calls to the agent will no longer be forwarded to the agent’s phone.
- Explore dashboards will show per channel agent statuses but not unified custom statuses.
- At the time omnichannel routing is activated, agent statuses are automatically set to offline initially, then agents are prompted to set their own status after that.
- When using priority phone numbers in Talk, call tickets are assigned High priority but aren't necessarily put directly at the top of the queue.
- Tickets generated by voicemails can't be routed by omnichannel routing.
- Talk Partner Edition isn't supported. The way you route calls for Talk Partner Edition depends on the integration you're using.
- When offering messaging conversations (and sometimes live chats) to agents, only 20 offered to events are recorded per ticket. Omnichannel routing will continue to offer the ticket beyond 20 times as needed, until an agent accepts the ticket, but any offers after the first 20 aren't recorded in the ticket event log.
- Voicemails can't be assigned to agents via omnichannel routing.
How omnichannel routing works
When you use omnichannel routing, tickets are generated for all channels of work as soon as they are received, enabling you to run triggers on them, including incoming calls. For brevity, channels of work are labeled as Email (including tickets generated from email, web form, side conversations, and API), Messaging (sometimes including tickets from Chat), and Talk. Email tickets enter the omnichannel routing queues only after the routing tag is added to them; messaging conversations and calls enter the queue as soon as they are received.
Omnichannel routing sends work to agents based on the following:
- Queue. This is defined by the omnichannel routing queue the ticket is inserted into. The queue assignment determines which groups of agents are eligible to be assigned to each ticket.
- Availability. This is defined by the single unified status the agent sets across channels.
- Capacity for each work channel. You define the maximum capacity for each channel and decide which tickets are eligible for routing.
- Skills. This is defined by the skills assigned to agents and tickets and applies to all channels.
Then triggers are used to assign the tickets to groups, assign a ticket priority, and add tags to the ticket. After triggers run on a ticket, the omnichannel routing queues are evaluated, and the ticket is inserted into the first queue it meets the conditions for. If you don't configure custom queues, all tickets are added into the single, standard queue and rely on the ticket's assigned group to identify eligible agents.
After a ticket is assigned to an agent, it is removed from the omnichannel routing queues.
The following table shows the order in which tickets are routed to agents:
| Plan | Order in which tickets are routed |
|---|---|
|
Suite Team and Growth |
Tickets are assigned to agents in the the order they appear in the queue. |
|
Suite Professional and Enterprise |
The ticket with the highest priority and oldest eligible-for-routing timestamp is routed to an agent within the assigned (or queue's) groups with matching skills (if using), an eligible status, and the most spare capacity. |
More specifically, tickets are assigned to agents based on the following:
- The ticket's group or queue's groups:
- If you're not using custom queues, a ticket must be assigned to a group to be eligible for routing with omnichannel routing.
- Custom queues can be used to route work to multiple groups of agents with omnichannel routing. Tickets in queues are routed to the queue's groups, ignoring the ticket's assigned group.
- When using custom queues, work is assigned to agents in the primary groups first. If no agents from those groups are available when a ticket reaches the front of the queue, omnichannel routing looks for available agents in the secondary or "fallback" groups.
- If an agent can receive work from more than one queue, omnichannel routing assigns work from the queue with the highest priority first.
- An agent's status for the channel:
- Email tickets: An agent must have a status of online or away to receive email tickets.
- Messaging conversations: An agent must have a status of online to receive messaging tickets. See Setting your agent status with omnichannel routing.
- Calls: An agent must have a status of online to receive incoming call tickets.
Agents are automatically set to offline or away, as defined by an admin, when they are idle for longer than the idle status threshold. Additionally, if an agent forgets to set their status to offline, the status of the agent is automatically set to offline when one of the following events is detected:
- An agent closes the Agent Workspace without signing out (by closing down their computer or browser window or putting their computer to sleep)
- An agent’s connection is lost due to a network outage
See Setting your unified agent status with omnichannel routing.
- An agent's spare capacity for that channel:
- An agent must have fewer open tickets or messaging conversations assigned to them than the defined maximum capacity for that channel to have spare capacity. See Creating capacity rules to balance agent workload.
- If more than one agent has an eligible status and spare capacity, the agent with the highest spare capacity for the relevant channel is assigned.
- If more than one agent has an eligible status and the same spare capacity for the relevant channel, the ticket is assigned to the agent who hasn't been assigned a ticket in the longest time.
- To be assigned an inactive messaging ticket (more than 10 minutes without a reply), an agent must have spare capacity. Whether inactive messaging tickets count towards an agent's capacity depends on your routing configuration.
- An agent's skills:
- An agent must have the same skills as the ticket in addition to having an eligible status and spare capacity.
- If you select Skills timeout, tickets will be assigned without regard to skills if an agent with the matching skills is unavailable for a specified duration after a ticket reaches the top of the queue. If this option isn't selected, tickets will sit in the queue until an agent with the matching skills becomes available or a call reaches the maximum time in queue and is sent to voicemail.
Here's an example of a scenario for omnichannel routing:
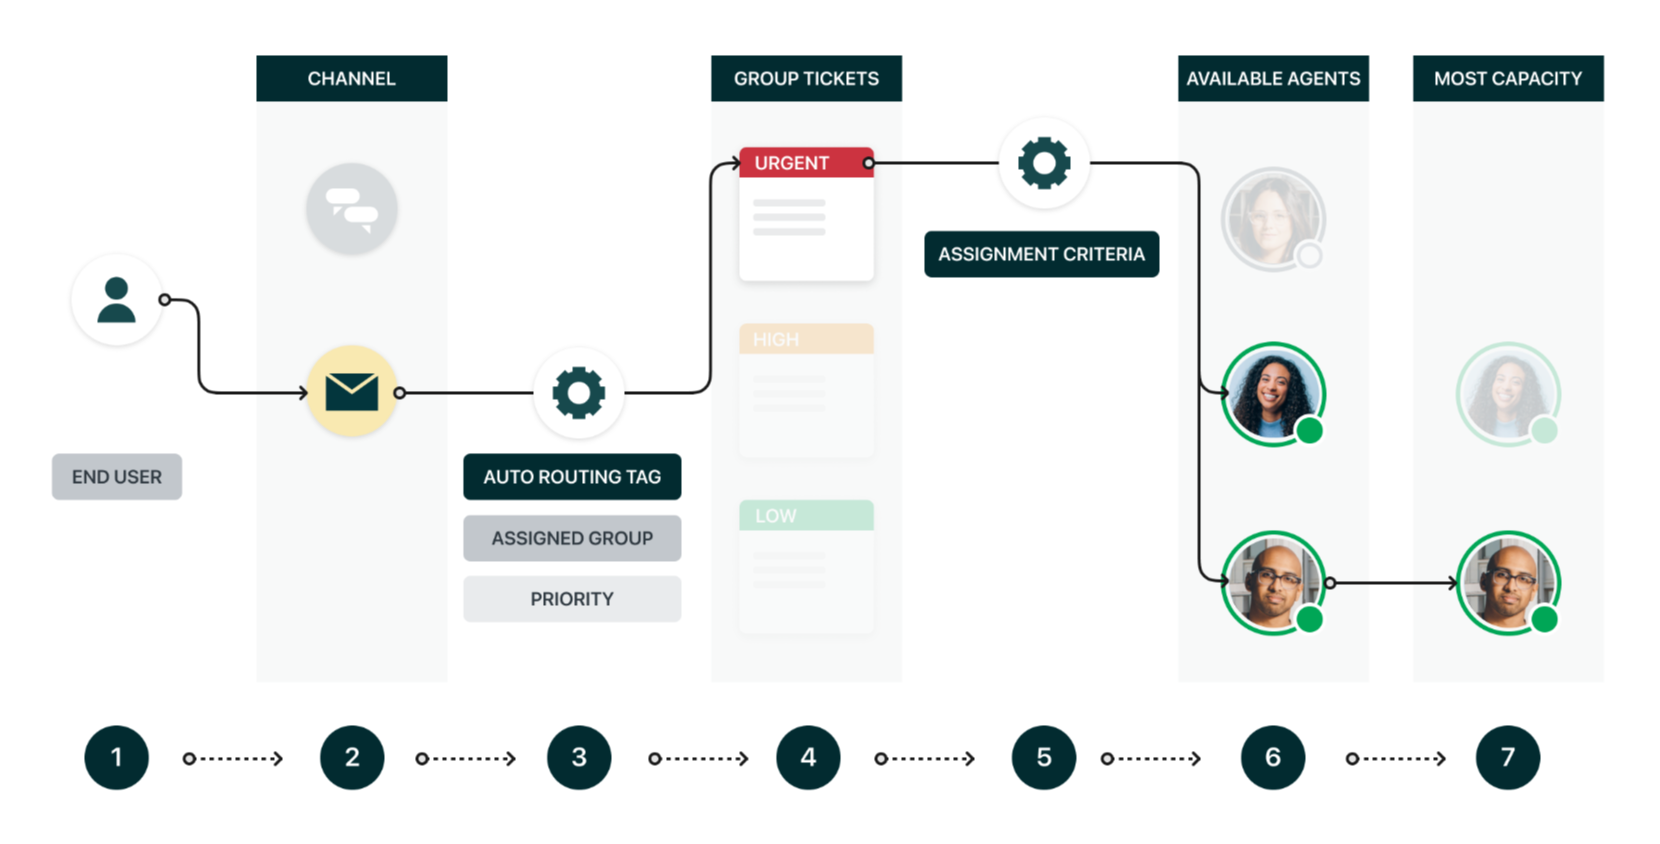
- An important VIP end user has an urgent issue that needs to be resolved.
- They submit a ticket using the email channel.
- The account admin has set up a trigger for the account to add the auto-routing tag to these tickets and then assign a group, priority, and skills.
- After the triggers fire, the end user's ticket is matched to an omnichannel routing queue and inserted based on the ticket's priority of Urgent and it's eligible-for-routing timestamp.
- Omnichannel routing now assesses the ticket based on agent skills, status, and capacity.
- The routing system first understands that three agents are available for work.
- Second, it identifies that two of the agents have the skill (German language) required for the ticket.
- Finally, it finds which of those two agents has the most spare capacity for emails and assigns the ticket to this agent.
Reassigning messages and calls in omnichannel routing
Messaging conversations and calls require time-sensitive responses. Therefore, omnichannel routing has special reassignment logic for each. For more information about how tickets enter and leave the queue to be routed by omnichannel routing, see Understanding how omnichannel routing orders tickets in a queue.
Reassigning messaging conversations and chats
With reassignment timing, a message or chat can be reassigned to another agent in the group if the original agent does not accept the work within a specific time threshold. The default threshold is 30 seconds. On Enterprise and above, that threshold can be customized.
The reassignment timing setting must be turned on during setup to reassign messages automatically if they aren’t accepted within the specified time. If that setting isn’t enabled, the routing engine will keep trying the same agent.
Reassigning incoming calls
When a call is offered to an agent, they can choose to accept or decline it. If the agent declines the call or doesn't answer within 30 seconds, the call is returned to the queue and assigned to another available agent. The call will continue to be offered to available agents in a round-robin fashion until the maximum queue waiting time expires. When using skills-based routing for calls, you can leverage the skills timeout settings to "overflow" the calls to agents without the matching skill when needed.
- Hours since created > (calendar) Less than >1
- Status > Less than >Solved
- Channel > is > Phone call (incoming)
After a call ends, the ticket generated by the call is removed from the omnichannel routing queue. If an agent needs to add more information to the ticket after a call ends, they must manually find the ticket, either by searching or using a view.
Summary of features
Omnichannel routing has a broad scope, so here's a quick reference of features and functionality.
Channels supported by omnichannel routing
At a high level, omnichannel routing can be used to route tickets from email,
messaging, and calls. However, in business rules, these categories of tickets
are broken down into via types. The
following lists show the supported via types (referred to as channels) as they appear in
Admin Center business rule conditions.
- Web form
- Web service (API)
- Closed ticket
- Ticket sharing
- Facebook post
- X (formerly Twitter)
- Web widget
- Mobile SDK
- Side conversation
- Merge
- Any channel
- Native messaging
- LINE
- SMS (through Sunshine Conversations only)
- Facebook Messenger
- Telegram
- X (formerly Twitter) Direct Message
- Google RCS
- Apple Messages for Business
- Google Business Messages
- KakaoTalk
- Instagram Direct Messenger
- Sunshine Conversations API
- Chat
- Phone call (incoming)
- Phone call (outgoing)
Summary of features by plan
The availability of omnichannel routing features varies by plan level. The following applies to your Zendesk Suite plan level, or to the plan level of all individual products:
| Team | Growth | Professional | Enterprise |
|---|---|---|---|
|
Routing email, messaging and call tickets |
Routing email, messaging and call tickets |
Routing email, messaging, and call tickets |
Routing email, messaging, and call tickets |
|
Routing based on capacity and agent status |
Routing based on capacity and agent status |
Routing based on capacity, agent status, and skills |
Routing based on capacity, agent status, and skills |
|
Default unified agent statuses |
Default unified agent statuses |
Default unified agent statuses |
Default unified agent statuses |
| Custom omnichannel routing queues | Custom omnichannel routing queues | Custom omnichannel routing queues | Custom omnichannel routing queues |
|
Routing based on priority |
Routing based on priority |
||
|
Up to 5 custom statuses |
Up to 100 custom statuses |
||
|
Message reassignment |
Customizable reassignment time |
Related articles
See the following articles for more information to help you get up and running with omnichannel routing and agent statuses:
- Turning on omnichannel routing
- Managing your omnichannel routing configuration
- Understanding queues in omnichannel routing
- Creating capacity rules to balancing agent workload
- About unified agent statuses
- Adding unified agent statuses
- Managing unified agent statuses
- About using skills to route tickets