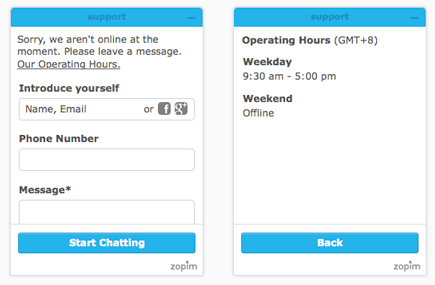
You can set an availability schedule for your chat agents by enabling operating hours on your account. If you are also using offline forms, you can display this schedule to customers during your offline hours.
Understanding operating hours
When you enable operating hours, any agents signed in to Chat outside of the scheduled hours have their availability status set to Invisible. Agents cannot manually change their availability status during offline hours.
You can apply a single offline hours schedule across your entire account, or, if you have multiple departments enabled, you can apply customized schedules to each department. However, the operating hours applied to the entire account override the operating hours applied to departments.
By default, when operating hours are set, agents cannot receive messages from end users outside of the scheduled work hours.
However, in some cases, your end users may be able to use custom Javascript to override your operating hours, and send messages to your agents' accounts, even if they are Invisible. Contact Zendesk's customer support for more information.
Setting up operating hours
- From the dashboard, select Settings > Account > Operating Hours tab.
- In the upper-right corner of the page, click On.
- Select the type of schedule you want to set up for your account.
- Account schedule is a single schedule that applies to your entire account.
- Department schedules lets you apply multiple schedules to a department or apply multiple departments to a single schedule.
- Select a type of schedule from the Online Schedule drop-down menu:
- Daily: Allows you to set separate hours for each day of the week.
- Weekday/Weekend: Allows you to set the same hours for every weekday (Monday to Friday) and both weekend days (Saturday and Sunday).
- Ensure the check box is selected next to each day of the week that has operating hours. If a day has no operating hours at all, clear the check box next to it.
- Adjust the sliders next to the days to select the hours agents are available to chat. Note that operating hours must be at least one hour and can be scheduled in 15-minute increments.

- If you're using department schedules, click the link to also add departments to the schedule. Note that you must add at least one department to each schedule for department schedules to work.

- If you want to show your operating hours on to visitors on the chat widget when the widget is offline, select the Display Operating Hours check box. For details, see Displaying operating hours on the widget.
- Click Save Changes.
- For changes to take effect, make all agents log out, click your profile icon in the upper-right, thenn select Leave session, and log in again.
Displaying operating hours on the widget
If you've configured the Offline Form to appear (Settings > Widgets > Forms > Offline Form), you can also show operating hours show on your offline widget.

To display operating hours on the widget
- From the dashboard, select Settings > Account > Operating Hours tab.
- Select the Display Operating Hours check box.
- Click Save Changes.
Reviewing operating hours
Where you review your schedules after you've set them up depends on whether you're using account schedules or department schedules.
To review account schedule hours
- Go to Settings > Account > Operating Hours tab.
To review department schedule hours
- Go to Settings > Departments and click on the department with the schedule you want to review. The schedules appear in the Operating Hours section. The hours that appear here take into account all of the schedules applied to this apartment.