Zendesk supports a set of standard ticket statuses that are used to help you manage your ticket workflows. Activate custom ticket statuses to create additional, more-specific ticket statuses.
Make sure you understand how activating custom ticket statuses affects other features in your account, such as your business rules and the agent experience.
This article includes these sections:
- Activating and deactivating custom ticket statuses
- Understanding how custom ticket statuses impact your account
- Understanding how custom ticket statuses impact the agent experience
Related articles:
Activating and deactivating custom ticket statuses
You must be an admin to activate or deactivate custom ticket statuses.
To activate custom ticket statuses
- In Admin Center, click
 Objects and rules in the sidebar, then select Tickets > Ticket
statuses.
 - Click Custom ticket statuses to expand it.
- Select Allow custom ticket statuses.
 You may want to review your triggers, automations, macros, and views based on standard ticket statuses and make sure you’re happy with how they were automatically updated.Note: When custom ticket statuses are activated, keyboard shortcuts will not work when you are creating a new ticket. After a ticket is created, however, you can use keyboard shortcuts again.
Now, you're ready to create custom ticket statuses (see Creating custom ticket statuses).
To deactivate custom ticket statuses
- In Admin Center, click
 Objects and rules in the sidebar, then select Tickets > Settings.
 - Click Custom ticket statuses to expand it.
- Deselect Allow custom ticket statuses.
- Click Save.
- Review your triggers, automations, macros, and views
based on ticket statuses.
You may need to make some adjustments. For example, any instances of the Status category and Ticket status condition in your triggers will be automatically converted to the Status condition.
Understanding how custom ticket statuses impact your account
Zendesk supports a set of standard ticket statuses which are used to help you manage your ticket workflows. These standard ticket statuses are used in your default triggers and other automations that are based on status changes in a ticket.
When you activate custom ticket statuses, the existing standard ticket statuses — New, Open, Pending, On-hold (if activated), Solved, and Closed — become status categories.
A status category is a logical group of similar ticket statuses; it includes at least one default ticket status and can contain multiple ticket statuses.
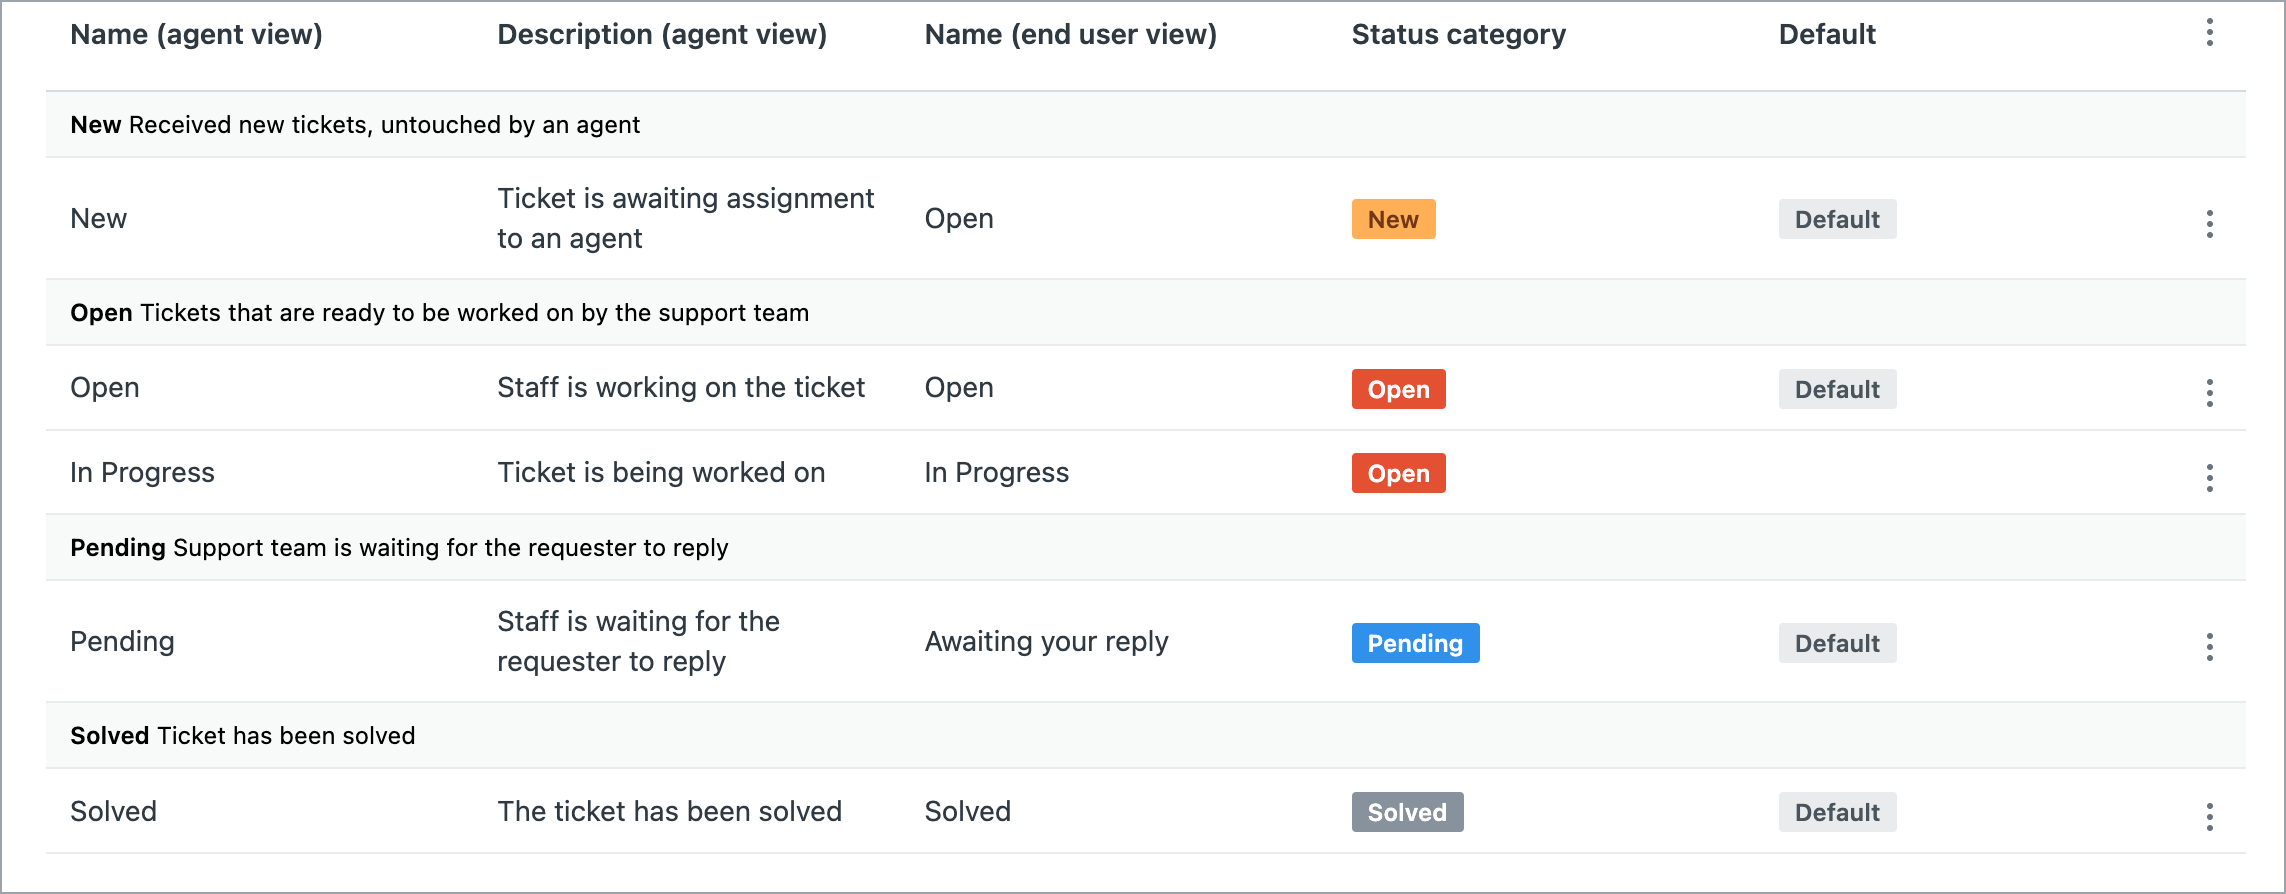
Status categories, and the initial default ticket statuses inside of each status category, are named after the standard ticket statuses. The example below shows your initial default ticket statuses organized into their respective status categories:

Custom ticket statuses are created within these status categories. For example, you could create a custom ticket status in the Open category that describe why a ticket is open, such as Open - New customer or Open - Existing customer:

You can change the default ticket status of a status category, if needed. Every ticket status, including both standard and custom ticket statuses, belongs to a status category. You can’t create or edit status categories, and you can’t move ticket statuses from one status category to another.
The status category you use to create a new ticket status controls the state of the ticket and is dependent on the system ticket rules. All ticket statuses, including both standard and custom statuses, are dependent on these rules.
When you activate or deactivate custom ticket statuses, the status of your tickets are automatically updated based on status categories. For example, if you created a custom ticket status called Open Investigating in the Open status category, assigned it to several tickets, but then deactivated custom ticket statuses, the status of all those tickets is changed to Open.
Finally, it’s important to note that AI agent tickets can’t have custom ticket statuses.
How custom ticket statuses impact existing business rules
When you activate custom ticket statuses, the ticket status conditions and actions in your existing triggers, automations, macros, and views are automatically updated from Ticket: Status to Ticket: Status Category. The Ticket: Status Category condition and action uses the default ticket status of the status category, where applicable.
In the example below, the default automation "Close ticket 4 days after status is set to solved", contains the condition "Ticket: Hours since solved" and action "Ticket: Status Closed":

After you activate custom ticket statuses, the automation is updated to the condition "Ticket: Hours since status category solved" and action "Ticket: Status category closed":

It's recommended to review your existing triggers and other business rules after activating custom ticket statuses. Edit the "Ticket: Status Category" condition or action to "Ticket: Ticket status" as needed.
Understanding how custom ticket statuses impact the agent experience
When you activate custom ticket statuses, you and your agents will see a variety of changes to other features, including:
- Selecting a status from the status picker in the ticket interface
- The appearance of ticket statuses in views
- Searching for tickets based on ticket statuses
- Tickets in the "Closed" state retain the solved status (see About closed tickets solved with a custom ticket status)
- Tickets in the “Closed” state appear in search results if your search terms are included in their subject line or comments. See Searching Zendesk Support data.