Summary: ◀▼
The LMS conversation simulator app lets you create realistic training tickets, assign them to agents, and track progress for onboarding and ongoing coaching. You can build templates from intents or similar tickets, add documentation, set goals, use QA scores, export CSV reports, and pause or cancel assignments. It helps you measure agent readiness and support training with real ticket scenarios.
The LMS conversation simulator ticket generation app by Zendesk Labs assigns realistic, true-to-life training tickets to agents in a structured, easy-to-use way. This new tool improves your agent training in several key ways:
- Creates a safe space for practicing customer interactions when onboarding agents
- Allows rapid assessment of agent training retention and comprehension
- Delivers just-in-time training for new products, services, and policies your agents need to understand
This article contains the following topics:
- Getting started
- Installing and configuring the app
- Configuring LMS conversation simulator permissions
- Using the LMS conversation simulator app
- Exporting template and assignment details
- Managing assignments
- Filtering templates
- Best practices
- Agent guide for the app
- About the training documentation ticket
Getting started
Before you install the LMS conversation simulator app, take a moment to review the following:
- Training tickets generated by the LMS conversation simulator app can be evaluated within Zendesk QA (or another QA tool).
- You need to be signed in as a Zendesk admin to set up the app.
- You must turn on custom objects (legacy custom objects are not supported).
- You must have at least two custom objects available for use. If you’ve already used up all of your included custom objects, you’ll need to upgrade your plan to obtain more.
- Ticket generation for light agents or contributors is not supported. To ensure an agent successfully receives training tickets, they must be assigned a standard role or a custom role that includes custom object permissions.
Installing and configuring the app
You can install the LMS conversation simulator app from the Zendesk Marketplace.
To install and configure the app
- In the Zendesk Marketplace, go to the LMS conversation simulator app page.
- On the app's page, click Install.
- Select the Zendesk account where you want to install the app, then
click Install.
The account you selected opens and the LMS conversation simulator page displays.
- Change the app title if required.
- Configure group and role restrictions to the app as required.Note: If you restrict an agent from the app, they won't be assigned training tickets.
- Click the Sign in with LMS conversation simulator link.
- In the new tab that's displayed, complete authentication.
- You are then redirected back to the app. A green check mark will appear next to the OAuth Authentication step. Click Install.
- During installation, the LMS conversation simulator automatically creates
several configurations:
- Custom Object: Assign training template
- Custom Object: Training template
- Custom Ticket Field: Assigned training
- Custom Ticket Field: Training template
- Admins: View, Edit, Add, and Delete
- Agents: View and Edit
Both admins and agents need to have View and Edit access to the two custom objects for the app installation to work.
To configure admin and agent access
- In Admin
Center,
click
 People in the sidebar, then select Team > Roles.
 - From the list of roles, click the role you want to give permission to. The role settings page displays.
- In the Custom objects section of the role settings page, configure the View and
Edit permissions for the following custom objects:
- Training template
- Assign training template
- Click Save.
The installation is now complete.
During installation, the LMS conversation simulator app creates two bot users: one for training tickets and one for documentation tickets.
Configuring LMS conversation simulator permissions
- Support team-based workflows: Supports how teams work across scorers, template creators, training assigners, and leaders.
- Expand access with control: Role-based permissions let admins open access to templates while controlling who can make changes.
- Improve leadership oversight: Track both agent readiness and LMS team activity over time.
To configure access to the LMS conversation simulator
- In Support, click the LMS icon (
 ).
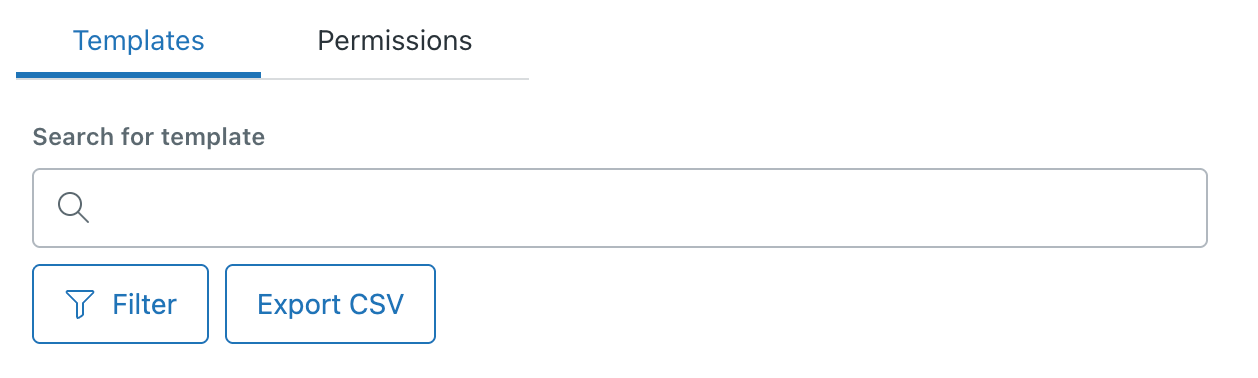
). - On the LMS conversation simulator page, click the Permissions tab.
- On the Permissions tab, select a role to configure its permissions. The list of
roles will vary depending on your account settings.
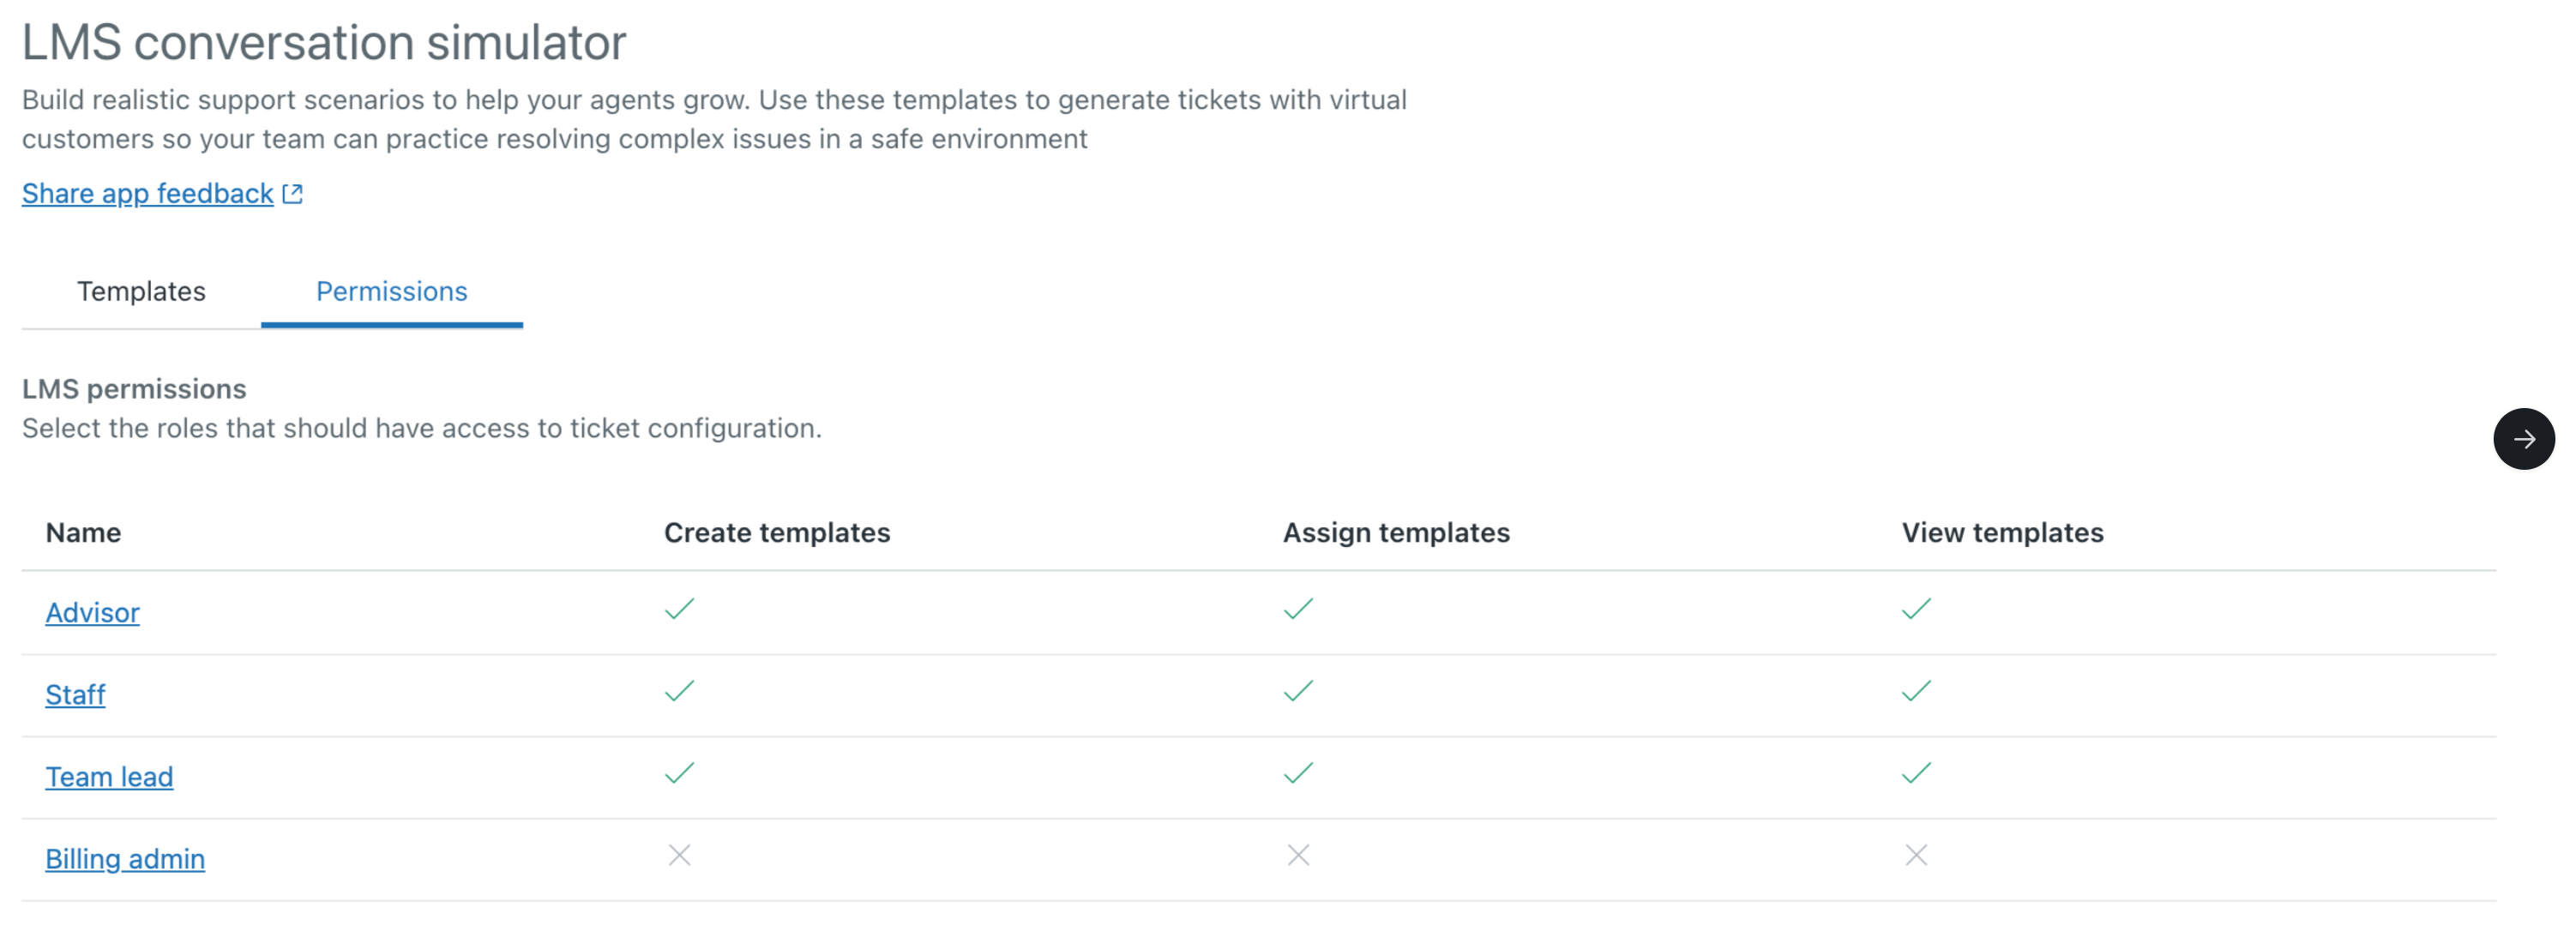
- In the permissions panel for the selected role, select the required permissions
for creating, assigning, and viewing templates.
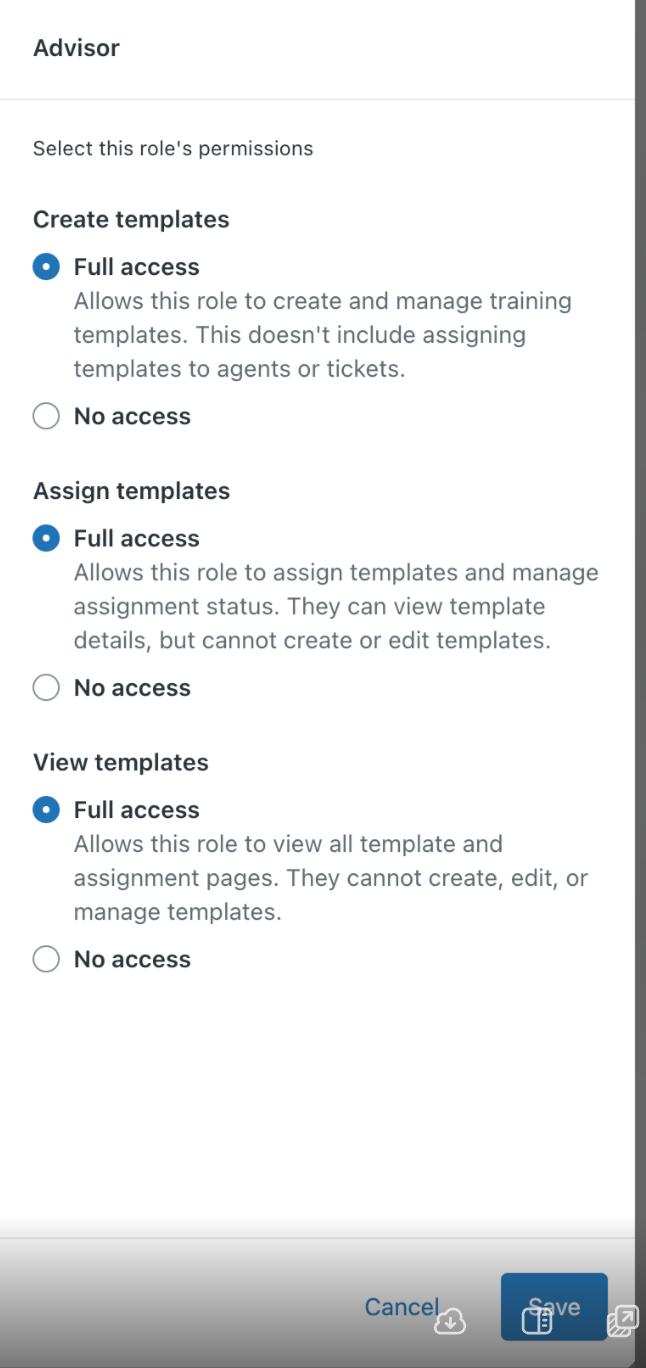
- Click Save.
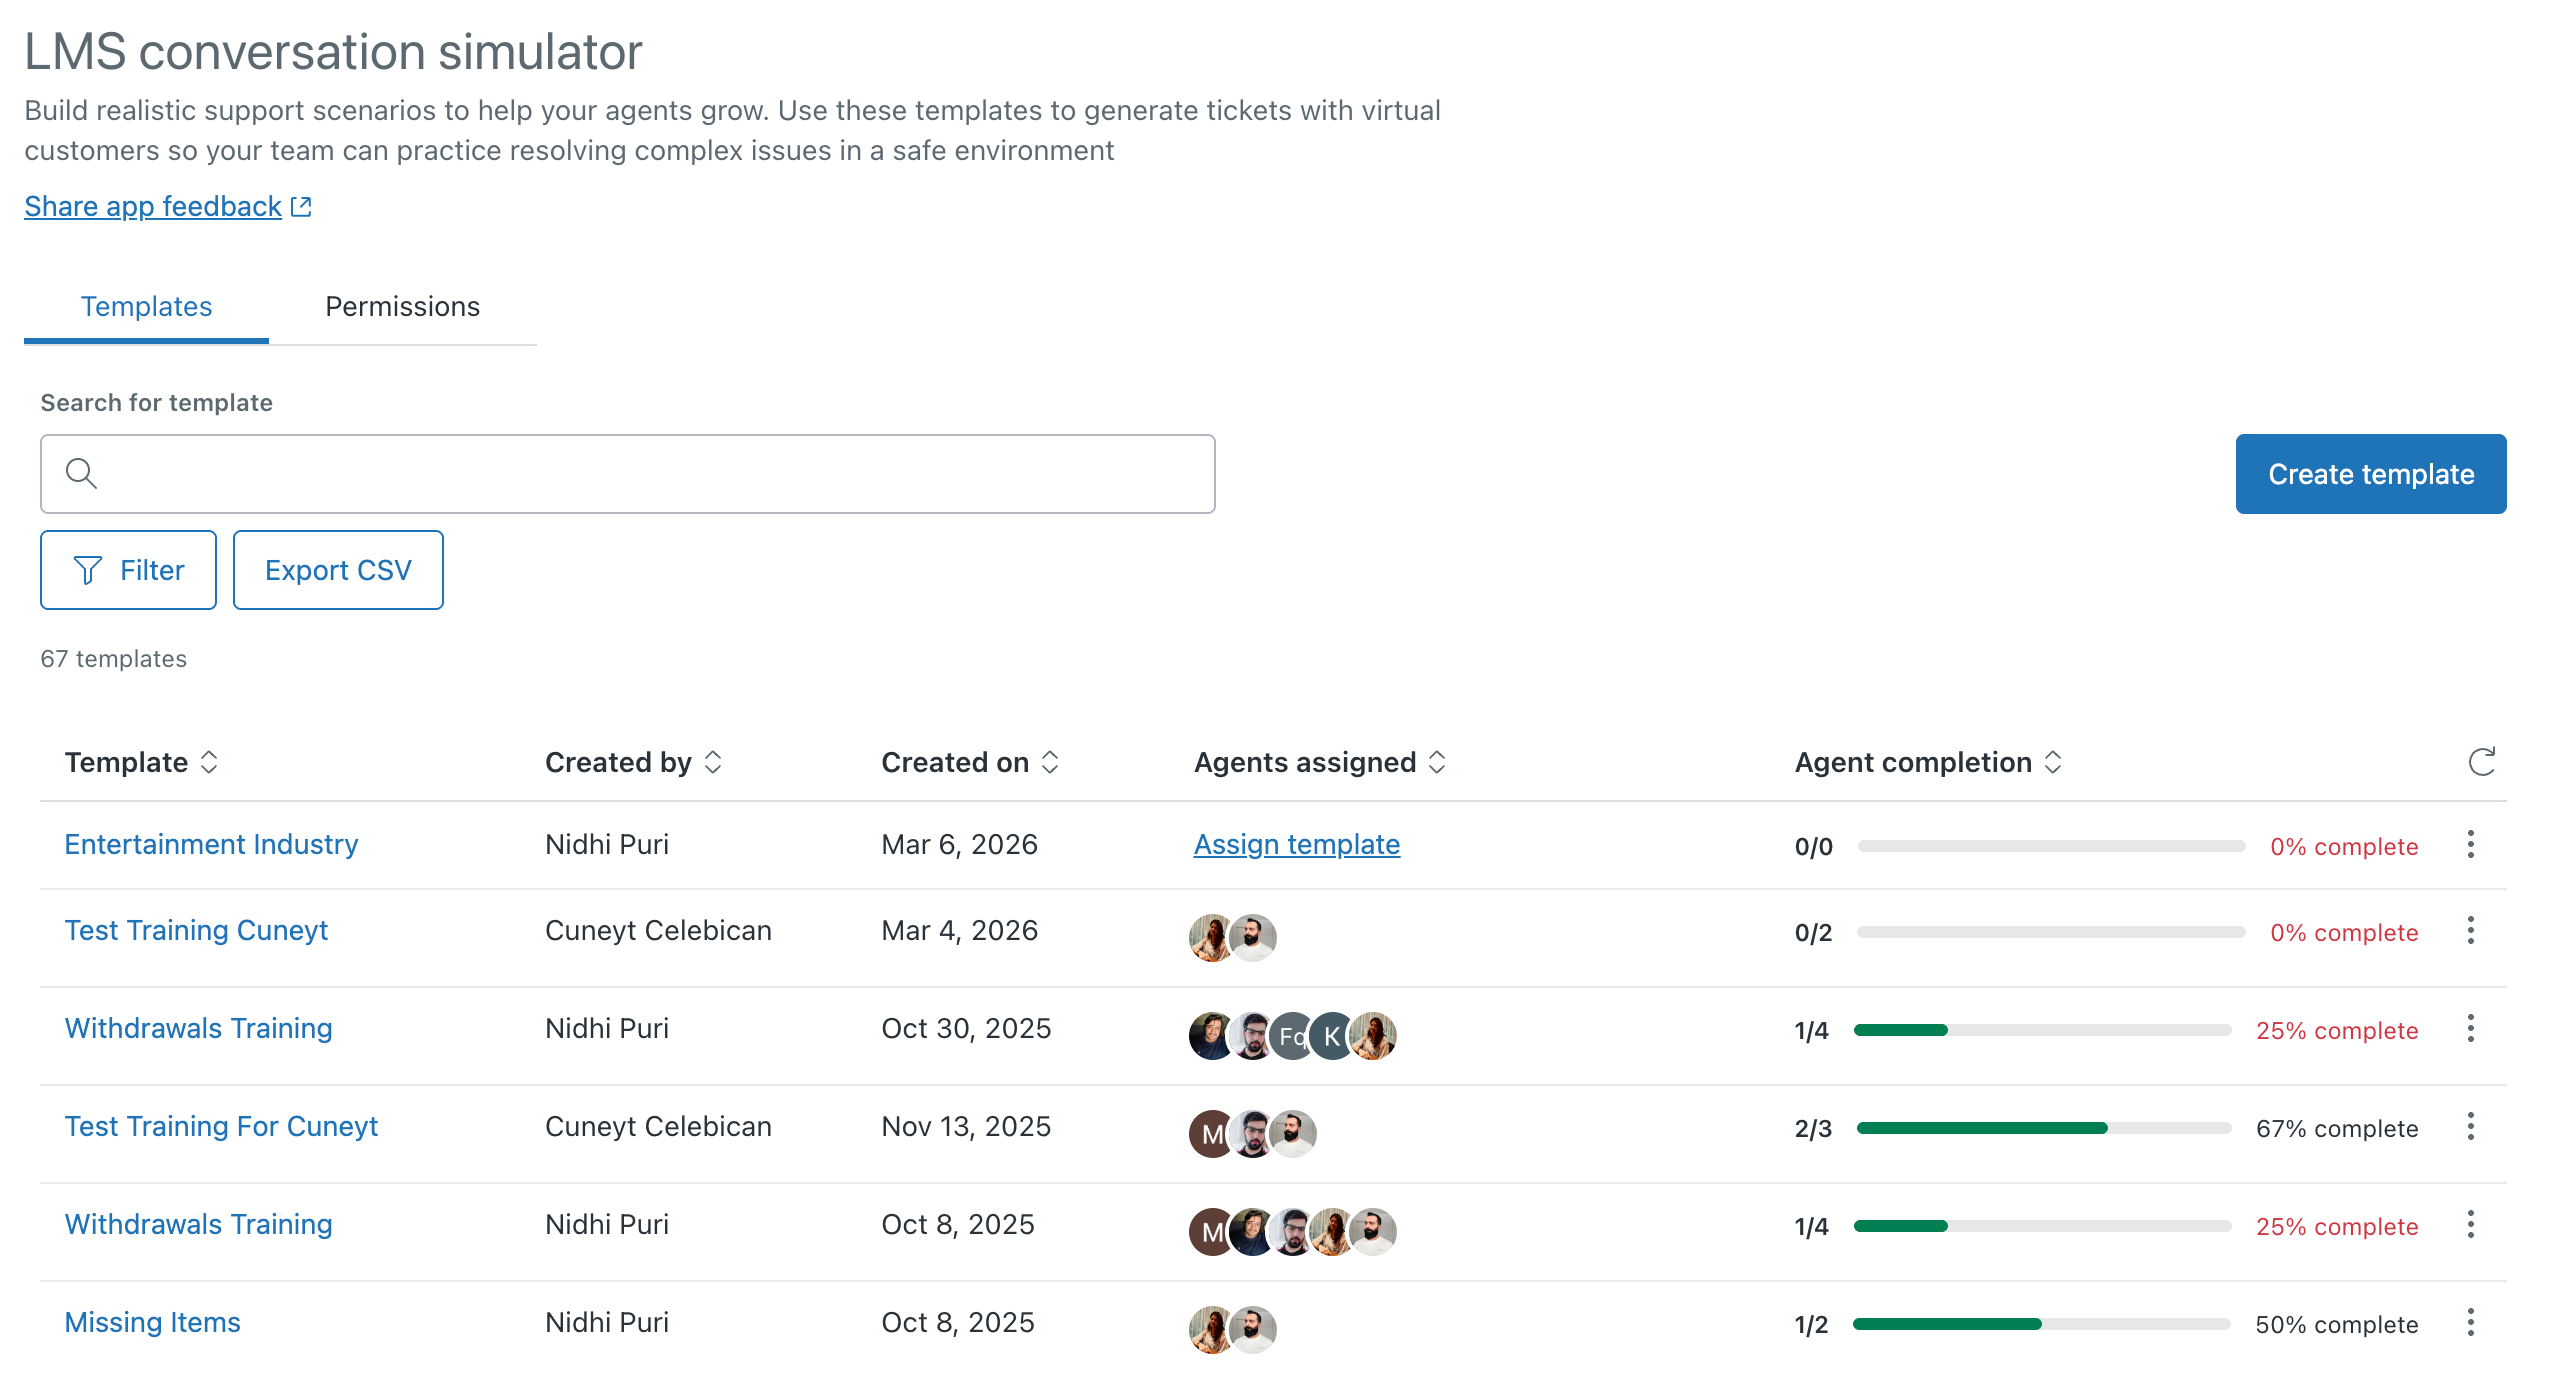
Using the LMS conversation simulator app
To open the app, in Support, click the LMS icon (![]() ).
).
The LMS conversation simulator page displays the title, description, creator, and assignees for each training template. Training templates include a consolidated view of key progress metrics, including template completion status, number of agents currently in progress, and number of agents not yet complete. You can hover over a template to see additional template details or click Filter to narrow-down the list of templates.
Click a template to open a detailed assignments list showing each assignment’s required ticket count, color-coded ticket status indicators, and overall assignment status: In Progress, Paused, Cancelled, or Completed.
Create a new training template
In this section, you'll create a training template that you can assign to agents.
This section contains the following steps. Follow each step in order:
Getting started
In this step, you'll provide basic information about your new template.
To create a training template
- On the templates tab of the LMS conversation simulator page, click Create template.
- On the Create template page, enter a unique name and optional
description for the template. The description you use does not affect
your AI-generated tickets.

- Click Next.
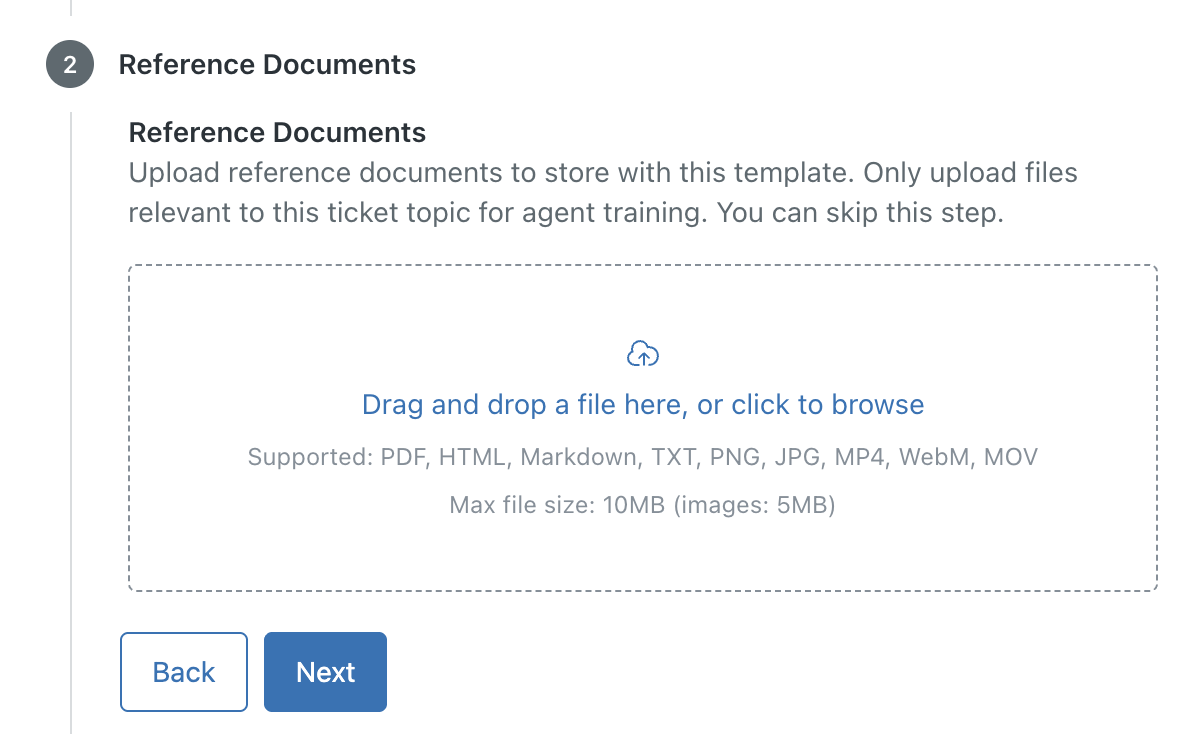
(Optional) Add reference documents
You can upload reference documents that are visible for every training ticket created. These documents can be any file type shown in the image. For example, customers often want to share an image of a product, damaged goods, or a policy they are referring to, to better explain the situation in the ticket. These files will appear as links that agents can open to review the details and provide a more accurate analysis based on the information shared.
To add reference documents
- Drag and drop the required documents into the reference documents area. You can also click, then browse to the files you want. You can upload up to three documents.
- Click Next.
Define your scenario
Next, define your scenario. This defines the topics that the simulator will use to create tickets.
To define your Scenario
- In the Define your scenario section of the Create template page, choose
one of the following options to use as reference points for AI-generated
ticket conversations:
- Select intents: From the list, select a topic from the Zendesk-provided intents. This will help define the data used to train your agents.
-
Select similar tickets: Select related tickets from your
real-life encounters with customers. You can use the standard
Zendesk search syntax
to find tickets that match your planned training conversations.
The LMS conversation simulator references end user comments from
these tickets to establish realistic detail for your training
scenarios. You can click the ticket subject hyperlink to open
the ticket in Support or choose the tickets you want to use as a
training reference. Any tickets you select must be accessible by
the agents you are generating the training for.
Use the Filter button to help you search for the tickets you want.
Important: Make sure to redact any sensitive PII data in these tickets prior to creating the training template.

- Click Next.
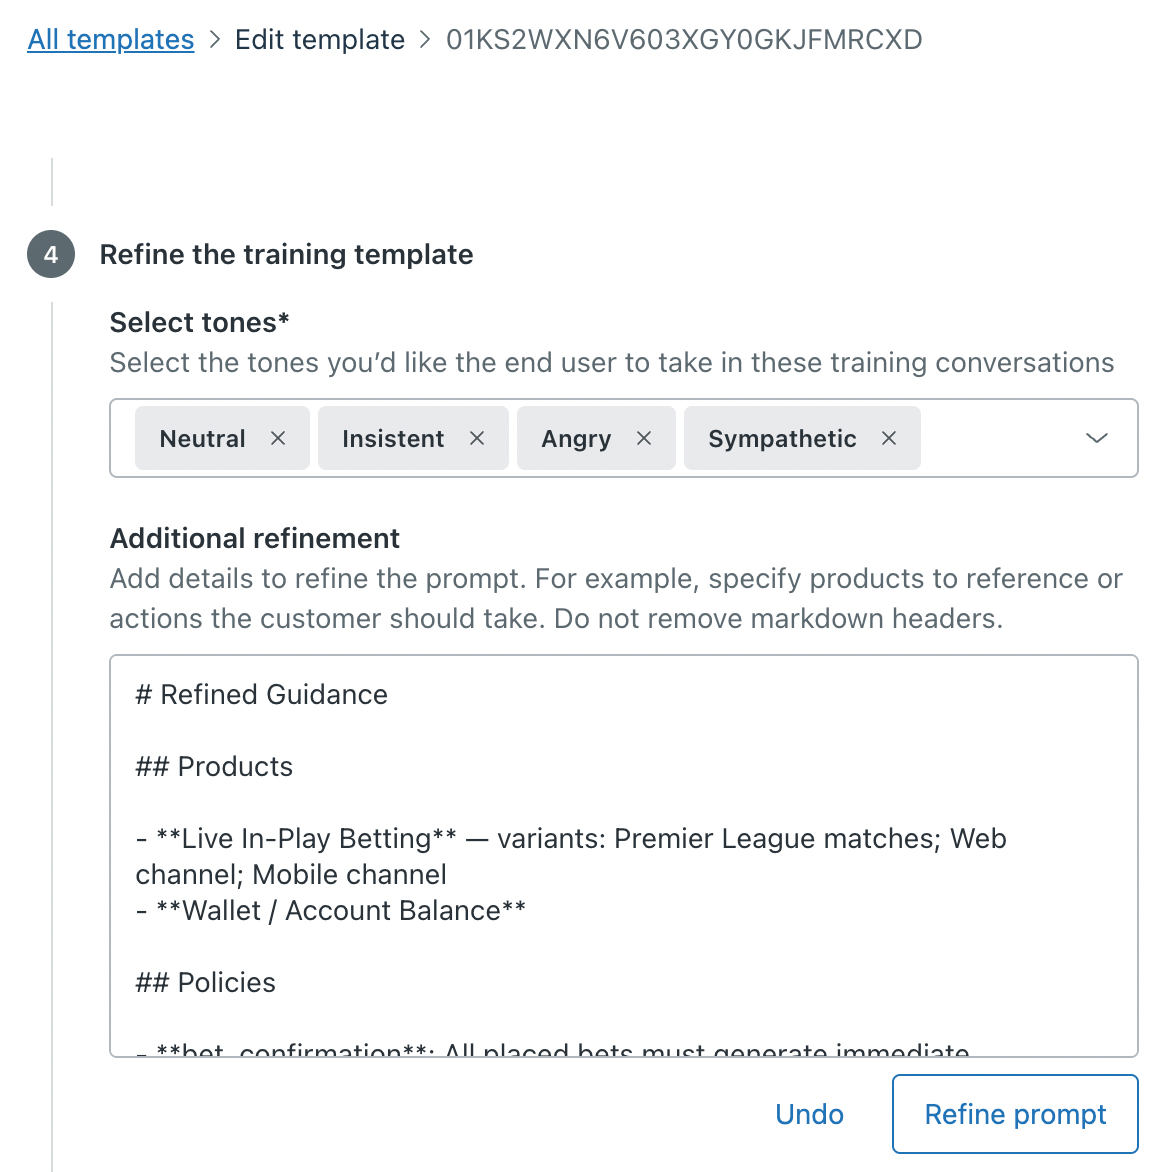
- From the Select tone dropdown, choose the tone your AI-generated end user will use in conversation with your agents. You can choose from values such as friendly, sympathetic, and formal. You can select multiple tones, and the training assignment will randomly assign the selected tones to the created training tickets.
- If there are other details that you think might help create the
training, you can enter them under Additional refinement. For
example, you might specify products to reference or specific policies to
push back against. This directly modifies the AI prompt used to create
the training tickets, so try to be explicit in your instructions.
Under Additional refinement, you'll see one or more of the three fields: products, policies, and behavioral rules. To ensure the refinement works correctly, don't delete these fields. See the screenshot below for an example. If you don't include all three fields, you'll see an error message and the refinement won't be created.
Once you've entered details, click Refine prompt. Your additional details are validated, then saved.
Once the prompt has been refined, if the user manually removes any of the three rules from the text box, the LMS conversation simulator will treat the remaining input as a standard text prompt and display a warning. If you don't click Refine prompt, the LMS conversation simulator treats the prompt as a standard text prompt without showing any warning or error.
The system converts this natural-language input into a concise, specific prompt that can be passed to the AI to make it richer.
- Click Next.
- If you want your agents to review any training documentation prior to
being assigned tickets for training or assessment, you can provide up to
three links to documentation, videos, or internal policy documentation
in your help center. These links will be provided in a single ticket to
the agent prior to receiving any simulated customer
conversations. When the agent solves the ticket, the first AI-generated
conversation will be assigned to them. If no links are provided, the
first ticket will be a generated conversation based on the scenario you
created.
Under Training documentation, click Add link.
- Add a link to the training documentation you want the agent to see.
- Add a name to the link to make it more readable for agents.
- Continue to add links as required.

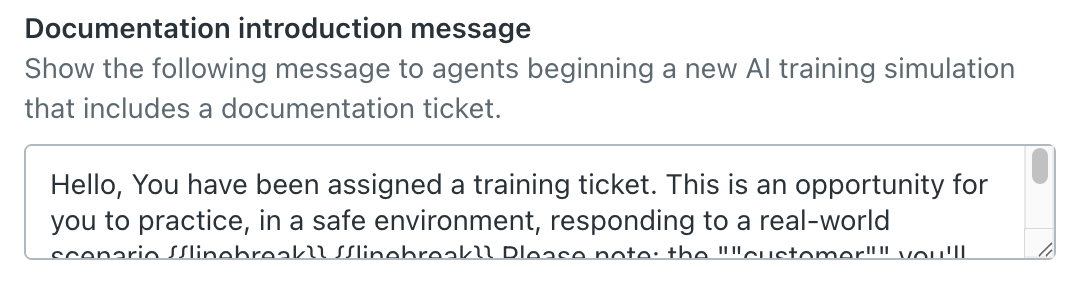
- In the Documentation introduction message section, enter a message to
inform agents that they've received a training ticket and must mark
the ticket as solved to continue receiving training tickets.
Testing your training template
This is a great time to test out an AI-generated conversation.
To test your conversation
- On the Create training template page, click Test this ticket. A
test chatbot is displayed where you can converse with the AI.

Using this example, you'll see that the AI is referencing "software" when you want it to reference "retail clothing".

To improve this, you can return to the scenario pages and select example tickets that reference clothing. You could also expand your additional refinement to add details about your products that customers might want a refund for.
- When you've finished testing, close the test chatbot.
Saving your template
Now that you've finished configuring and testing your template, you can save, edit, or delete it as required.
To save your template
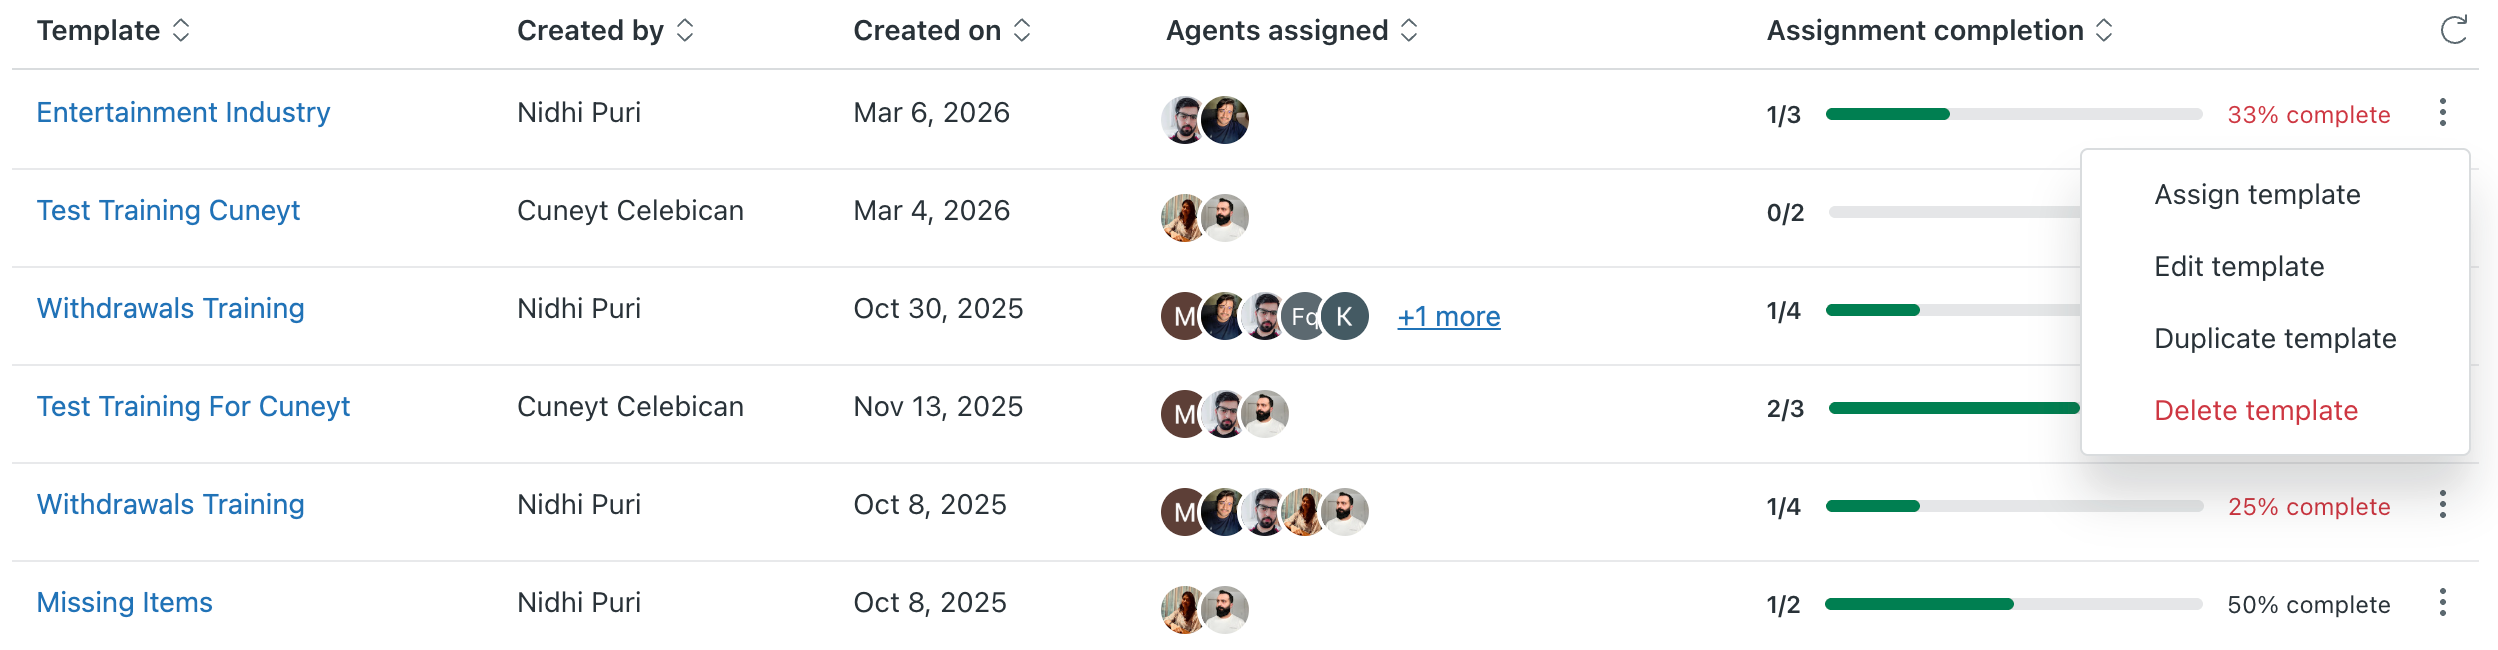
- Click Save to return to the Overview page. From this page, you
can click the options button (
 ) to assign, edit, duplicate, or
delete the training template, as needed.
) to assign, edit, duplicate, or
delete the training template, as needed.
Assign training tickets to agents
At this point, you’ve created your training template and are ready to assign tickets to agents. You can choose agents based on their scores with similar tickets in Zendesk QA or another QA tool, select all new agents who are onboarding, or select all agents that might work with a new product or service.
Training tickets are not generated immediately upon assignment. The LMS conversation simulator generate tickets once the assigned agent logs into the Zendesk instance.
To assign tickets to agents
- In the LMS conversation simulator, next to the template you want to assign, click Assign template.
- On the Assign template page, provide the following information (click
Next to advance to each section):
-
Template: Select a training template from the
list.

-
Language: From the list, select the language that the tickets
will be created in. You can choose from English, Spanish,
Portuguese, Italian, French, German, Arabic, Chinese, Korean,
Japanese, Hindi, Bengali, Swahili, Yoruba, and Indonesian. You can
also select Agent preferred language to create tickets in the
agent's configured language where available.

-
Number of tickets: Enter how many training tickets
you want the agent to receive from this training template. This does
not include the initial training documentation ticket that you might
have configured. Tickets will be created and assigned one at a time,
with each new ticket being created after the previous one was
solved. You can create up to ten tickets.

-
Tags: In order to identify, route, and track
training tickets, you can tag your training tickets with one or more
tags. Enter an existing tag, or create a new one. Press enter to
finalize your selection.

-
Goals: Select your goal with this assignment. You
can select a standard goal that targets more soft skills (for
example, multi-step problem solving) or you can write a custom goal
(for example, "The resolution for this problem is that the Bluetooth
keyboard needs to be disconnected and reconnected"). The AI customer
will end the conversation when the goal has been met.

-
Template: Select a training template from the
list.
- Choose the agents who you want to assign the training. You can select agents from a list, or use a search filter.
- Choose the training due date. You can also choose to send agents a
notification when the due date is approaching.
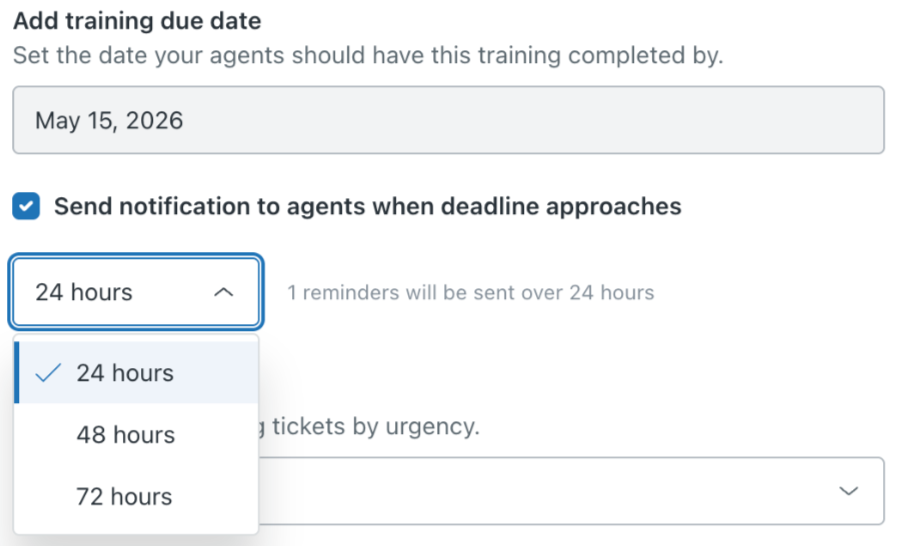
- Finally, select the priority for any tickets the simulator creates. The priority helps agents to decide which tickets to work on first from their assigned training list.
- Click Assign training ticket.
The first training ticket will now be assigned to the agents you selected.
Adding QA scores to your status
- Easier progress tracking: Use assignment status filters to see training progress and quickly identify agents who need extra support.
- Extend QA into training: Customers who already score production tickets can use the same QA approach for LMS training.
- Assess readiness earlier: Leaders can evaluate new hires, Tier 1 agents, and BPO teams while they are still in training, before they move into production.
- Use real-world scenarios: Scoring LMS tickets helps measure support skills and product knowledge in realistic situations, making training more practical and relevant.
Setting up QA score integration
Before you can incorporate QA scores into your LMS conversation simulator reports, there are a few steps you need to take in Zendesk QA and the LMS conversation simulator app.
To configure QA score integration
In Zendesk QA
- Follow the instructions in Setting up a custom integration in
Zendesk QA to obtain an API key.
- Copy the API key to your computer clipboard and store the generated API key in a safe place as you won't be able to retrieve it later.
In the LMS conversation simulator app
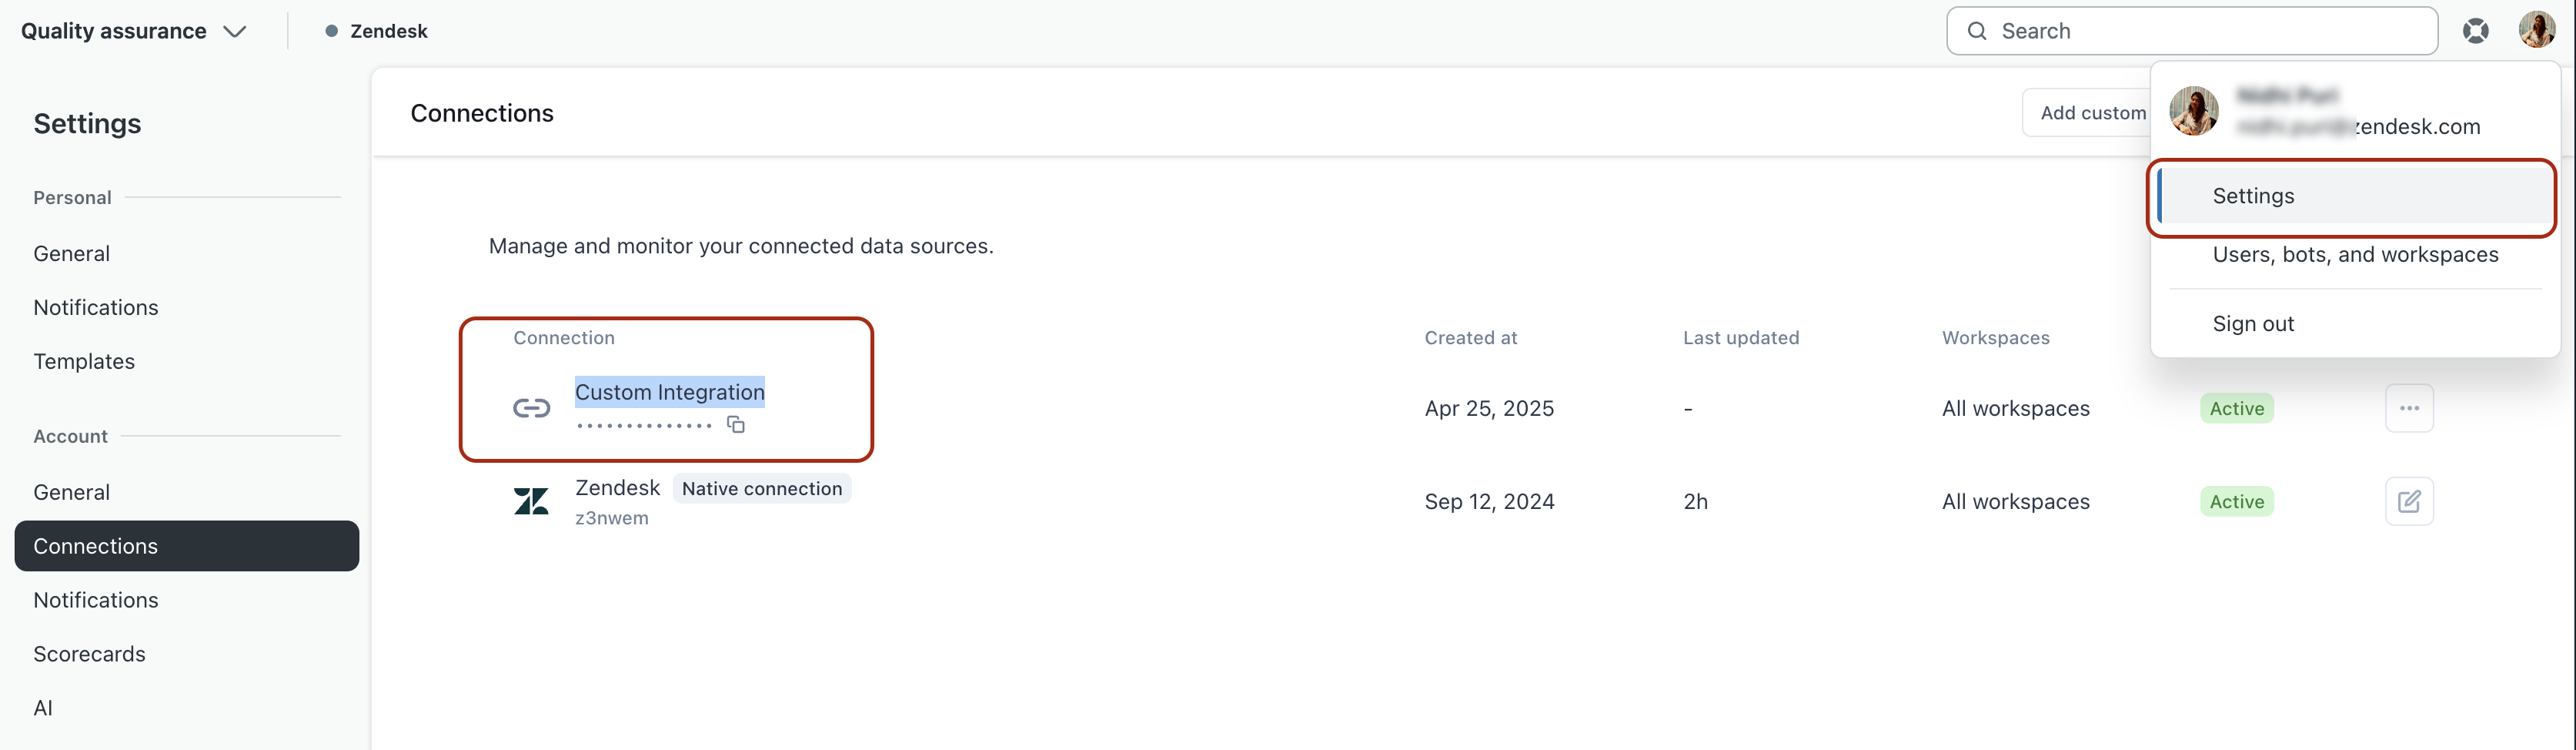
- In Admin Center, click
 Apps and integrations in the sidebar, then select Zendesk
Support apps.
Apps and integrations in the sidebar, then select Zendesk
Support apps. - From the list of apps, click LMS Conversation Simulator.
- On the app installation page, select Enable Zendesk QA.
- In the Zendesk QA API token field, paste the API key you copied
previously.
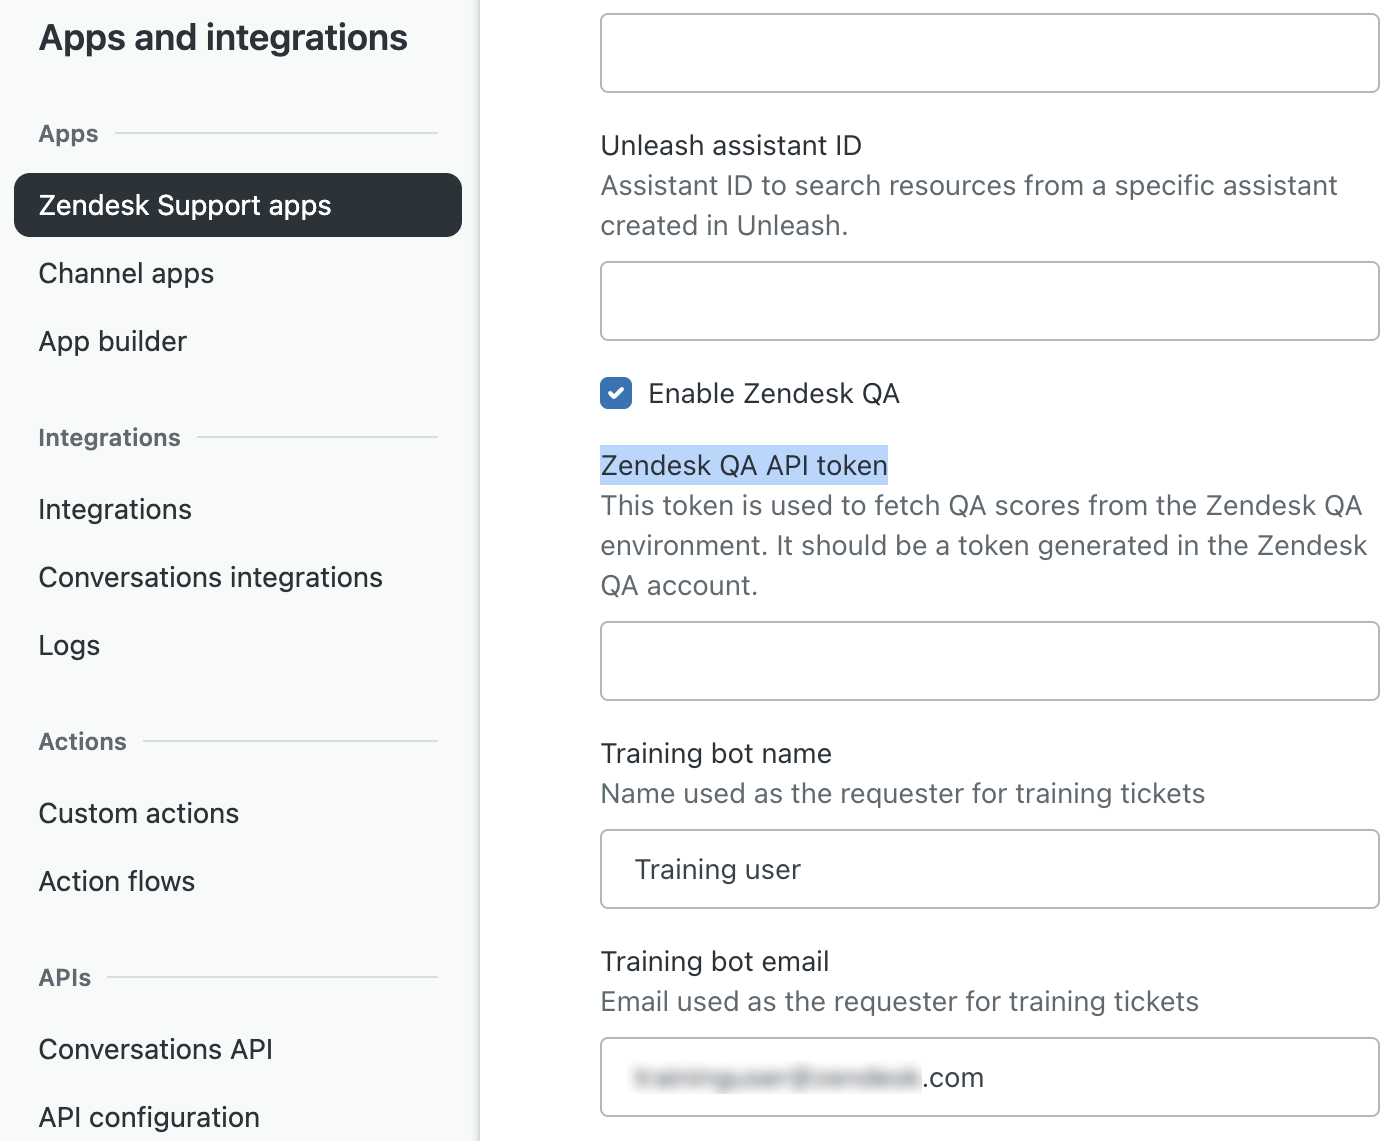
- Click Update.
You've now set up the integration between Zendesk QA and the LMS conversation simulator app.
Viewing your QA scores in LMS reports
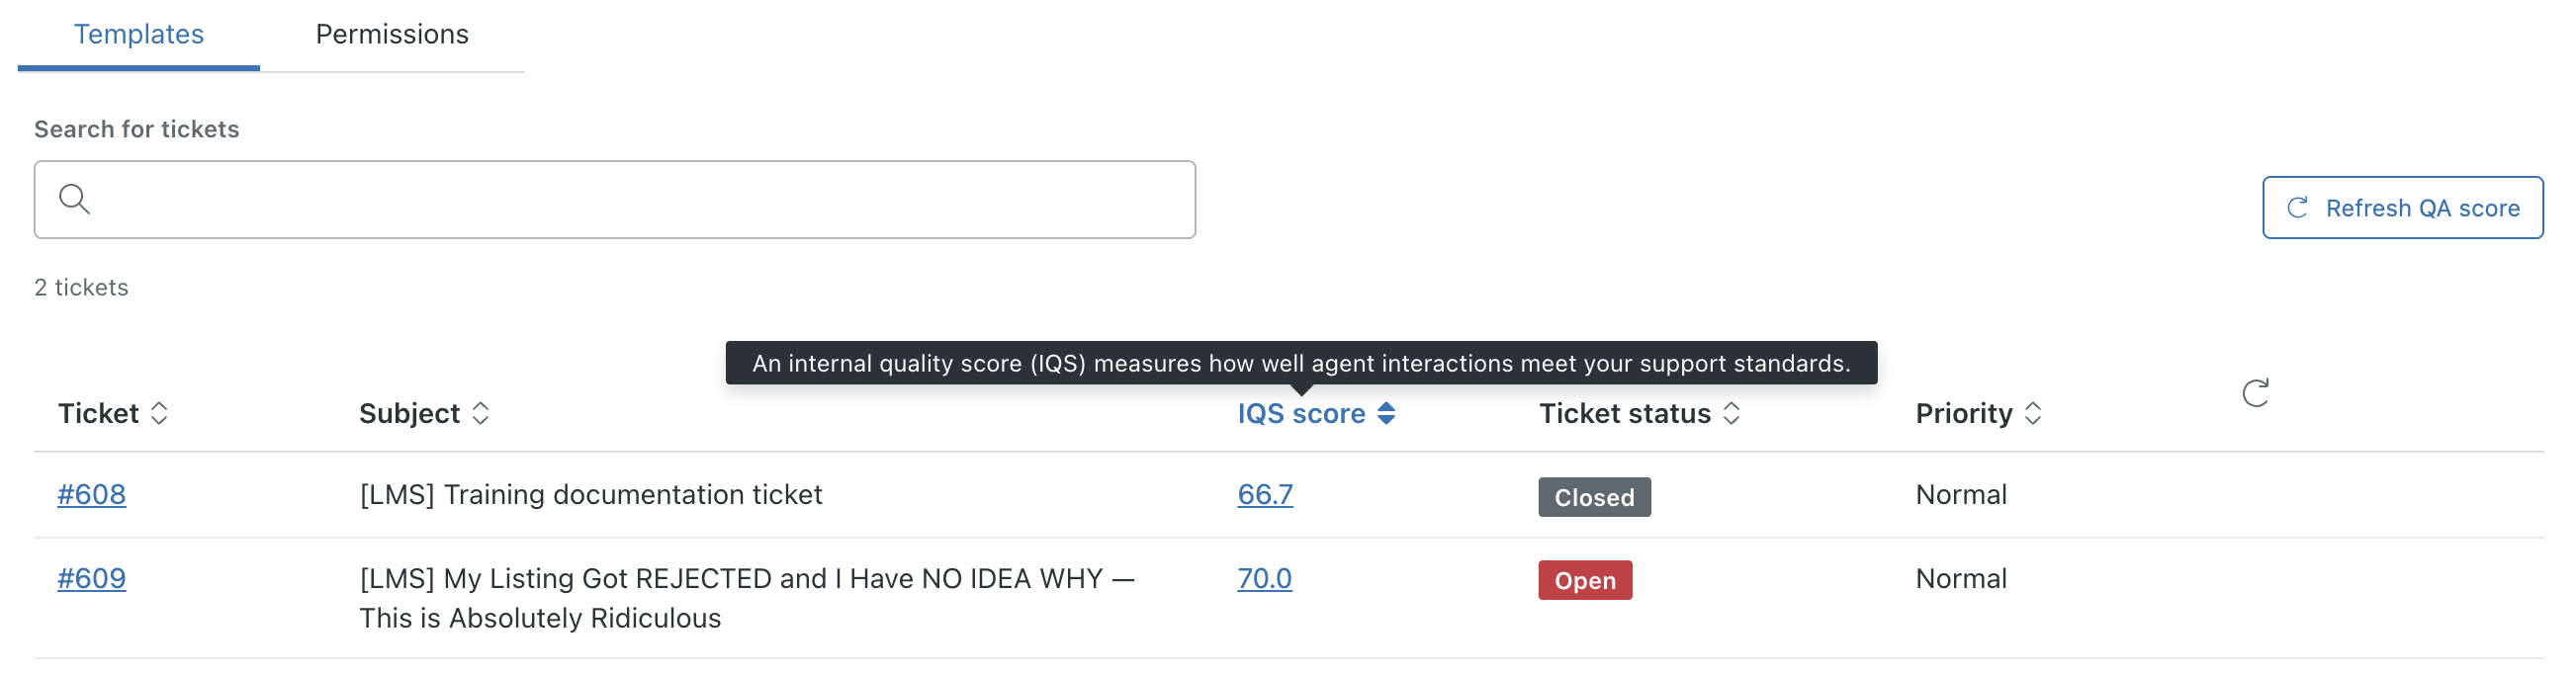
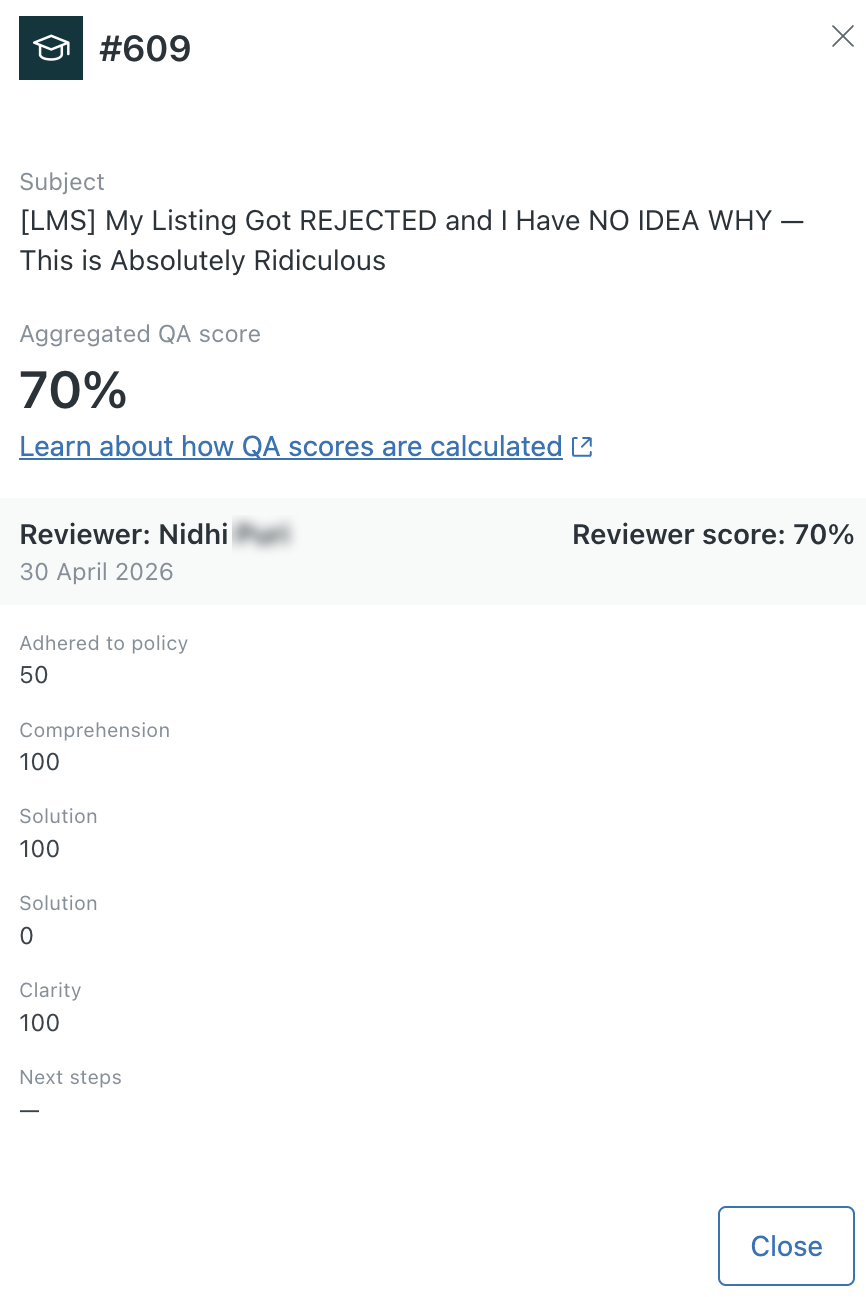
Once you've configured the connection between Zendesk QA and the LMS conversation simulator app, you'll see a new column named IQS score that displays any manual QA scores you've entered.
Click any QA score to read a detailed breakdown of how it was calculated.
Exporting template and assignment details
You can export template and assignment details, including assigned agent information to support external reporting, performance tracking, and stakeholder updates. Information is exported as a comma-separated-values (CSV) file.
To export template and assignment details
- On the LMS conversation simulator page, click Export CSV.
Your data is immediately exported, and you'll find the CSV file in your computer's Downloads folder.
Managing assignments
After you've assigned training tickets, there are several actions you can take to manage the assignment.
If you know that an agent will be unavailable, you can pause their assignments and resume them when they return. You can also cancel an assignment if it's no longer required. Additionally, you can send a reminder to agents if their training is overdue.
To manage assignments
- On the LMS conversation simulator page, click a template to open its status page.
- On the template status page, click the options menu (
 ).
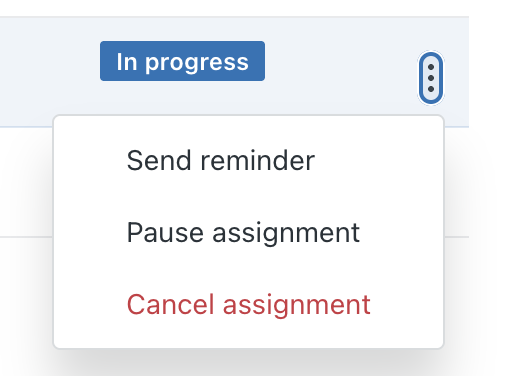
). - From the list of options, click Pause assignment, Resume
assignment, Cancel assignment, or Send reminder.
The agent is notified that the current training ticket is paused. This helps prevent delays from negatively impacting training timelines and related scoring. While paused, no new training tickets are generated for the agent.
Filtering templates
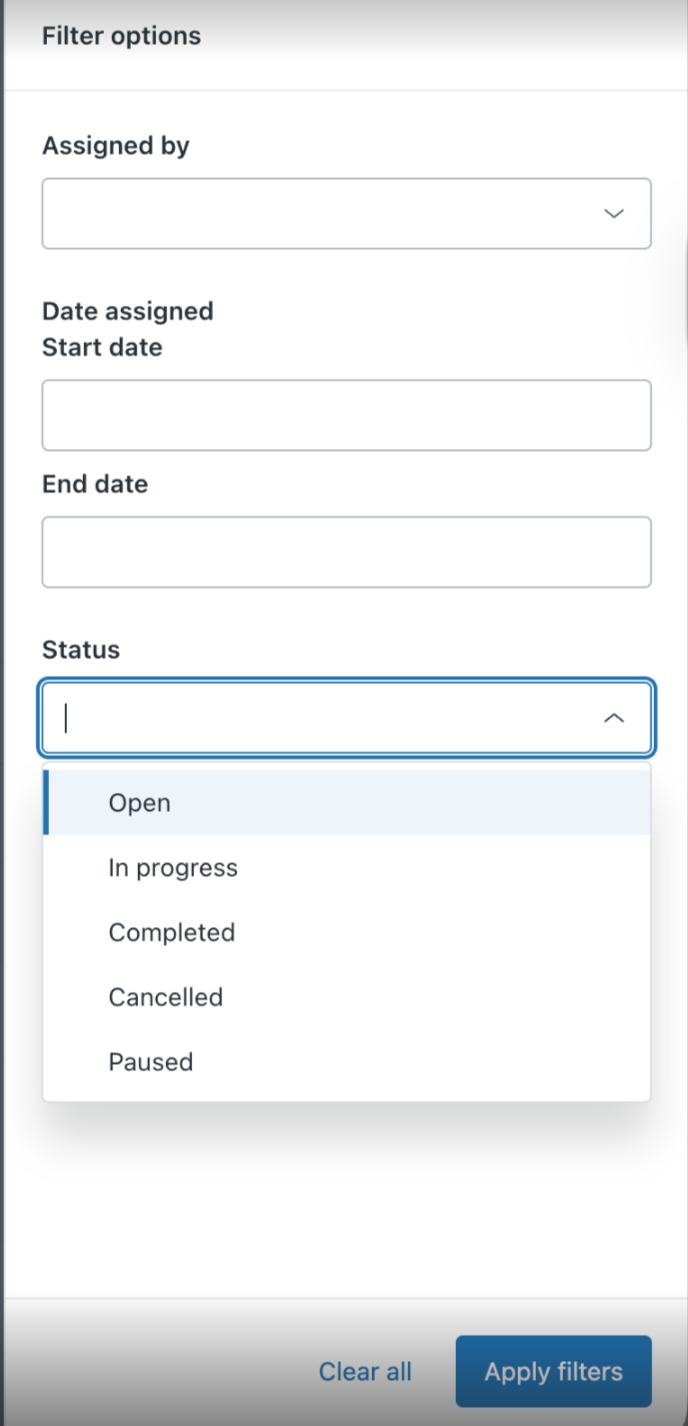
- Assigned by: Display templates that were assigned by the person you specify.
- Start date: Display templates that were assigned on the date you specify.
- End date: Display templates that were completed on the date you specify.
- Status: Display templates with the selected status.
To filter templates
- In a template, click Filter.
- In the Filter options panel, configure the filters as required.
- Click Apply filters.
The list of template assignments updates to reflect your filters.
Best practices
Review the following best practices to help you get the most from the LMS conversation simulator app:
- If any of your reports and metrics use inclusions or exclusions,
modify the reports as follows:
- If your reports include a specific tag, form, or similar that's counted in your metrics, you don't need to take any further action. LMS tickets use your default ticket form and automatically apply the lms-training tag.
- If your reports exclude items, you’ll need to modify these reports and metrics to exclude tickets with the lms-training tag.
- When you create groups, you'll often assign tickets to them and filter views based on groups. In this case, make sure that tickets with the lms-training tag are assigned to the appropriate group or there is a public view that includes all lms-training tickets assigned to the current user.
- Make sure that training tickets don’t impact an agent’s performance reviews. If you’re using Zendesk QA, exclude the lms-training tag from any dashboards you’re using.
Agent guide for the app
If you’ve been assigned a training ticket from the LMS conversation simulator, there are several important things to understand.
This section contains the following topics:
About the training documentation ticket
Your training might begin with a single training documentation ticket. This will have between one and three documentation links that your administrator suggests reviewing before you begin having simulated conversations. When you’ve finished reviewing the documentation, solve the ticket.
The ticket can be identified by the requester (LMS Training Bot), Subject (Training documentation ticket), and potentially tags or custom ticket fields (Assigned training and Training Template), which, depending on your configuration, you might see in your ticket view.
Training tickets are created once you've solved the training documentation ticket.
About the training ticket
After completing the training documentation ticket (if included), you'll be automatically assigned your first training ticket. This ticket will have a status of Open. You can identify this as a training ticket using the ticket tags or custom ticket fields (Assigned training and Training Template), which, depending on your configuration, you might see in your ticket view.
Complete this ticket as you would any other. The requester will continue responding until the ticket is resolved. After the ticket is marked as Solved, no further training tickets will be created and assigned to the agent.

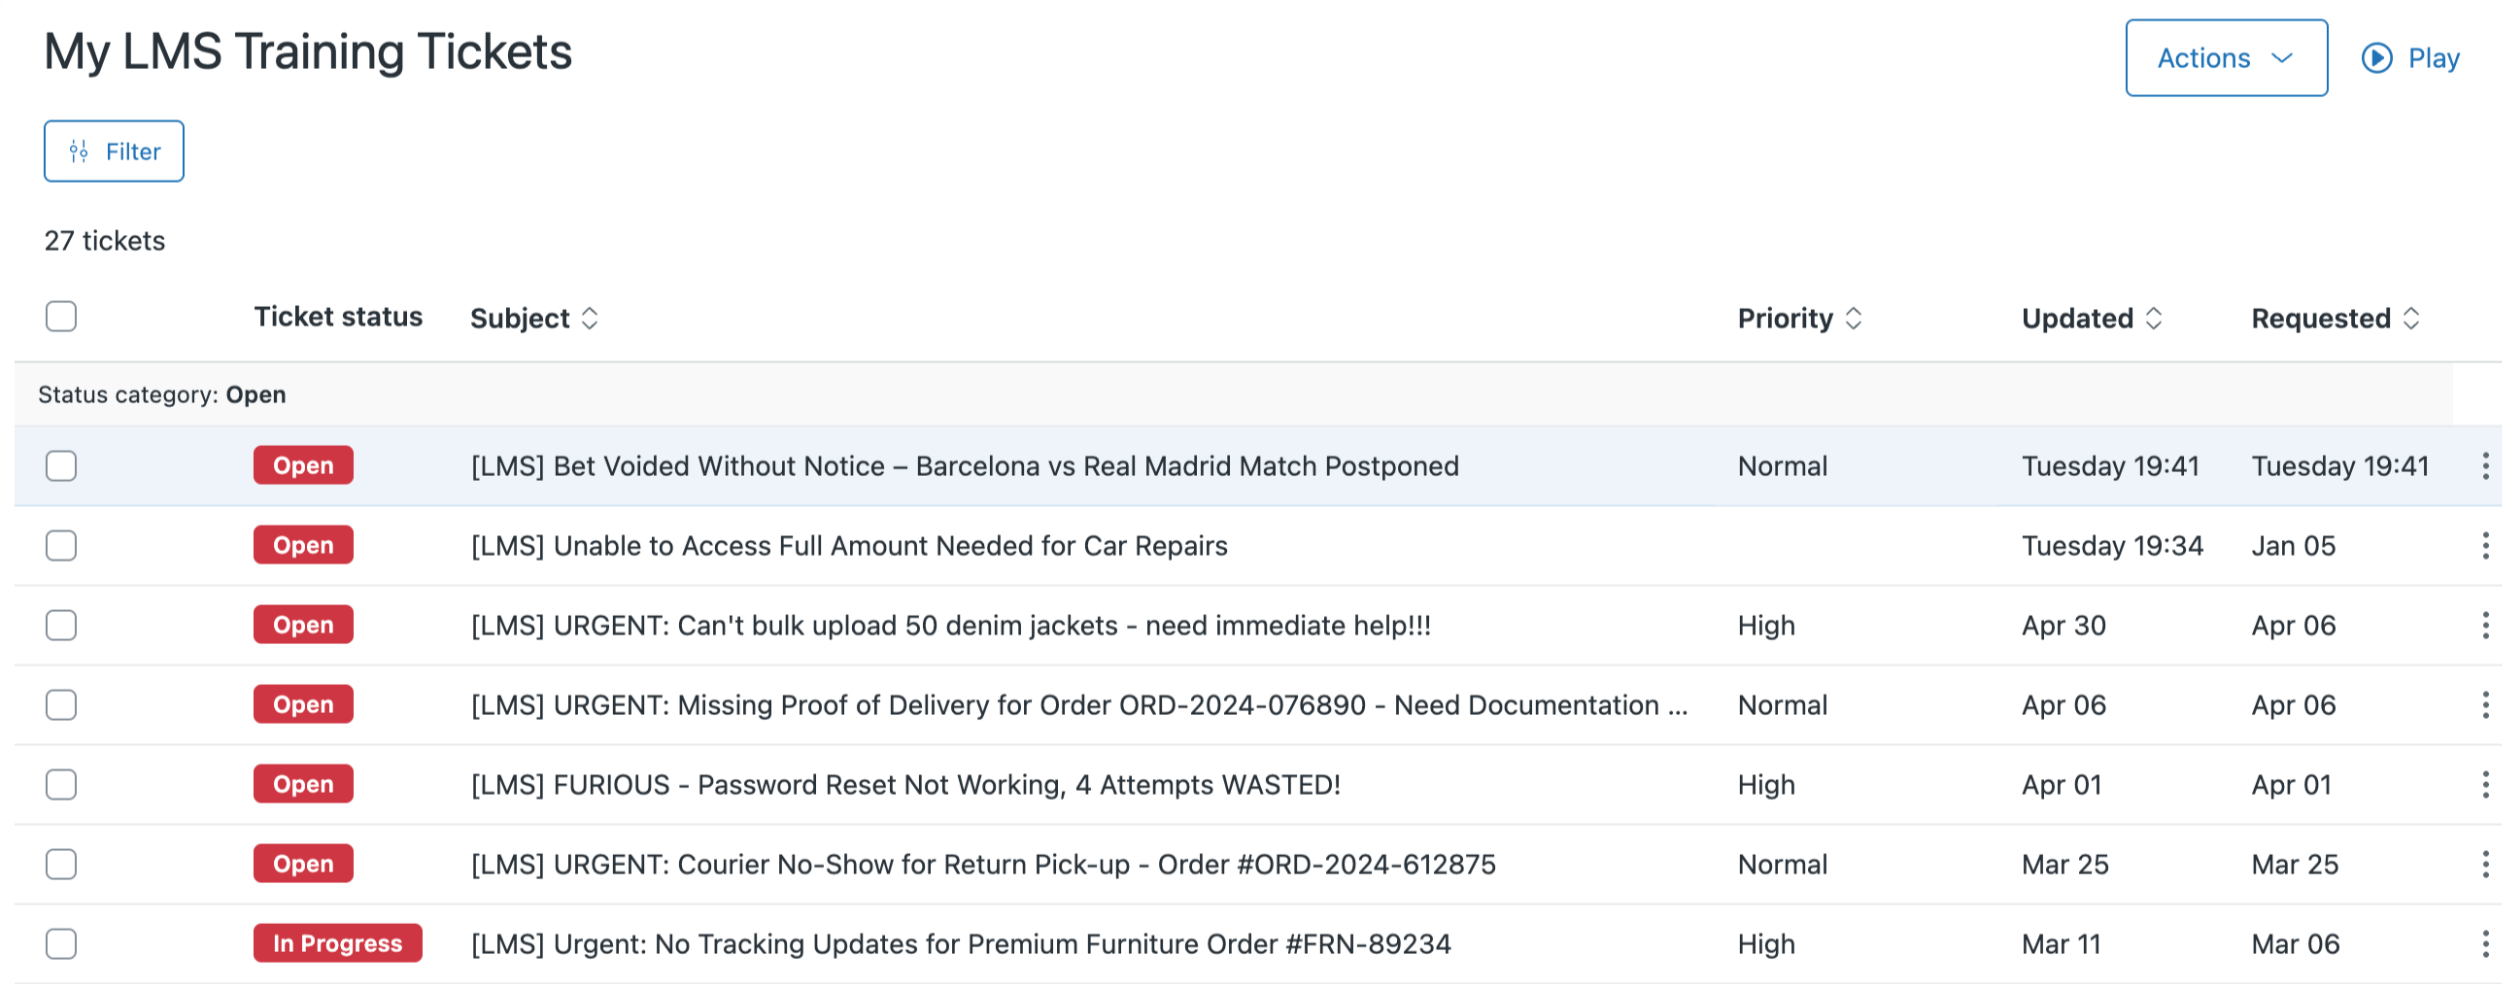
Monitoring your training tickets
The LMS conversation simulator app provides two methods you can use to monitor your training tickets:
- Agents can see a progress, pending, and completed training icon at the top
menu bar showing the total number of training tickets assigned to them, how
many they have completed, and how many are pending.
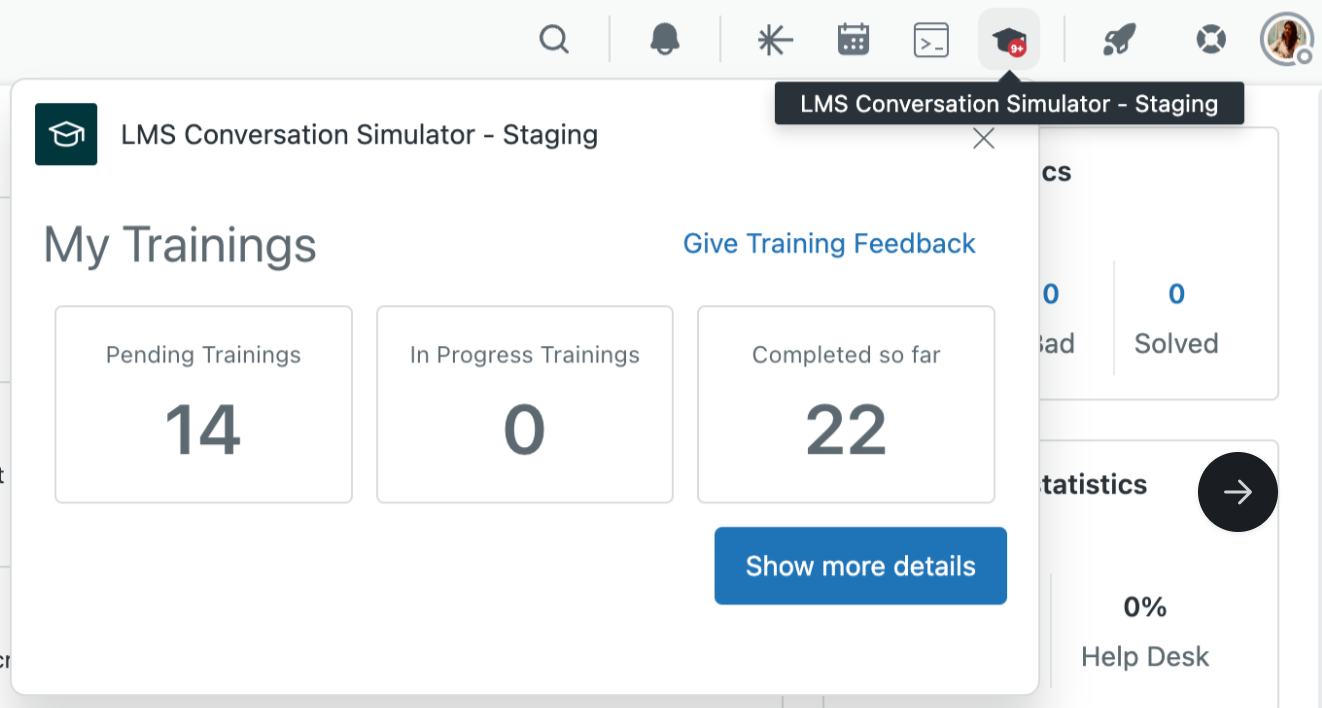
- The LMS conversation simulator app creates a custom Support view that
aggregates all training tickets for easy tracking. Click the training icon
in the top menu bar, then click Show more details, to see the
training tickets view.