This article explains how to migrate your live chat settings to messaging so you can deploy a messaging Web Widget on your website or help center that closely matches your current Chat configuration. It covers tasks you should complete before turning on messaging at the account level, which Chat settings are automatically copied to messaging, which settings need to be reviewed or reconfigured, and how to complete the migration by turning on the messaging Web Widget.
Any account using the Web Widget (Classic) or chat widget to deliver live chat support can begin the migration to messaging. This includes accounts that:
- Have never turned on messaging or attempted a migration
- Attempted to migrate to messaging previously but didn’t complete the process
- Completed the process and later turned off messaging and reverted to their live chat configuration
This article includes the following topics:
About the migration process
When you turn on messaging, many core features of your live chat configuration are automatically migrated to your new messaging settings. Some messaging-specific settings are turned on by default, and other features must be configured manually in Admin Center.
This section includes the following topics:
Automatically migrated settings
The following live chat settings are automatically migrated to messaging when you turn on messaging at the account level:
Triggers
When you migrate from live chat to messaging, Zendesk reviews your active and inactive Chat triggers and moves them to Admin center for use in your messaging setup.
Each Chat trigger is converted into one or more triggers that is compatible with messaging:
- If all of a trigger's conditions and actions map to current messaging conditions and actions, the trigger becomes a messaging trigger. The new messaging trigger keeps the activation status of the original Chat trigger.
- If the trigger fires when an end user loads a page and has a routing action, it becomes both a proactive message and a Support ticket trigger. Both new triggers are inactive by default.
- If the trigger fires when an end user loads a page and doesn't have a routing action, it becomes a proactive message. The new proactive message triggers are inactive by default.
Any Chat triggers that include conditions or actions that aren’t supported by messaging triggers aren’t migrated automatically. Instead, they must be manually reviewed and reconfigured.
- Chat triggers created after your previous migration attempt will be automatically migrated to triggers that are compatible with messaging.
- Updated Chat triggers that are migrated to messaging triggers will overwrite previously-migrated triggers with the same name.
- Chat triggers that were not migrated successfully in your prior migration attempt will be migrated again.
For detailed information about working with migrated (and unmigrated) triggers, see Migrating triggers from live chat to messaging.
Operating hours
Messaging uses schedules, which are similar to Chat’s operating hours. As part of the migration, Zendesk converts your operating hours to schedules in Admin Center. From the Schedule page in Admin Center, you can access and manage migrated schedules and create new schedules. See Setting your schedule with business hours and holidays.
Schedules are applied to the Web Widget channel to deliver different automated responses to your end users based on when they initiate contact. See Configuring messaging responses and business hours.
Pre-chat and offline forms
Messaging collects end-user information as customer details in the Web Widget’s default messaging response. The information request is sent to end users after they respond to the widget’s first message. If you’re using pre-chat or offline forms, Zendesk configures the default messaging response to collect the same end-user information and send an identical follow-up message after that information is submitted, and do the same for messages sent outside of business hours if you’re currently using operating hours. See Configuring messaging responses and business hours.
Satisfaction ratings (CSAT)
If you’re using a satisfaction survey to gather customer feedback, customer satisfaction (CSAT) ratings are activated in messaging. When a messaging conversation ends, customers are prompted to leave feedback. See About the CSAT user experience for email and messaging.
Banned visitors
IP addresses you have banned from live chat are migrated to messaging. See About banning IP addresses from messaging channels.
Goals and conversion tracking
Your live chat business goals are converted to messaging goals as part of the migration. Messaging goals allow you to track customer actions and see which agents are responsible for driving those actions. See Tracking customer actions with messaging goals.
On-by-default settings
Some messaging settings don’t have exact live chat equivalents, but are turned on by default to help create a familiar experience for your end users and agents.
These settings include:
-
Agent-ended sessions:
The end session setting for messaging works similarly to the end chat
feature. It lets agents end the messaging
session and releases agent capacity.Note: You can also Allow end users to end messaging sessions. This is a separate setting and is not on by default.
- Inactivity periods: In messaging, capacity release and conversation inactivity period settings determine how long a conversation remains active and what happens when it becomes inactive. By default, the inactivity timer is set to 10 minutes, and release agent capacity is released when that limit is reached.
- Wait time banner: You can show estimated wait time and queue position so end users know when to expect an agent reply. You can show estimated wait time and queue position so end users know when to expect an agent reply. Wait times are managed in Admin Center with messaging triggers. See Displaying estimated wait time in messaging conversations.
- Inactivity reminders: You can configure your inactivity period and capacity release settings to send up to three reminders to end users when a messaging conversation becomes inactive. These reminders use default text and timing, but can be customized.
Unmigrated settings
- Mobile SDKs: You can create and deploy messaging for your iOS, Android, or Unity channel.
- Chat APIs: Chat APIs, Real-time APIs, and Incremental APIs are not supported in messaging. See Zendesk Web Widget and SDKs in our developer API documentation for alternatives.
- Third-party bots: Most third-party bots can be used in messaging.
- Skills-based routing: Messaging tickets continue to route using your current chat routing rules after migration, but skills-based routing is not part of the standard messaging routing configuration. It is available with omnichannel routing.
- Reporting: The Messaging dashboard in Explore can be customized to meet your reporting needs.
Before migrating to messaging
Admins should audit and prepare the Chat settings they use before migrating. Some Chat settings are not accessible after you turn on messaging for your account, so recording them will make it easier to confirm that the migration was successful and your messaging experience is working as expected.
Check the following Chat settings:
- Active Chat triggers: Remove or deactivate any unnecessary triggers, and clean up the rest. Note whether each trigger will become a messaging trigger, a Support ticket trigger, or a proactive messaging trigger.
- Goals: Review chat goals and remove duplicates, redundancies, or goals you no longer need..
- Chat tags: Special characters and capitalized letters aren’t allowed in messaging tags, and will be replaced with an underscore. They won’t break your triggers or other business rules they're used in, but it’s a good idea to clean them up first.
- Operating hours: Check your current operating hours setup so you can confirm it is converted correctly to a Support schedule. If you have more than one set of operating hours for a department, they’ll be merged into a single schedule.
- Banned IP addresses: Make sure your Banned Visitors list is current so unwanted visitors can’t access your new messaging channel.
Also, give your agents plenty of notice before moving to messaging. The migration will change their workflows and workspace.
At a minimum, make sure agents can:
- Set their status for the standard routing configuration.
- Use the notifications list to manage multiple conversations.
- Work with messages, including responding to support requests, reassigning tickets, and use automatic translation.
Helpful resources for agents:
Turning on messaging and migrating your chat settings
When you’ve completed the preparation steps you can begin the migration process, which includes the following steps:
Turning on messaging
To turn on messaging for your account
- In Admin Center, click
 Channels in the sidebar, then select Messaging and social >
Messaging.
Channels in the sidebar, then select Messaging and social >
Messaging. - On the Get started with messaging page, click Get started.
- On the Messaging settings page, select Turn on
messaging.
The migration can take up to 10 minutes. When it’s complete, a Get ready for messaging pane appears.
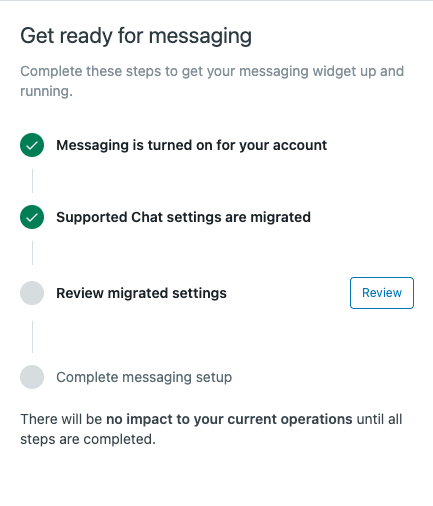
Reviewing the messaging settings
After you turn on messaging, it's important to review the messaging settings and features that replace your migrated and on-by-default settings, and note the unmigrated Chat settings in Admin Center.
The automated migration is usually straightforward, so a quick review is often enough. If a setting has an Action needed label, inspect it more carefully. That usually means the setting didn’t migrate successfully or needs additional configuration.

- In the Get ready for messaging pane, click Review.
The Review changes from your Chat settings pane
opens:
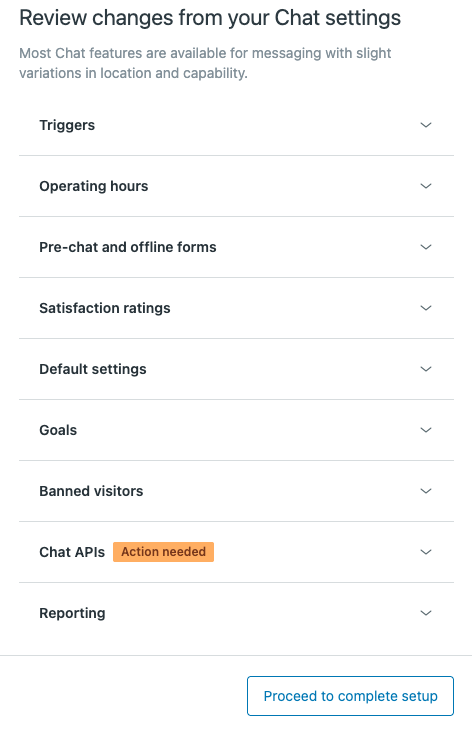
- Expand each section and click the button to access an Admin
Center page in a new tab. After reviewing each feature, click the
Messaging and social - Channels tab to continue your
settings review.
- Triggers: Review the migrated triggers, activated triggers, and unmigrated Chat triggers.
- Operating hours: Review the migrated Operating hours schedule and update or create schedules as needed.
- Pre-chat and offline forms: In messaging, an end user's information can be requested in the default messaging response. You can review and update that response later in the setup wizard.
- Satisfaction ratings: Click Get started to view the Customer satisfaction page, then click Edit survey to view the migrated CSAT survey configuration.
-
Default settings: On the linked Messaging
settings page, expand each section to review and update
the following as needed:
- Downloading transcripts manages messaging transcript visibility for both agents and end users.
- Multi-conversations allows end users to conduct multiple conversations simultaneously.
- Capacity release defines how long a conversation remains active, and what happens to the ticket when the conversation becomes inactive. These settings are on by default.
-
Ending sessions defines whether agents
can manually end messaging
sessions, how ended sessions impact agent
capacity, and whether ended sessions can be used
as conditions or actions in triggers. This
setting is on by default.
With additional configuration, you can allow end users to end messaging sessions.
- Email identities manage user authentication rules and settings.
- Conversation control determines when and how messaging conversations are resolved.
- Goals: On the Messaging goals page, review each goal and update it if needed.
- Banned visitors: On the Banned IP addresses page, confirm that the addresses banned from live chat are included here.Chat APIs: Chat APIs are not compatible with messaging. Review the impact and learn about alternatives in the Zendesk Web Widget and SDK developer documentation.
- Reporting: Click Activate Explore to begin creating your dashboards. In the meantime, review the Messaging dashboard documentation.
When you’re done reviewing these features, click Proceed to complete setup.
Completing the setup
Finish setting up messaging by completing these final steps:
- Let your agents know when you’re turning messaging on and Chat off.
- Use the setup wizard to walk through the final migration steps:
-
Selecting a brand to set up: If you have multiple brands, choose the one you want to use for your initial migration.
-
Defining business hours: Choose Always online, or select an existing schedule. If no schedules are available, or if you want to create a new one, click Add or manage schedules.
-
Setting up automated responses: Enter a First message to greet customers, and choose which customer details to collect, if any. If you applied a schedule in the previous step, click Outside business hours and configure the automated response there as well.
-
Turning on the messaging Web Widget: Close all active chats for the brand you’re upgrading to messaging, then click Turn on messaging widget.
-
You can return to the setup wizard when you’re ready to add additional brands to messaging.
After completing the migration
You’ve now deployed a fully-functional messaging channel that closely matches your original live chat setup. Now, you can continue updating the widget's appearance and behavior, and explore additional messaging capabilities.
To reduce risk when exploring messaging functionality, create a sandbox environment to test new features before adding them to your live Web Widget.
Updating the messaging Web Widget
The messaging Web Widget has a number of settings not covered by the automated migration that you can update to customize its look and feel, and its automated interactions with your end users.
Customize the messaging Web Widget components on the widget’s settings page, including:
- Basics: Web Widget name, customer permissions for channel switching and multiple conversations, and a privacy notice.
- Style: Appearance-related settings, including frame and text colors, personalized logos, and launcher position and shape.
- Responses: Automated customer greetings, business hours, and requested information are all configured during the migration. Check these settings, and add a follow-up message to be sent after a customer submits their details.
Adding new capabilities
Consider adding these features to improve functionality, increase automation, support your agents, and speed up resolution times:
- Omnichannel routing is a unified routing system to manage incoming requests from email, voice, and messaging channels. Omnichannel routing works out of the box for messaging, and is far more flexible and customizable than the standard messaging routing options. It’s the recommended routing solution for messaging.
- AI agents are the next generation of AI-powered bots that automate and resolve your customers’ issues across service channels. Using generative AI, AI agents can have back-and-forth conversations with your customers, potentially resolving requests without ever requiring a human agent.
- Agent copilot (add on) provides AI-powered tools to enhance human agent productivity, such as suggested first replies and macros, ticket summaries, enhanced writing tools, and intelligent triage.