You can customize your agents' workflows to help them address chats quickly and efficiently. Below are some examples and ideas to consider when optimizing your agents' workflows.
Working with shortcuts
Shortcuts are pre-defined responses you can use for your chat conversations, so your agents can save themselves from repetitive typing. They can also help ensure your agents are giving consistent and accurate answers to common questions. The following are some suggestions of shortcuts you might want to create and notify your agents of. For details about using shortcuts, see Inserting common phrases with shortcuts.
Create a customized greeting
You can personalize the greeting with the customer’s name and note that you know that they’ve already been looking through your Help Center articles to provide that next level of personalized service.

Turn FAQs or popular articles into shortcuts
A great way to build good self-service habits across your customer base is to drive customers to your Help Center.
Take a look at your most popular questions and articles and make sure you have shortcuts ready that answer those questions. You can drive your customers to self-serve in your Help Center by linking your chat responses to relevant knowledge base articles.

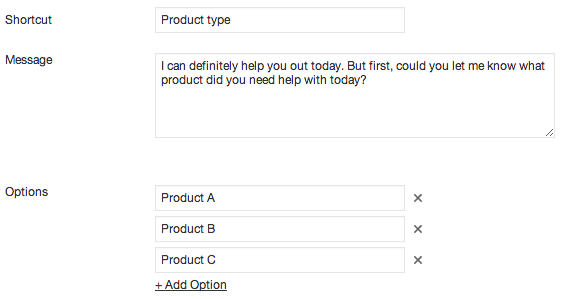
Let customers select their product
The Options feature enables you to offer answer options for your customers to choose from. For example, if your business offers multiple product lines, you could ask your customer which product line they need help with. Your customers can simply select one of the options, just like a multiple-choice question.

Routing chats with departments
A department in Chat is a group of support agents. You can either require visitors to select the department they want to contact or automatically route chats to certain departments based on the page they're viewing. Using departments can help you address chats more quickly by sending visitors directly to the agents who can help them.
For more information about departments, see Creating agents and departments in live chat.
Transfer chats to the right team
- Sales for purchasing questions
- Support for troubleshooting issues
- Billing for payment problems
You can allow customers to select the department they want using the pre-chat form (see Enabling the pre-chat form), or you can set up triggers to automatically route them based on which page they're on, like in the example below:

Segment chats based on product line
If your business offers multiple product lines, you could use departments to route your customers to the right product experts before they even start to chat.
By setting up departments based on the product lines your business offers and adding tags to each customer indicating their product line, you can create a trigger to automatically route chats to agents specializing in the correct product line, like in the example below:

Route chats based on request type
- Product consultation
- Technical issues
- General question
Use the pre-chat form to require customers to select their request type before initiating a chat. After your customer selects the type of request that best fits their needs, their chat notification is routed to agents in that department. For more information, see Enabling the pre-chat form.
Transferring chats
Agents can invite another agent to a chat with a visitor. Agents might want to do this if they need assistance from a colleague answering a visitor's question. When transferring chats, agents have two options:

- Transfer and Leave: With this option, the chat request is routed to the other agent and the current agent leaves the chat. In this situation, agents should communicate to visitors they'll be talking to a different agent.
- Invite: This option means the new agent is added to the chat, along with the current agent and the visitor.