An action flow is a user-defined automated workflow. Each action flow consists of an action flow trigger, which initiates the flow, and one or more actions. Action flows can run in response to their configured trigger or be initiated by agents using agent copilot auto assist.
For example, you might define an action flow that is triggered when a ticket's form changes from the standard Support form to the custom Incident ticket form. When this happens, the action flow changes the ticket's priority to urgent, creates a Jira issue, adds a link to the Jira issue to the ticket, and sends the relevant team a Slack message notifying them of the urgent Jira issue.
This article describes how to create an action flow.
Anatomy of an action flow
-
Action flow trigger: The condition under which the action flow is
initiated. Admins can apply conditions to the ticket and user event triggers
to further constrain when they fire.The following types of action flow triggers are available:
- Ticket events
- User events
- Slack events (EAP)
- Action flow suggested by auto assist approved by agent
- Custom action flow triggers
-
Zendesk actions: Steps related to Zendesk objects.The following actions are available:
- Create ticket
- Look up ticket
- Update ticket
- Add tags to ticket
- Remove tags from ticket
- Look up user
- Look up organization
- External actions: Steps related to external systems you've connected to. The actions available vary by system. See Adding external actions.
-
Flow control and utility steps: Steps structure of your action flow
and extend it with custom logic. The following flow control and utility
steps are available:
- Branch: Splits your action flow into two paths based on a user-defined condition.
- Custom code: Run JavaScript in your flow to implement custom logic and data transformations.
-
Send outputs to
copilot: For action flows initiated by the Action flow
suggested by auto assist approved by agent trigger, you can
use this step to send outputs from the action flow back to agent
copilot for use in procedures. If used in a branched action flow,
the outputs sent to copilot reflect that branch only.Note: No other steps can follow a Send outputs to copilot step within a branch of an action flow.
- Custom actions: User-defined steps that update or query data using any API. Custom actions are used by agent copilot auto assist and action flows.
With the exception of the custom code steps and some action flow triggers, steps always require a data input. Commonly, the input of one step is the data returned from a previous action, known as that step's output. However, in some cases, you can specify static inputs. Additionally, not all steps provide an output. For more information, see Providing inputs for actions and steps.
Creating an action flow
Admins can create up to 25 action flows. Each flow can consist of one action flow trigger and up to 50 steps total.
- In Admin Center, click
 Apps and integrations in the sidebar, then select Actions > Action
flows.
Apps and integrations in the sidebar, then select Actions > Action
flows. - Click Create flow.
- Enter a unique Name and a Description to help other admins
understand the action flow.Note: Agent copilot auto assist uses the action flow's name and description to determine when an action flow should be suggested to an agent. For help writing good names and descriptions, see the best practices.
- Click Next.
- Click + Add trigger, and then use the step sidebar to configure the condition under which the action flow is initiated and any required inputs.
- Below the trigger event step, click the Add step icon
(
 ). Then use the step sidebar to
configure it.
). Then use the step sidebar to
configure it.
- Repeat step 6 beneath other steps as needed to complete your action flow.
- Click Save.
New action flows are inactive by default. Before an action flow can be used, you must activate the flow.
- (Optional) Test the action flow.
- When you're ready to use the action flow, click Activate.
Adding an action flow trigger
Every action flow begins with a trigger event. This is what initiates the flow. The following types of events are available as action flow triggers:
-
Ticket events: Including ticket lifecycle, such as creation, and
ticket updates to: ticket properties, standard or custom ticket fields,
routing, comments, SLAs, schedules, and CSATNote: Action flows initiated by ticket updates often run when a ticket is created, too, because ticket values are perceived as changing from null or empty to an actual value.
-
User events: Including user creation; updates to a user's name,
role, organization, group, brand, and so on; updates to custom field
values on a user's profile; adding or changing a profile picture;
changes to a user's identity; and changes to a user's status, such as
suspended or deletedNote:
- The User last login changed action flow trigger only fires if the previous login occurred more than 20 minutes ago.
- The User commenting permission changed action flow trigger only fires if the user's profile is updated to change their Comment permissions. This doesn't apply to the custom role permissions on Enterprise plans and above.
-
Slack events: (EAP) Including new message posted in channel, new
direct message sent to a user, and new reaction added to message
Note: There isn't a built-in way to link a Slack message to a Zendesk ticket after the ticket is created, for ongoing conversational support. If you use a Slack event as an action flow trigger that then creates a Zendesk ticket, only the contents of the message that initiated the action flow as it existed at that moment in time, is available for inclusion in the ticket.
-
Action flow suggested by auto assist approved by agentNote: Auto assist action flow triggers function only if you have purchased the Zendesk Copilot add-on and configured auto assist. If you haven't purchased the Copilot add-on and configured auto assist, flows initiated by this trigger can't run.
- Custom action flow trigger: User-defined triggers designed to listen for an HTTP request from a specific external system. Select an existing custom trigger or create a new custom trigger.
- Open an action flow.
- In the visual workflow builder, click + Add trigger.
- In the step sidebar, select whether you want the action flow to be initiated by a Ticket event, User event, Slack event, when a Suggested action flow is approved by agent, or by a custom trigger.
- Click through the available options and select a single action flow trigger.
- If you selected Agent copilot > Auto assist > Suggested action
flow approved by agent, you can configure an input to be
provided by auto assist:
- In the step sidebar, click + Add input.
- Enter a Name and Description.
Providing clear and detailed names and descriptions for inputs helps auto assist determine the correct information to provide when the action flow runs.
It is possible to have auto assist provide a ticket ID as input for this action flow trigger. To do so, you must name the input zendesk_ticket_id and set the type to number. If the input name and type aren't exact matches to this, auto assist won't be able to add the ticket ID.
- For Type, select one of the following options: True/False (Boolean), Text, Number (Integer), or Decimal.
- Click Save.
- (Optional) For ticket event, user event, and custom action flow
triggers, you can configure conditions that must be met for the action
flow trigger to fire:
- Select the Variable. This is data output from the action flow trigger.
- Select the Operator that describes the relationship between the condition's variable and value. The available operators change based on the variable selected.
- Enter the Value used when evaluating the condition.Note:
- These values are case-sensitive. It's important to note that Zendesk tickets use lower-case for the type, status, and priority fields. For example, when referring to a ticket's type, entering a value of Incident would fail to match because it's expecting incident.
- The value field isn't required when using the Is present or Is not present operators. Use the is present operator when a variable is present only sometimes or is consistently included but can have a null value.
Adding actions and steps to action flows
Adding Zendesk actions
Zendesk action steps perform Zendesk-specific tasks, such as modifying a ticket's priority. Action flows can consist of Zendesk actions and external actions for multiple connected systems.
Zendesk actions that are performed by the flow are attributed to the system user.
The attribution of actions performed by an action flow depend on the type of actions:
- Open an action flow.
- In the action builder, beneath an existing step, click the Add
step icon ().
- In the step sidebar, under Zendesk actions, click the menu options to select the action.
- In the step sidebar, enter the required inputs for the selected action. See Providing inputs for actions and steps.
Adding external actions
External action steps perform tasks specific to a connected system, such as sending a Slack message or creating a Jira issue. An action flow can consist of Zendesk actions and external actions for multiple connected systems.
Regardless of how an action flow is triggered, external actions are attributed to the admin who connected the external system.
- Using Confluence actions
- Using Google Sheet actions
- Using Jira actions
- Using Microsoft Calendar actions
- Using Microsoft Excel actions
- Using Microsoft Outlook actions
- Using Microsoft Teams actions
- Using OpenAI actions
- Using Salesforce actions
- Using Shopify actions
- Using Slack actions
- Open an action flow.
- In the action builder, beneath an existing step, click the Add
step icon ().
- In the step sidebar, under External actions, click the menu options to select the action.
- In the step sidebar, enter the required inputs for the selected action. See Providing inputs for actions and steps.
Adding branch steps
Although some action flows progress linearly, it's common for them to include one or more branches. When you add a branch, you must define a single condition for the If condition is met branch. The Else branch encompasses everything that doesn't meet the If condition, so no configuration is required for the second branch.
- Open an action flow.
- In the visual workflow builder, beneath an existing step, click the
Add step icon ().
- In the step sidebar, under Flow control, select Branch.
- Configure the If condition is met branch's condition:
- Select the Variable. This is data output from a previous step in the action flow.
- Select the Operator that describes the relationship between the condition's variable and value. The available operators change based on the variable selected.
- Enter the Value used when evaluating the condition. Note:
- These values are case-sensitive. It's important to note that Zendesk tickets use lower-case for the type, status, and priority fields. For example, when referring to a ticket's type, entering a value of Incident would fail to match because it's expecting incident.
- Dates have additional configuration options, which enable more complex time-related conditions, such as a date value plus or minus a certain number of days. See Using date and date time values in actions and steps.
- The value field isn't required when using the Is present or Is not present operators.
Adding Send outputs to copilot steps
When an action flow is initiated by the Action flow suggested by auto assist approved by agent trigger, the Send outputs to copilot step becomes available. As the name suggests, the step sends outputs from the action flow back to copilot so auto assist can make suggestions based on that information. This step must be the last step of an action flow. If your action flow contains branches, this step can be used as the last step for some or all of the branches; in this scenario, only the outputs from the specific branch of the action flow are sent to copilot.
- Open an action flow.
- In the visual workflow builder, beneath the last step in your action
flow (or branch of an action flow), click the Add step icon
().
- In the step sidebar, under Flow control, select Send outputs to copilot and place it where you want it in the flow.
- In the step sidebar, click Add output to add at least one
output:
- Select the Variable. This is data output from a previous step in the action flow.
- Enter a unique Name that describes the output.
Adding custom code steps
Custom code steps allow you to incorporate modern JavaScript code into your action flows. The JavaScript must export a function that takes an inputs object and returns an outputs object. Each time you add a custom code step to an action flow, it is prepopulated with this framework, which you can modify, expand upon, or delete and start fresh.
Although the custom code step is designed to be as user-friendly as possible, admins might still require engineering support when implementing these steps.
For more information, see Using custom code steps in action flows.
Adding custom actions
Custom actions are user-defined steps that update data using any API the user specified. The custom actions defined for auto assist are also available for action flows.
- Text
- Number
- Decimal
- True/false
- Date
- Date and time
- Arrays (the above data types only; arrays of other data types might work but aren't guaranteed)
For more information, see Creating and managing custom actions.
- Open an action flow.
- In the visual workflow builder, beneath an existing step, click the
Add step icon ().
- In the step sidebar, under Custom actions, select one of the
actions you've created.Note:
- Custom actions created prior to March 13, 2025 must be re-saved in order to be available as actions in action flows.
- A custom action reflects the action as it was defined at the moment it was added to the action flow. If a custom action is updated after it was added to an action flow, you must delete the custom action step in the flow and re-add it to see the changes.
- Provide static values or variables as inputs into the input fields
required by the custom action.
For more information, see Providing inputs for actions and steps.
Providing inputs for actions and steps
When specifying inputs for steps, you must provide values that correspond to the input's data type, such as text, number, decimal, list, or true/false.
For most inputs, you can provide static values, which can be entered or fetched from Zendesk or a connected external system when configuring the step, or variables, which are data output from previous steps in the action flow. Certain inputs require you to select a predefined value from a list, such as a ticket status or priority or data from a connected external system, such as a Slack channel name or Jira project ID. For inputs that allow you to enter values rather than selecting from a predefined list, it's possible to combine static and variable values.
When using ticket tags in action flows, you can provide static values or simple text, list, decimal, or true/false variables. However, list and JSON object variables aren't supported as tags. Additionally, you can't combine static and variable values as a ticket tag input.
Using date and date time values in actions and steps
Some actions and processes you need to use action flows for are time sensitive. In this case, you can leverage dates and date time values. In custom actions and branch steps, you can use a date or date time variable from a previous step or the step's run time. The step run date and step run date and time values are calculated the instant the step in the action flow runs and reflect the account's timezone.
These values can be further configured to reflect a time offset of plus or minus a user-specified number of days from the date. For example, you might create an action flow that sets a Salesforce opportunity close date equal to the Zendesk ticket's Close date custom field value plus seven days.
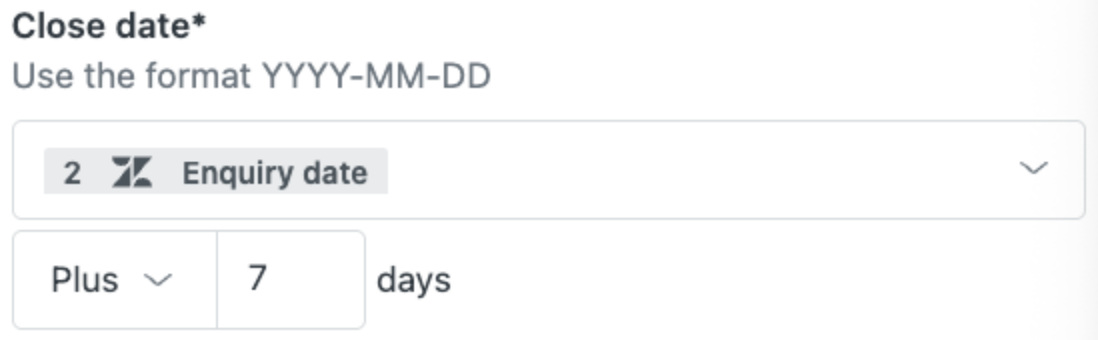
When using dates as a variable, you must use the format
YYYY-MM-DD. Date times must use the format
YYYY-MM-DDTHH:MM:SS[.SSS]Z+hh:mm, where the Z+hh:mm
value represents the UTC offset. The UTC offset can be Z alone
to indicate no offset, +hh:mm to indicate an offset of added
hours and minutes, or -hh:mm to indicate an offset of
subtracted hours and minutes.
- The datetime for 5:11 pm on February 19, 2025 in UTC time is:
2025-02-19T17:11:00Z - The datetime for 12:34 pm and 56 seconds on December 13, 2025 in
Australian Eastern Time is:
2025-12-13T12:34:56+10:00 - The datetime for 3:56 pm and 19.012 seconds on September 16, 2024 in US
Eastern time is:
2024-09-16T03:56:19.012-05:00
- The following conditional datetime comparison statement is true:
2025-06-16T12:00:00Zis equal to2025-06-16T22:00+10:00 - The following conditional datetime comparison statement is false:
2024-01-06T01:30:00Zis after2024-01-05T23:00:00-3:00
Naming inputs and outputs for actions and steps
All inputs and outputs of actions and steps must have unique names. In many cases, these are automatically populated based on a selected value, but can be modified as needed.
- The name begins with a letter.
- The name is unique within the step.
- The name contains only letters (
a-z,A-Z), numbers (0-9), and underscore characters (_).