Customer lists define a segment of your users based on a set of criteria. Customer lists are similar to views for tickets in that they enable you to create a list based on system attributes, tags, and custom fields. In this case, the list is a group of users instead of a group of tickets.
- Entitlements Create separate customer lists for each plan type you offer, based on a custom field for subscription type or plan.
- Online retailers Create lists of customers according to their purchase history or preferences, based on custom fields.
- E-Commerce Create a list of customers based on their subscription start date or trial expiration date.
- Gaming companies Create customer lists to identify big spenders and active gamers, based on the customer's online activity.
You can do more analysis by exporting customer lists as CSV files. Or you can install apps to send email campaigns or surveys to a customer list.
Administrators can create shared and personal customer lists. Agents in custom roles with permissions can view customer lists and create and manage them depending on how their permission was defined.
This article contains the following sections:
Creating a customer list
You create a customer list by applying filters to determine which customers are included in the list.
Administrators can create shared customer lists (available to all agents or available to one group) or they can create personal lists (available only to themselves). Agents in custom roles with permissions can view customer lists and create and manage them depending on how their permission was defined.
- Click the Customer Lists icon (
 ) in the sidebar.
 - Click Customer Lists in the top toolbar, then select Create a list.

- Enter a Title for your list.
- (Admins and agents with permission to create shared customer lists) Select a Visibility option to determine who can see this list.
- All agents This list is available to all agents.
- Me only This list is only available to the admin or agent who creates the list.
- Group This list is available to the selected group. You can select one group only.
Agents do not set a visibility option because they can create only personal lists for themselves. They cannot create shared lists.
- Click in the box beside Filters, then select a condition, an operator, and a value to define this collection of users.
Conditions include system attributes, tags, and custom user fields. For more information about filters, see Building condition statements for customer list filters.
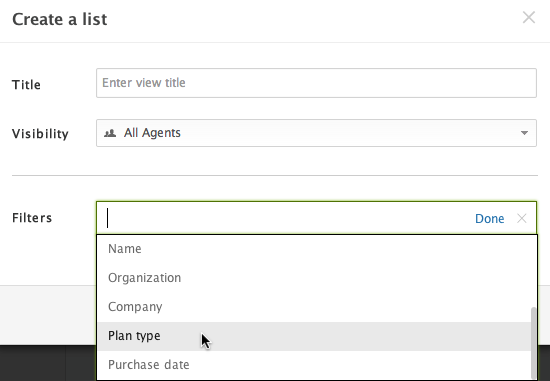
- If you want to add another filter, click Add new filter.
- Click Save to create the list or click Preview to see the list before you create it.
You can also click Cancel if you don't want to create the list.
- If you clicked Preview, click Save or Cancel in the upper-right corner of the list preview to either create or cancel the list.
Your customer list appears. Note: If you have more than 100,000 total users you will not see a complete list of matched users in your customer lists. Instead, you will see a sample of users that match the customer list. Admins can export a customer list of up to 100,000 users in size by selecting Export as CSV to see the entire list in the message that appears in sampled lists.
Building condition statements for customer list filters
-
Plan type is premium -
Created after 01/01/2013 -
Organization is ABC Company
The conditions for customer list filters include the system attributes, tags, and custom user fields. The operators and condition values vary depending on the selected condition.
| Condition | Description |
|---|---|
| Name | The user's full name. |
| Organization | The user's organization name. |
| Tags | Tags that have been added to the user's profile. |
| Language | The user's language preference. |
| Role | The user's role (for example, end-user, agent, a custom role, and so on). |
| Created | The date the user was added. |
| Last login | The date the user last logged in. |
| Custom user fields | Custom user fields that have been created. |
Viewing your customer lists
In addition to lists you and your team have created, there is one default list named All customers that includes all of your end users. You can access all of your customer lists (default, shared, and personal lists) in one place.
- Click the Customer Lists icon () in the sidebar, then select a customer list.
In the left pane you see your customer lists, with shared lists first and personal lists below that in the Your lists section. In the right pane you see the selected customer list.

Editing a customer list
If you want to change the way information is presented in the customer list, including the user information that appears in columns, the sorting, or the grouping of customers, see Modifying the columns in a customer list.
- Click the Customer Lists icon () in the sidebar, then select a customer list.
- At the top of the customer list, click the name of the list.

- Make changes as necessary to the Title, Visibility, or Filters for the list.
Note: Only administrators and agents with permission to create shared customer lists can change visibility.
Your list automatically updates as you make changes, but your changes are not saved yet.
- Click Save at the top-right side of the customer list to save your changes.
Alternatively, click Cancel if you don't want to save your changes.

Modifying the columns in a customer list
After you set up a customer list, you can modify the information that appears in the list for each user. You can also change the way the information is presented, including the sorting and grouping of users.
If you want to edit the customer list, including the title, visibility, and filters, see Editing a customer list.
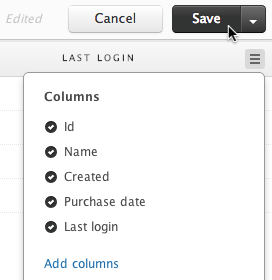
To add or remove columns in a customer list
- Click the Customer Lists icon () in the sidebar, then select a customer list.
- Click the List controls icon (
 ) on the right side of the column headers row.
 - If you want to remove a column, hover your mouse over the name of the column, then click the X.
You can remove multiple columns. Your list updates as you remove columns, but the changes are not saved yet.

- If you want to add a column, click Add columns, then select the names of the columns you want to add.
You can select multiple columns. Your list updates as you add columns, but the changes are not saved yet.
- Click Save at the top-right side of the customer list to save your changes.
Alternatively, click Cancel if you don't want to save your changes.
To change how users are grouped in a customer list
- Open a customer list, then click the List controls icon () on the right side of the column headers row.
- Click the Group by drop-down list, then select customer information you'd like to use to group customers in the list.
Your list automatically updates, but your changes are not saved yet.
- Click Save at the top-right side of the customer list to save your grouping.
Alternatively, click Cancel if you don't want to save your changes.
To change the sorting and ordering for a customer list
- Open a customer list, then click the List controls icon () on the right side of the column headers row.
- Click the Order by drop-down list, then select customer information you'd like to use to order your list.
Your list automatically updates, but your changes are not saved yet.
- If you want to reverse the sorting, click Sort above the drop-down list.
- Click Save at the top-right side of the customer list to save your ordering.
Alternatively, click Cancel if you don't want to save your changes.
Exporting a customer list to a CSV file
All administrators can, by default, export customer lists as CSV files. Any agent assigned a custom role with permission to add and edit personal, group, and global customer lists can export these lists as well.
When you request a file, you will be notified via email when it's ready. You can download a zip file containing the CSV file. The download link is valid for at least three days.
- Click the Customer Lists icon () in the sidebar, then select the customer list you'd like to export.
- Make sure your customer list includes all the columns that you want to export.
To add or remove columns, see Modifying the columns in a customer list.
- Click Export as CSV in the upper-right corner of the customer list.

You are notified via email when the file is ready.
- Click the link in your email notification to download the zip file containing your CSV file.
The download link is valid for at least 3 days.
Using customer lists for email campaigns and surveys
- MailChimp Campaign and Proactive Campaigns enable you to send email campaigns to a targeted customer list and proactively communicate or follow up with your customers.
- SurveyMonkey enables you to send surveys to a targeted customer list to gather valuable feedback and ideas for your team and business.
Admins can install apps in Zendesk Support. Agents can use the apps to create email campaigns or surveys for customers in a customer list.
- In Admin Center, click
 Apps and integrations in the sidebar, then select Apps > Channel apps.
 - Click Zendesk Marketplace in the upper-right corner of the page.
- Find the MailChimp Campaign app or the SurveyMonkey Create app, then click the title of the app.
- On the app page, click Install in the upper-right corner.
- In Support, click the icon for the MailChimp Campaign app or the SurveyMonkey Create app in the sidebar.
- Enter a name for your email campaign or survey.
- Select an existing customer list or click Add a new customer list to create a new list.
- Complete the other information for your campaign or survey.
- Click Continue.
- Complete and send the email campaign or survey in MailChimp or SurveyMonkey.