Generative replies allow your AI agent to deliver automated, AI-generated answers in response to customer requests. These replies:
- Use information from your own trusted help center content.
- Give end users the information they need without having to leave the conversation to read an article.
- Don't require you to create or maintain custom answer flows.
Data shows that generative replies are typically three times more capable of returning relevant responses to customer questions as opposed to answer flows.
This article contains the following topics:
About generative replies in legacy AI agents for messaging
If you have an active help center, your AI agent can use generative replies to immediately respond to questions from your end users. These responses use generative AI to evaluate all the articles in your help center, then use that knowledge to provide concise, contextually relevant answers within the ongoing conversation.
When a relevant help center article is identified, generative replies are displayed as a single message. These messages are short (generally under 100 words) and reflect the AI agent’s persona. Any articles used to generate the response appear as links underneath the message.
Generative replies are always followed by a standard request for end-user feedback (“Was this helpful - yes/no”). You can configure how the AI agent responds to this feedback.
For generative replies, the language the AI agent uses depends on the language of the user’s initial message:
- If the user’s language is supported, the AI agent replies in that language.
- If the user’s language is not supported, the AI agent replies in the account’s default language.
For standard responses and messages sent as part of an answer flow (legacy), the AI agent uses the language set on the Settings tab.
If some or all of your help center is restricted, generative replies respect the view permissions set on articles. For details, see Using restricted help center content in AI agents for messaging.
When the end user is authenticated in the Web Widget, the locale used to search articles is based on the help center the user is authenticated in. When the end user is not authenticated, the locale used to search articles is based on the end user's language in their user profile.
If your account doesn't have an assigned intent model and is using generative replies, your AI agent will use replies from matched intents before turning to generative replies for an answer. The AI agent will only use generative replies to respond to customer questions in the following scenarios:
- An intent matching that question is configured to generate a reply.
- An intent matching that question does not have an assigned answer.
- No intents are detected for that question.
For details, see Using generative replies with intents.
Activating generative replies
When you create a new AI agent, generative replies are activated by default. If you have any existing AI agents that don’t use generative replies yet, you can update the “If the AI agent finds relevant information” standard response so that the AI agent uses generative replies.
To activate generative replies in an existing AI agent
- In Admin Center, click
 AI in the sidebar, then select AI agents > AI agents.
 - Click the AI agent you want to activate generative replies for.
- Select the Messaging behavior tab.
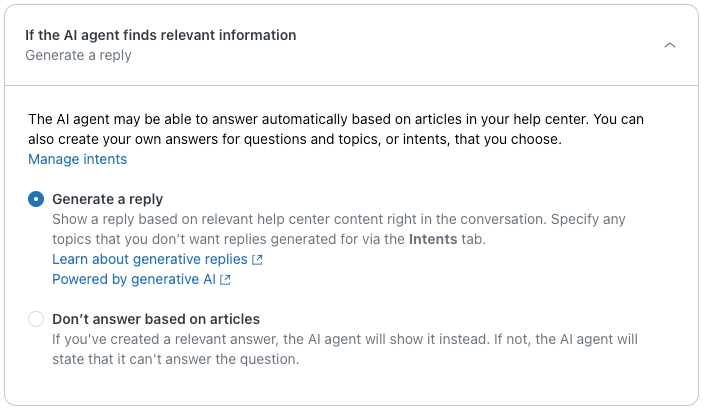
- Click the If the AI agent finds relevant information section to expand it.
- Select Generate a reply.
- (Optional) Click Test AI agent, then enter phrases the AI agent can match to existing help center content to view samples of replies your end users might receive.
- Click Publish AI agent to apply your changes.
If your account doesn't have an assigned intent model, your AI agent now uses generative replies to respond to customer questions. If your account has an assigned intent model, proceed to the next section to make sure generative replies are active for all intents.
Using generative replies with intents
When you activate generative replies, replies are generated for questions that match intents without assigned answers and for questions without a matching intent.
Using generative replies for questions with specific intents
By default, any intent without an assigned answer will generate a reply. For each intent, you can leave this setting as-is (recommended), update it to not generate a reply, or add the intent to an answer in your AI agent for messaging.
To use generative replies for questions with specific intents
- In Admin Center, click
AI in the sidebar, then select AI agents > AI agents.
- Click the AI agent you want to manage generative replies for.
- Select the Intents tab.
- In the Answer column, click the drop-down to select an
option for each intent you want to update:
- Generate a reply (recommended) lets the AI agent create an AI-generated response to a customer’s matching free-text entry.
- Don’t generate a reply prevents the AI agent from responding to a customer’s matching free-text entry. Instead, it replies with the standard fallback response (“Sorry I couldn't answer your question”).
- Show an answer lets you connect the intent to an existing answer or create a new answer for it.

-
Click Publish AI agent to apply your changes.
Using generative replies for questions without matching intents
You can generate a reply for any question asked by an end user that does not have a matching intent.
To use generative replies for questions without matching intents
- In Admin Center, click
AI in the sidebar, then select AI agents > AI agents.
- Click the AI agent you want to manage generative replies for.
- Select the Intents tab.
- In the Questions without matching intents drop-down, select
one of the following options:
- Generate a reply (recommended) lets the AI agent create an AI-generated response to a customer’s matching free-text entry.
-
Don’t generate a reply prevents the AI agent
from responding to a customer’s matching free-text
entry. Instead, it replies with the standard
fallback response (“Sorry I couldn't answer your
question”).

- Click Publish AI agent to apply your changes.